Hello Friends, If you don’t know it already…Tombow is partnering with Penny Black this week. Yesterday on the PB blog Elizabeth created a beautiful note card box with a template. I hope you will have time to click over today and …maybe leave a comment *wink 🙂 at Penny Black’s blog
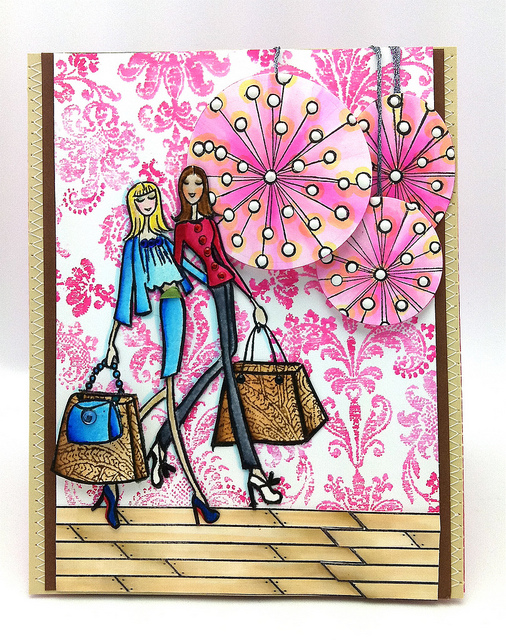
I love the vibrancy of Tombow’s dual brush pens and I love the variety of colors. You will see in my mini tutorial why I think this is valuable to have a range of colors. I will also show you how I created these large “lanterns”.
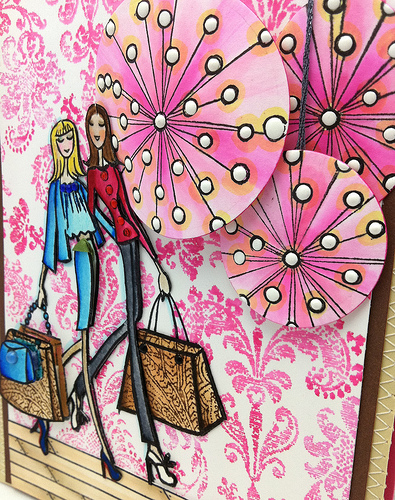
If you look at the photo above in the right hand corner you can see the subtle range of colors that gives the background some depth so it doesn’t look flat.

Always start out coloring the entire background with the lightest color using the brush tip. Don’t be shy… you can really scribble that color on and won’t damage the tip.
Add your two accent colors in certain places on top of the lightest color. Take your time… there isn’t any rush.
Spritz you stamp about a foot away three or four times. (You might want to practice first on some scrap paper.)


Yes, the paper does curl but, I would rather have more intense color. Once the paper is dry I play with the paper to straighten it out and sometimes I might back it. (Add another layer of paper on the back)

I love using these painter palettes to scribble color into . A Dove blender works so beautifully to move the colors onto larger surfaces quickly. The same three colors were used on the lanterns that I used on my background. White enamel was added to each circle.
For this particular card I stamped the ladies onto watercolor paper and used the Dove blender pen to wash color onto the images. 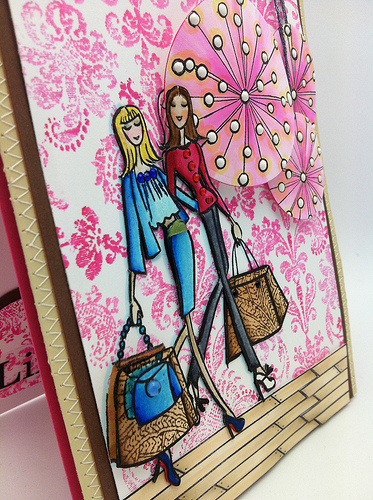
After I washed the color onto the images I like to go back and use Tombow’s blender pen to add highlights to my image. Tombow’s blender pen you have so much control with applying color and the color doesn’t get washed out. Honestly, I tried everything else I this works best for me.

This is an example after I washed the color on the images.
Then I added a darker brown marker directly onto my image & worked it in to blend it.
In other areas on my images I used the bender pen to pick on the color from the palette and add it to the image. Here is another post that might explain it better?
Did you notice the floor. I used to make my own wood flooring and was thrilled to find this stamp. I picked up an extra on sale so if you leave me a comment I will pick a random winner.
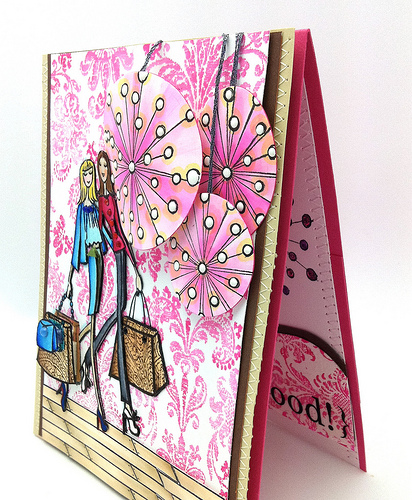
The sentiment is a happy one…. it’s from SRM stickers. I am impressed if it you make it all the way here but, I am glad you did. Writing doesn’t come easy for me and it takes me forever to edit myself. I always am so grateful that you stop by. Hugs, Kathy
Supplies for the card:
|
|
|
|
|
|
|
|
|
|
|
|
|
|
|
 Vibrant Artichoke
 Day 19. A VIDEO! Woo Hoo
 Day 27. Mixed Media Enhancing Your Copic Coloring


WOW, super!:)
Wow, they look beautiful. I actually have some blender pens, I should get them out and try a bit of this. Thanks for sharing.
Hi Kathy!
This looks amazing!!!! Loooove the background and that wooden floor is amazing, really perfect for these girls to walk on! Thanks so much for showing how you made that background, wauw, adding a bot of water spray gives such a wonderful result, love it!! Gorgeous card!!
Hugs, Wendy
This is a gorgeous card – so much detail!! Thanks for the tutorial – I have some of these markers but I’ve never been quite sure how to use them ;D
Its just amazing, the colours are so vivid. Thanks for sharing your techniques with us. I have no tomboy pens as yet, but you never know lol.
This is Gorgeous Kathy. Love the Card, background stamp, the technique….love it too. Your tutorial is perfect.Looks like these pen are great for coloring… TFS.
I really love the way you take the time to explain your techniques Kathy… I have a few Tombow pens and love the way they give a watercolour look.
I love the last one! It`s simple, but gorgeous! And well done with the wooden floor! 🙂
The floor does look amazing, you made it look like real wood! I do love the watercolor background, it is really vibrant. I also love that you stamped the background pattern in the paper bags. It is always amazing that you do so much cutting (as it makes my hands hurt so much)! Really great card. Thank you for sharing!
Katie
Your cards always blow me away Cathy, you are seriously talented! Even your cutting of the images is perfect 🙂 I just love this card.
Amazing card – what a work of art! Jo x
thanks so much for the information on using the tombow markers. they are new to me.
As always, your coloring is SUPER, Kathy! Love how you decorated the inner card!
Love this card and the wooden floor. Thanks for the chance.
Corinde.
Thanks for all the info & I KNOW about the writing/editing bit. Love your use of those enamel accents & the info about the watercolour paper makes a lot of sense – I’ve just been doing a whole lot of experimenting & couldn’t believe how differently watercolour paper behaves with inks, markers etc…… Your posts are a delight & give me much. Thank you for all the effort you put in.
Paula (PEP)
Amazing cards, Kathy! I really like the way you coloured (and the explanation). The floor stamp is really cool. Thanks for the chance to win one!
A work of art! Fabulous tips too, and oh my god THERE IS A WOOD FLOOR STAMP…tell me where!
Kathy, I love this technique. I understand your difficulty writing. I have the same problem. I often read other comments in blogs. I wish I could express myself that way. As Paula said “Your posts are a delight & give me much. Thank you for all the effort you put in.” Thanks you both.
Amazing coloring, love the card! What a neat floor stamp, thanks for a chance to win!
Thank you for an amazing tutorial and an explanation. Writing posts and especially tutorials is not an easy process. I really appreciate you sharing your tips especially with the blending pens. And yes I did read all the way to the end. Your cards are truly an inspiration to me and have inspired me to carry on with card making and not to give up. I have set up an online shop in Etsy as a result. I thought to celebrate the launch I would raise some funds for charity, but lathough i have had new followers, and facebook followers. I have not had any sales for charity. Oh well, got to keep trying to bring the traffic and hopefully that will equal sales for such a worthy cause.
Hi Kathy, thank you for the detailed explanation and for sharing your beautiful cards with us! You really are an awesome artist! These are so beautifully coloured.
Beautiful colors and artistry! Very interesting how the watercolor paper takes the ink. I just made a card doing the stamp spritzing on watercolor paper and it was faded and irregular like your first print. Wish I had of known to spritz it directly! Thanks to you, now I know! Lovely card, thanks for sharing.
Hi Kathy…sorry I missed last night’s Penny Black group meeting. Your posts are a nice substitute. Loved working with the Tombows last month. Your art here inspires me to try more. So glad I picked up one of the wood floor mark down bin stamps you found! This is a really cute card! See you soon , I hope!
Kathy, your writing is perfect. Always so easy to understand. WE should be thanking you for taking the time to show us your amazing work! Love this fabulous card! Hugs to you!
As always I love your card. Thanks for such a great tutorial.
Your card is delicious! Thanks for the tutorial and the chance to win a cool stamp.
Ohw what a gorgeous cards.
Marie-Anne
Love the card.
I gotta get out more, all I’ve ever seen from Tombow is glue, and I have an abundance of that!
Great floor, lanterns, women, bags, oh I could go on!
Beeee-u-tiful! I am amazed all the time. Thank you for taking the time to explain how each item was created.
Those lanterns really pop on that fabulous card. Wow!
How many ways can you say FABULOUS?! 🙂 Kathy, this is AMAZING…seriously – your creativity astonishes me! I love your blog posts – you always explain and show such wonderful details. You have been my inspiration for a long time – TFS! 🙂
It’s always a treat to see your tuts! Such an awesome background to use behind the two girls and I love the “umbrellas”! Take care, you! xx
No way – A WOOD FLOOR STAMP? I always draw mine in too; I’m jealous.
LOVE your creation; thanks for the amazing tutorial!! Beautiful colors!
This is fabulous Kathy, I must dig out my marker pens, you have inspired me, Love the wood floor!!
Beautiful card and terrific post!!
Wow! The way you made the purses and put the texture on them, looks fabbie, they look so fun and stylish!
Outstanding coloring and I love the lanterns!
Kathy, amazing creation. Amazing step by step too. Thanks so much and thanks for chance to win.
Kathy, the card is stunning! (as usual :-)) Thanks for the tutorial on the background paper, using the marker & water, esp. comparing with watercolor paper & CS 🙂 I luv those ladie’s “eye shadows”! 😉
Such amazing Cards Kathy! You’re one talented Lady!!
So lovely!
Thank you so much for using the Tombow markers.. I have tons of them and just don’t want to invest the money in copics.. Nice job with the card!
I have been building my collection of Tombows and appreciate seeing how you use them. Love the card!
Hi Kathy,
So great of you to provide such a detailed tutorial. I’m looking forward to trying out my blender.
Thank you for sharing!
Thanks for sharing a tutorial on the tombow markers… I must agree with you that the colours does look better after a spritz on the water colour paper!
It’s amazing. Lovely card!
Oh wow….such a wonderful tutorial and your card is stunning. Love the image.
Amazing card and so many tips…love how you did the wallpaper and great floor. Have not used my Tombows much lately…now I will.
Great tutorial sweetie. Love your cards as always, they brighten my day! hugs
I have always loved Tombow markers – and you showcase them beautifully! And the wood floor stamp is awesome – I would love to add that my collection!
wow! Just gorgeous coloring! Love the hint of yellow on the circle pieces!
Hi Kathy,
Thank you so much for the tutorial. I am definitely going to try using the enamel accents. I actually bought them to make Santa’s shoes shiny black and look like they were patent leather. I always forget to use the white when I want accents. Great tip! Your coloring is fantastic and now I have a new appreciation for my Tombow markers!
*Hugs*
~Andrea
Very nice card! The circles on the right upper corner are so wonderful! Great effect!
Are you kidding me with this card!! I love everything about it. You’re amazing.
Please tell us who is the manufacturer of the woodenfloor stamp. It is just fabulous.
Great mini tutorial
Very impressive, great technique!
Kathy, all the while forgetting to ask, you in winter you ask for my address and wanted something to send. I did not get, so I decided to ask if you sent something or not?
That floor stamp is something else, thanks for sharing it with us, and a chance too
Kathy! fabulous card and tutorial 🙂 thanks for sharing this
I love your coloring, thanks for sharing the tutorial.
Well this card is amazing! I love everything about it and thanks for all the techniques and tips. What detail I love the most?! Those red sole shoes! Ha! are they Louboutin? Hugs
Kathy, this card is amazing, you are such a GREAT card artist. These people stamps are so much fun. I honestly thought you hand drew the flooring, what a great stamp as well. =D
What a great card, love the floor. Where did you find that stamp?
Gosh I love this background. Would love even more if you used it again to make a several more simple cards using a variety of different color combos.