Hello Friends, How are you today?? Since September is almost over so is STAMPtember at Simon Says Stamp 🙁 Have you had a chance to take advantage of all the specials in the Simon Says store?? I have a feeling they might be giving away some stamps today on their blog… I don’t know a store that is more generous with their giveaways!!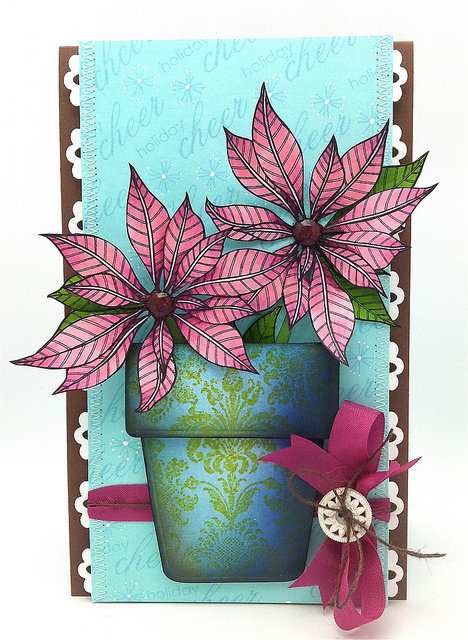
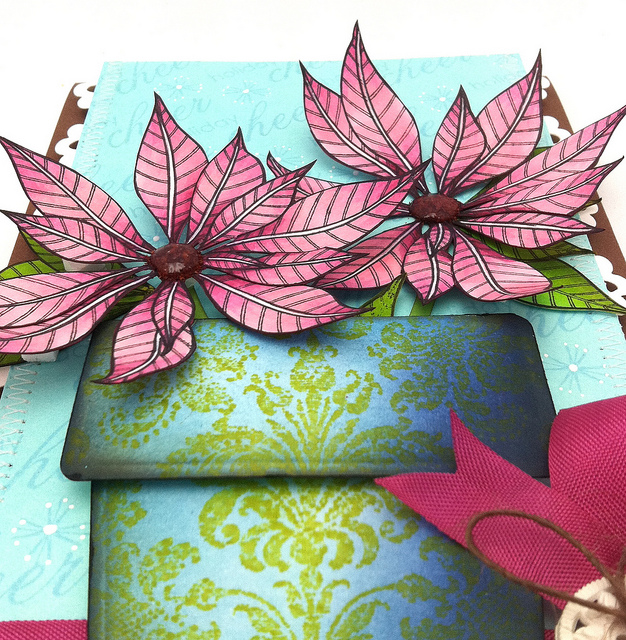
Every blue moon I design a card that I just have to keep?? It’s very rare I keep a card …but, this one I maybe…just might..keep for a while. I had so much fun making the flower pot with this Spellbinder Die and coloring the flowers from Penny Black called “Christmas Star”. When I have time I always enjoy stamping a background too.
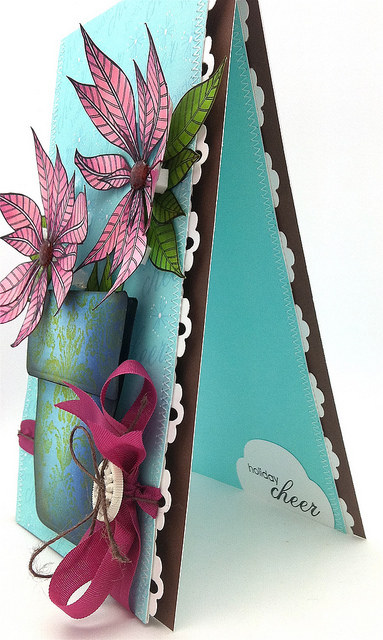
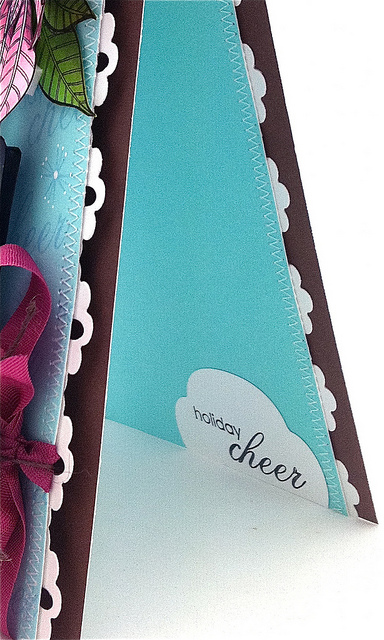
After the next card is a tutorial and I explain a little about the white edging called Edgeabilities from Spellbinders that you see on the front & the inside of the card.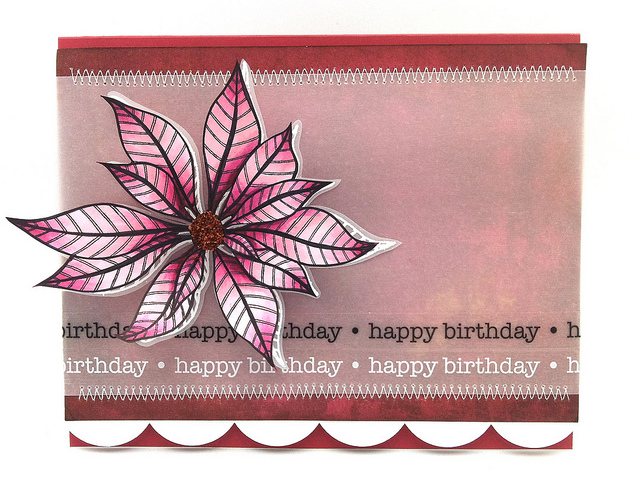
Don’t you love it when you have some stuff laying around and it makes it’s way onto a card that you are working on? The vellum flower UNDER my colored flower did just that. I recently just posted two vellum features on my blog.( here and here) I always loved vellum and it gives your cards such a different and appealing look.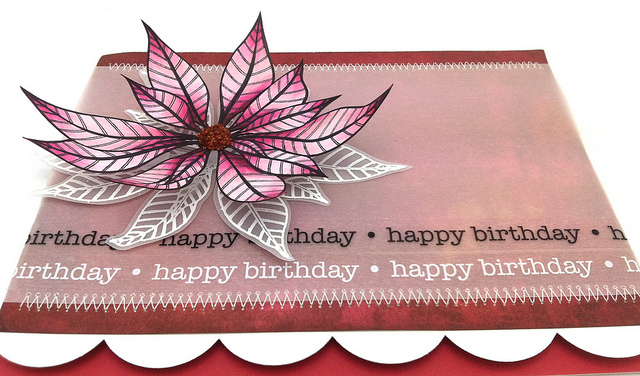
By now you all know that I love SRM stickers and I love how some of their stickers are white! The scallop is one of the new Edgeabilities …love them!
Here is a tutorial for the first card and how I colored three of the flowers with Copic markers.
 |
|
I always start with my lightest color in this case RV11. I use my Copic color swatch book to select the colors that I will be using on my card.
|
 |
|
Feather in or “sweep” in some color with RV23 on the points inside & outside the flower. I like to call it sweeping because the weight of your marker is heavier on your paper when you begin your stroke and at the end you have a lighter stroke …just like when you sweep
|
 . . |
|
Swirl some color (RV17) into a palette or on a acrylic block. Use your lighter color RV11 to pick up the color and brush the color down onto your tips of the flower again. This way you get less color and it’s easier to blend I think.
|
 |
|
Add some RV69 in the area that you think some shading will look good. It doesn’t have to be correctly shaded. The idea is to create and have fun.
|
 |
|
This time I put some RV69 into my palette and picked up the color with RV17. So you will be using the lighter color in this case (RV17) as your brush. Place the color down next to your dark highlights to soften the boldness of it.
|
 |
|
All this blending is what yields a colorful image in the end. 🙂 This is how it look after I have softened my darkest color RV69. I also added some more to the tips of the flower petals.
|
 |
|
See the tip on the front of the image. This is how it looks.
|
 |
|
Now you can go over most of your image with RV11 to blend it all together. This way always works best for me and you will find what works best for you.
|
 |
|
Now it’s ready to add some details. I like to go over my lines with a fine tip black marker.
|
 |
|
Use a white gel pen to add highlights down the middle as you see in the flower in the back of the photo.
|
 |
|
You can use a blade to cut into the tiny spaces between the petals or…you can cut around your petal. I might add tape to the back of the flower petal when I am finished.
|
 |
|
I always use a marker around the edges and for the tiny areas I flip my image over and add color to the edge this way.
|
 |
|
I have this flower three ways. After applying my white down the middle I traced next to the white lines with a fine tip black marker. The flower below I did add the black lines next to the white so you can see the difference.
|
 |
|
I like this look too.
|
 |
|
This image I fussed with the shading more as you see in the tutorial and you can see there is a lot more color. I traced the line down the middle with black instead of white. Looks more dramatic don’t you think??
|
 |
|
The three different versions.
|
 |
|
Time to think about leaves for the flower. Any green will do but, I selected YG07, YG17 and YG67.
|
 |
|
I like to mix these two flower softs together. Add glue to your center then sprinkle on the flower soft. Do NOT shake off the remaining until the glue is fully dry. Wait several hours. You might notice on my large card I added Glossy Accents on top of my flower soft for even more dimension.
|
 |
|
I love the endless possibilities of this Spellbinder flower pot. Add some color with Tumbled Glass, Faded Jeans and Chipped Sapphire. Always start with your lightest color first then build your color. Add some brown for a weathered look. I added Frayed Burlap or Brushed Corduroy.
|
 |
|
Before stamping cut off the folded edge of your pot so the pattern will line up then Ink up your background stamp called Delicate Pattern by Penny Black with Crushed Olive.
|
 |
|
To create a soft background I used Holiday Cheer with Summer Sky ink on the Penny Black mix and match paper. To fill in the spaces and add interest I stamped a tiny snowflake from the Crystalline transparent set. Plan where your ribbon and twine will go. Top with an antique button.
|
 |
|
Add white dots to the centers of the snowflakes. Cut two green stems and place your green “leaves”.
|
 |
|
Use scrap dots to adhere your flowers.
 |
I can’t wait to make more flower pots. This really was so much fun!! Have you see the new Spellbinder Edgeabilities?? I must point them out below. The versatility is endless and the price can’t be beat!! Spellbinders doesn’t pay me I really just love their product. Basically each package comes with 3 dies and they are all interchangeable. Each one is carefully measured so they fit together from all of their different sets. This video shows you many of the combinations and explains the Edgeabilites much better than I can. I forgot to mention that you can emboss each edge which really makes them stand out!
I am thinking you might want to buzz over to Simon Say’s Stamp’s blog but, before you go I have to thank you from your visit. I am so thankful.
I also would like to give Simon Says Stamp a BIG THANK YOU for featuring me on their blog today. I am so honored and at a loss of words. One thing I am not is a writer.Hugs,Kathy
SUPPLIES:
|
|
|
|
|
|
|
|
|
|
|
|
|
|
|
|
|
|
|
|
|
|
|
|
|
|
|
|
|
|
|
|
|
|
|
|
|
|
|
|
|
|
|
|
|
|
|
|
|
|
|
 more of simon says jan card kit
 Catalog card
 Lily Pad Palette Challenge


beautiful colouring and a very bright idea to stamp the flower pot wit damask pattern, the pot look stunning. Love every details on this card…you are amazing!
hugs,
Heaney
Awesome blog post today Kathy, Love how you coloured your flowers and yes I think I will be visiting Simon says for another order… love those flower pot dies.
All ways of colouring look great! Love this card)
Thanks for the amazing tutorial Kathy. You always inspire me.
OMG! You blew me away! It’s absolutely stunning, Kathy! Have always love your fantastic coloring and love this even more, the stamp – X’mas Star is on my wish list!
OMGOODNESS what an AMAZING tutorial and card Kathy!!! LOVE it!!!
Love the three variations on the flower! Great tutorial!
What a lovely card and thanks for the step-by-step tutorial! I, too, love using vellum and you are a master at creating lovely arrangements. The flower pot is just great and I can think of lots of uses for it! Thanks so much!!
Your cards are just stunning!
Beautiful, can’t blame you for keeping them just a little while, then you must share and spread the beauty! Thanks for the awesome copic tutorial!
Those cards are so beautiful, Kathy. I love your colouring! Thanks for sharing how you made them. 🙂
like it ,very pretty card with the pot flower
thank for showing how to make
This card is soooooooooo awesome!!!
Your work is flawless….you always go above and beyond. Thanks for sharing your talents!
I’ve always been drawn to the pink poinsettias over the red ones, so I ADORE these cards, Sista! The first one is a masterpiece with the beautiful flower pot. Wowzers! I wouldn’t give it away either 🙂
WAUW this tutorial here is awexsome KAthy. I just saw your flowers on SSS blog and they recomended, we went here to have a look and that was definately a great idea. I just love, what I´ve seen here, and I´ll havae to come back and have a much closeer look again a little later, when I have more time. You have an awesome blog as well as the most awesome craftroom too ha ha ha.
beautiful cards! I saw you featured on the SSS blog & wanted to come & check out your blog. Congrats on being featured!!
I think you just broke my jaw….WOW! I am totally speechless, can I come over and play…you need to teach me…love this so so much..thank you for always being an inspiring person to me…big hugs!
These are awesome, and what a fantastic tutorial! Thanks so much!
Your card is stunning Kathy – the tutorial just brilliant!! You are so inspiring! 🙂
Those poinsettias are stunning! You are a genius with color. Thanks you for showing the 3 versions and for the tutorial…I’m sure it takes a lot of time, but it is greatly appreciated.
Your tutorial was amazing and the end results too are fabulous:) Sandra H
GORGEOUS!!!!! LOVE LOVE LOVE your coloring Kathy…..So VERY PRETTY!!!!
Wow Kathy, the first card just blew me away, it is gorgeous! I can totally understand you want to hang on to it for a little bit 🙂
Thanks for sharing the tutorial!
stunning as always. came from Simon’s blog, now i’ve got you bookmarked and wil be back daily.
I’d be keeping that card too if I were you. A-M-A-Z-I-N-G!!! It truly is a masterpiece, Kathy! So gorgeous! Thanks for the wonderful tutorial and great tips! Hugs! 🙂
These are absolutely stunning! I also left a message for you on their blog!
I wouldn’t blame you if you kept that first card! At least send it to someone who truly appreciates a handmade beauty like that one! My address is 3205…..! Thanks for the tutorial!
The details on this card are just stunning. I love all three variations of the flower. Just found your blog through Simon Says, but I have become a follower and I’ll be back! 🙂 Thanks for sharing your talents.
Wow, beautiful cards! I enjoyed seeing your step by step tutorial on how you colored your flowers and flower pot. Thanks for the wonderful inspiration!
Gorgeous card Kathy 🙂 the flower pot is fantastic and the flowers ,, WOW !! gorgeous colouring and the added black and white really makes the images pop ! Thanks for the tip ! 🙂
I saw your feature on the Simon Says stamp blog and had to pop over to say ‘Hello’ 🙂 Hope all is well with you and we miss you on the team !! xx
luv n hugs xx
Lols x x x
This card is spectacularly beautiful. Just AWESOME in the best sense of the word. Thanks so much for sharing.
your card is stunning. Thank you so much for explaining exactly how you colored and assembled everything. I just learned a ton! Gotta go and apply all this new found knowledge.
Wow Kathy! I just love this, so gorgeous.
Wow just an amazing post today Kathy, all that detail in your card is incredible, no wonder you are keeping this one.
Was happy to see you spotlighted on simon says stamps. Another day of stunning inspiration.
WOW! Absolutely EXCELLENT! You have a very steady hand for those black lines! So stunning~~
Great cards! Thanks for the tutorial.
Marie-Anne
Beautiful card — love the dimension of the poinsettias and flower pot.
You have such an eye for colour and are always in touch with the light source. I envy you!
Each time I visit with you I swoon over your creations. I also love all your wonderful tips (black marker on the backside, re-lining the image, white gel pen and, most of all, shading).
Thanks soo much, Kathy!
PS- I now ‘need’ that stamp-lol!
Your card is beautiful and your detailed tutorial is very appreciated.
I am blown away by your talent and creativity-you are amazing.I’m coming back again-your tutorial is wonderful,I will learn so much here.
Wow, these are stunning Kathy. I especially love the first one. Thank you for the inspiration.
Hugs, Clare x
Thanks for all that wonderful colouring information. I so love how messy it all looks until you cut it out. I will never worry about going out of the lines again. 🙂 Such a beautiful card.
What a great colouring tutorial. Especially good for us beginners. Your card is absolutely beautiful. I Love the flower pot die.
Absolutely gorgeous!! Your detail is inspiring. Thanks for sharing how you put it together!
Wow , what an amazing card. I have never tried to use markers, but with your help I just might. Thank you so much for the inspiration.
gorgeous cards!!! stunning!! =)
hugs, SannaS
Absolutely GORGEOUS, Kathy! I esp. luv the first one, the Flower pot! 🙂
This is an outstanding post Kathy. The work & attention to detail in this is incredible & one of the things that I particularly enjoy about your blog. Thank you so much for all the information & I absolutely loved seeing all the variations of your poinsettia. I have this stamp & love it. I have rarely seen anyone else outlining in black but it is something that I did from very early one as – like you – I’m quite particular about the finish of an image. Have a lovely weekend Kathy.
Paula (PEP)
I’m so glad Simon Says led me to your blog. Your work is amazing and I know I’ll be back to visit to learn more about copics!
I can’t tell you how breathless I was after seeing this card! Love those gorgeous colors!
Hello Kathy!
Imagine my delight when I received an absolutely stunning card in the mail that used this very image (one of my favorites) only colored in gorgeous hues of blue! Well, you can’t imagine, because I was absolutely stunned. 🙂 🙂 In fact, the whole package made me feel like it was Christmas! Kindness always undoes me, and you were incredibly kind to send this to me. It was magical. Thank you so very, very much! Hugs, Reva
WOW! Gorgeous card and Thanks for the tutorial!!!
Kathy, thank you for this tutorial. Now I know how to use Copic and I’m going to buy these markers.
LOOOOOOOOOOOOOk at these comments!!! I agree with all of the above! From your no. 1 fan 🙂
Wowzers! How Gorgeous is this! What a Fabulous tutorial too! Thanks again so much for the Terrific inspiration!
Hugs
Shannon
The details on this card are just stunning. All three variations of the flower are perfect. Just found your blog through Simon Says, but I have become a follower and I will be back! Thanks for sharing your talents.
Fabulous tutorial. Love those cards.
You can view why I actually recommend vs co-signing for the purpose of personal loans. It’s a problem procrastinating to occur. And people [url=http://kredytbezbiku.edu.pl]więcej na[/url] payday cash loan guidance agencies will not offer just what they will promises.
A cash payday loan is often a short-term payday loan along with increased extra fees that lots of those people safeguarded when they believe it is the answer [url=http://pozyczkibezbik24.net.pl]pożyczki bez bik[/url] with an urgent predicament. The actual bank loan could cover over or possibly hang your entire day connected with reckoning, although it’s your most unfortunate doable method. A good number of borrowing products really are folded above often since customer doesn’t possess an adequate amount of finances to shell out the particular regular debts. It can be a horrible, high-priced never-ending cycle that is certainly quite challenging to avoid and also reasons enormous money problems for several households.
The collector is certainly appropriate, anyhow. Your home loan help small business will endeavour to be in your payday cash advances pertaining to what you owe. Still right up until you’ll find it prosperous (as well as overwhelming largest percentage typically are not) you may proceed to accommodate the actual competitive gallery attempts from your loan provider. As well as distributing a new cease-and-desist traditional cannot end selection initiatives. That Rational Debt collection Tactics Action forbids [url=http://pozyczkabezbik24.org.pl]szybki kredyt ing[/url] charge card companies coming from contacting people for those who mail some sort of page prompting them. But they yet may perhaps take legal action you for trial.
And here is my help: As i never frequently advocate debt to be able to leave debts, and yet a fabulous loan consolidation financial loan can be a proper picture to suit your needs. It again will enable you to pay your financial situation [url=http://pozyczkipozabankowe24.com.pl]pożyczki pozabankowe bez zaświadczeń o zarobkach[/url] in full. In exchange, choosing instructed to mail monthly bills to somewhat of a brand-new lender. People installment payments would most likely maybe turn out to be at a reduce monthly interest having less payments.
Earlier than signing up for some combination lending product, ensure that you understand the eye fee, fines meant for poor monthly payments. You furthermore mght will need to substantiate you have ample profit in making a expenses. Yet, and not presenting this data by yourself, I suggest you check with your current good friend so that you can improve together with have task for this financial debt. This individual need to have dealt with [url=http://pozyczkabezbik24.org.pl]kredyty chwilówki zarabiaj z nami opinie[/url] this unique from the beginning. Ultimately, Iwould think superior if you required some consolidation personal loan originating from a well-known lender possibly bank or investment company and also consumer credit joining.
In case your subscribers happen to be critically considering a new payday loan, I would recommend that they around get pożyczki bez bik the actual precaution safeguard involving with a loan service that may be a person in that, as their associates sign up for quite a few market best practices.
bez bik pozyczki
nasz adres oraz kontakt
kredyt bez bik us i zus
pożyczka bez bik
szybki kredyt dla firm
max pożyczka przez internet
kliknij tutaj i przeczytaj o tym więcej
Ѕееmѕ like summer іѕ heгe at last.
Giνe it а few ԁayѕ anԁ we’ll be whining about how hot it is.
Here is my blog – http://www.sugarasp.com