 |
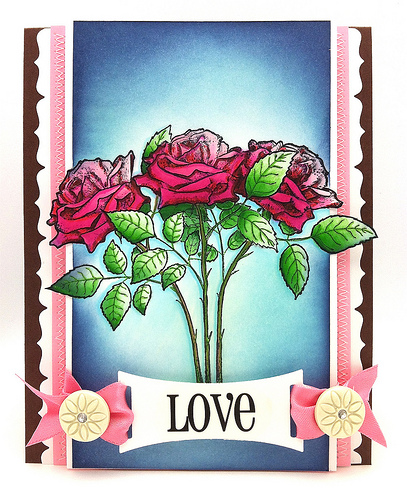
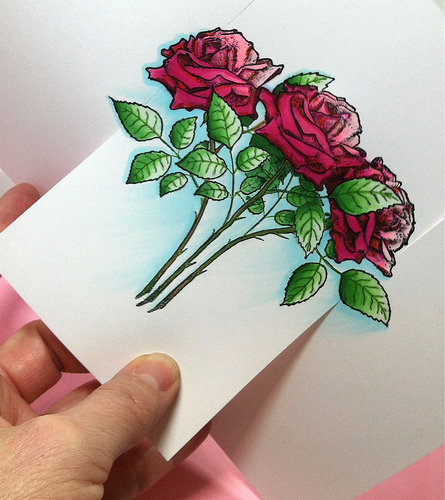
| Hello Friends, How is it going? I am gasping of the thought that Christmas Eve is in 5 days!! While I catch my breath I want to say a big “Thanks” for all of your positive feedback on my videos I really appreciate it 🙂 & I hope to have part 2 by Friday. Today this first card is featured on the Penny Black blog. Since my cards can get pretty detailed I will be sharing a more simpler version of each card hopefully with each post. Below you will find the quick version & a mini tutorial on how I stamped the top card. |
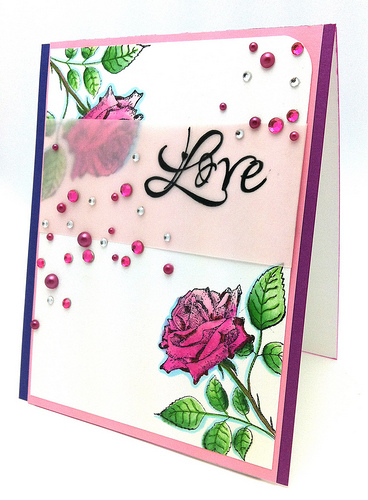 |
| I admit I wet a little nuts with the gems and pearls but, I couldn’t stop myself. The rose is the same stamp (as the card above) and colored with the affordable Le Plume markers and a few Copics. YES you can mix them. I have to mention the Le Plume markers are on sale for only $ 2.39 for a limited time. To finish off my card I layered a soft pink vellum with this sentiment and then had some fun adding gems & pearls from Kaiser. The back side of the card I traced the edge with a bright marker. |
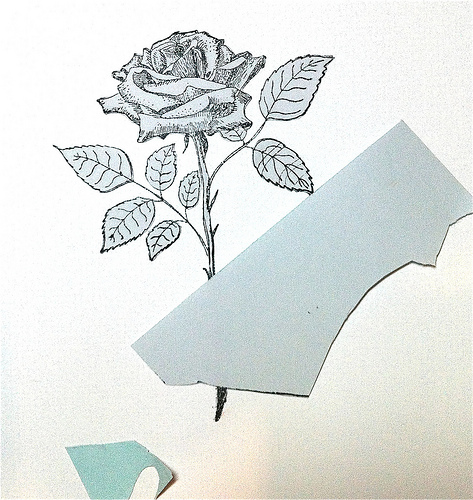 |
| I love this “stamping mask paper” that I use when I want to stamp something multiple times. I inked up my stamp on white card stock. Then I stamped it again onto the mask paper which has a slightly blue tint. I have already cut it out & placed the “mask” sticky side down onto my image. (don’t worry it peels of nice and clean) |
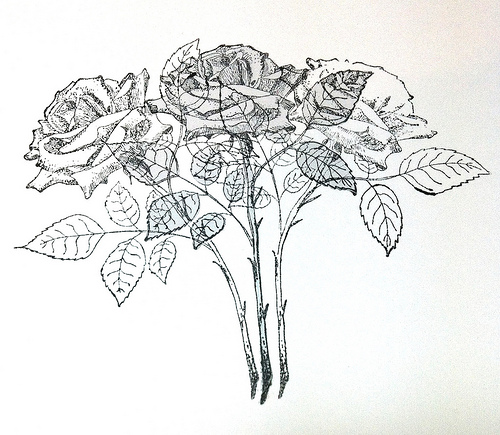 |
| Now you can see that I have stamped over the image with the masked paper on top two more times. |
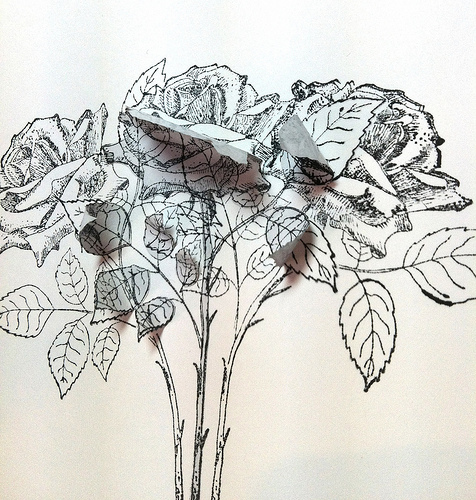 |
| Give it a minute to dry and peel up the masks. |
 |
| After I colored my images I used my this paper cutter to trim a line on each side of the flowers being careful to stop where I wanted to cut out the image. I held my face close to the trimmer and I could see where to stop the blade. Certainly a drawing a line with a pencil would work but, I admit that I am NOT so good at cutting out a perfect line with scissors. |
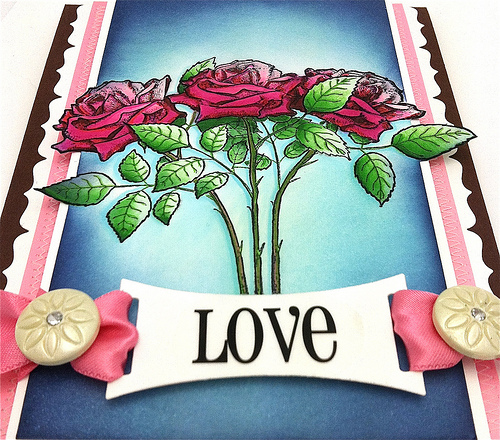 |
| Add some sewing perhaps and some layering. I am always reaching for these Spellbinder Edgeabilites for my cards and the sentiment banner is a Spellbinder too. Sentiment is from SRM stickers. I hope you will have time to see what’s been happening on the Penny Black Blog and I am wishing you the best of luck this week as you finish off your last week before Christmas. (IF you celebrate Christmas) Hope to see you soon. Hugs, Kathy |
CARD SUPPLIES & Marker Colors for Le Plume and Copic:
|
|
|
|
|
|
|
|
|
|
|
|
|
|
|
|
|
|
|
|
|
|
|
|
|
|
|
|
|
|
|
|
|
 Day 1. Coloring Book Card
 Penny Black’s Drab to Fab
 operation write home blog hop


both your cards look so beautiful…
Gorgeous cards as always Kathy! Absolutely LOVE all that bling on the second one too! 🙂
Love the effect of the 1st card,the roses are so sweet!
hugs
Doreen
Love Roses and the way you’ve colored them, makes me want to color right away. Will try that in the evening:) Waiting for the tutorial as always.
Wow, those cards are just gorgeous! Love the masking, looks a bit too difficult for me atm but would love to try it sometime. Great colors you used as well. Hugs, Hanneke
Your cards are so beautiful, thank you for creating and sharing them.
Gorgeous red roses, Kathy! Didn’t know that masking paper existed….must get some!
Love that masking paper, Kathy. Thanks for the link. Your card is gorgeous! I am really loving your videos so far – can’t wait for the next one! Hugs! 🙂
How AMAZING!! You work wonders with this stamp set!
Beautiful card! Thanks for the inspiration and the techniques! Merry Christmas!!!!
This glows . . . amazing masking, colouring and distressing!
Such talent its just so gorgeous:) Sandra H
you can never overdo the bling! beautiful, gorgeous, breathtaking cards!!!
Merry Christmas!!!
I love the way your ribbon tails echo the scalloped edging (a set of edgeabilities is on my “to get list” for 2012. The way the top arc of the sentiment panel reverses the arc of the rose spray is so effective as is the fact that your images extend over the sides of the main panel. Very effective indeed – I can’t cut a straight line with scissors either. As for the second card – the gems & pearls are so effective & I do like the way the transparent quality of the vellum is echoed with both the clear & the pink crystal gems.
Paula (PEP)
wow your cards just fascinate me…They are so gorgeous…Love your coloring…great new stamps.
Both your cards look s…o..Gorgeous……great new stamps . Waiting for the tutorial as always.
I love these cards Kathy. That rose is stunning and I love how you’ve masked and stamped the three together.
as always… beautiful cards, kathy!! 🙂
I can smell these roses from here! Incredible, I just love the detail you added to them.
Jaw dropping! Again… 🙂
LOVE them!
Beautiful cards! Thanks so much for sharing.
Love all your cards, Kathy. Thanks for sharing.
Both cards are so pretty – your colouring skills are amazing. Could you pass some of that skill off to me.
This stamp is lovely and so is your card! Love your stamping talent and look forward to your blog – thanks so much!
I love your work! Beautiful cards!
Hi…love these rose cards esp. the lone with layered roses. Thanks for the instructions I can’t wait to try this technique.
Very pretty and thanks for the masking tape instructions.
Stunning. I love the depth of the roses. Thanks for sharing.
Stunning. I love the depth of the roses. Thanks for sharing.
Stunning. I love the depth of the roses. Thanks for sharing.
Hi
Fabby card …. Love the vellum…. Stunning…
Hugs Sylvie
This is so pretty…thanks for the tut of masking!
xxx Margreet
What a pretty card! Thanks for that tutorial–its super easy to follow.
It is funny that sometimes I look at a stamp set and think “It’s nice, I guess”. Then I look at a great card made with the same set and I think “Wow! I need that.” Beautiful colors, by the way.
wow Kathy, these are super stunning, I am so glad I clicked to see. Thank you for the tutorial, love the masking and those gems and pearls are beautiful xxx
Awesome masking job and your coloring is so beautiful. Gives me something to aspire to.
Wow great teknig .Roses are stunning.
Its been sometimes I did not visit your gorgeous blog, Kathy as I am busy with my newborn. I just checking out for the past posts I missed out and I come across this post where you mention using mask paper. Thanks for introducing it as I been using ‘Post-It’ notes which sometimes do not give the best result.