 |
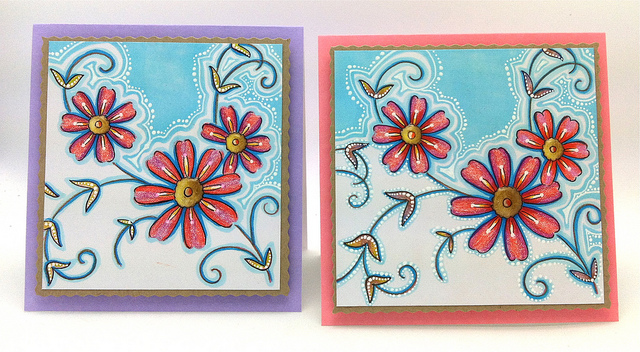
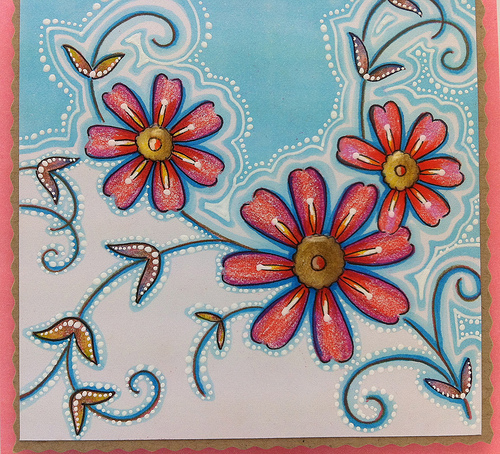
| Good Morning Friends, Today I have a mini tutorial on coloring a shadow stamp instead of inking for more depth, color and vibrance. What I am excited about showing you is creating another background with dots and lines using a gel pen. |
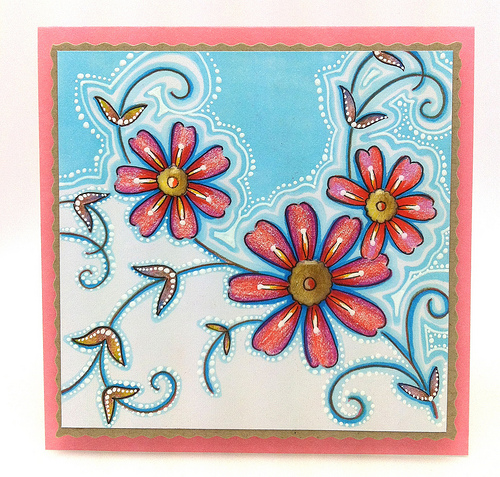 I admit I have trouble finding the right ink for shadow stamps…maybe I just need more…more color. So with today’s card this is how I like to use this kinda stamp. Notice on the top card I added dots on the bottom portion too and I discuss it further in the tutorial. |
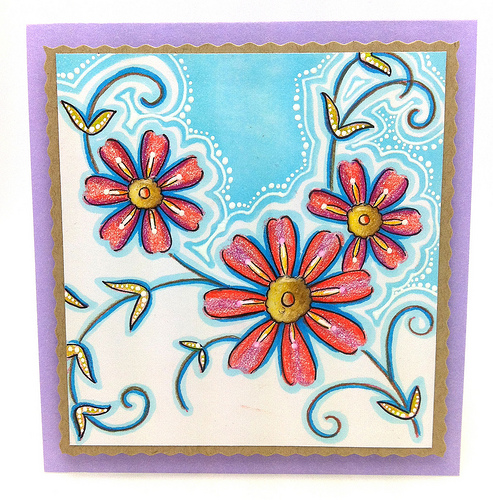 |
| I can easily add the dots on this later if I so desire and the same goes for a sentiment too. However, I like having blank cards on hand that are suitable for most occasions. |
 |
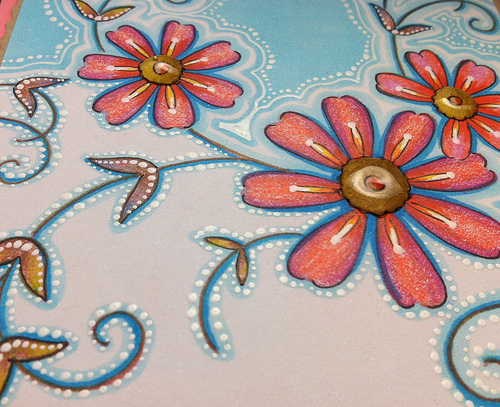
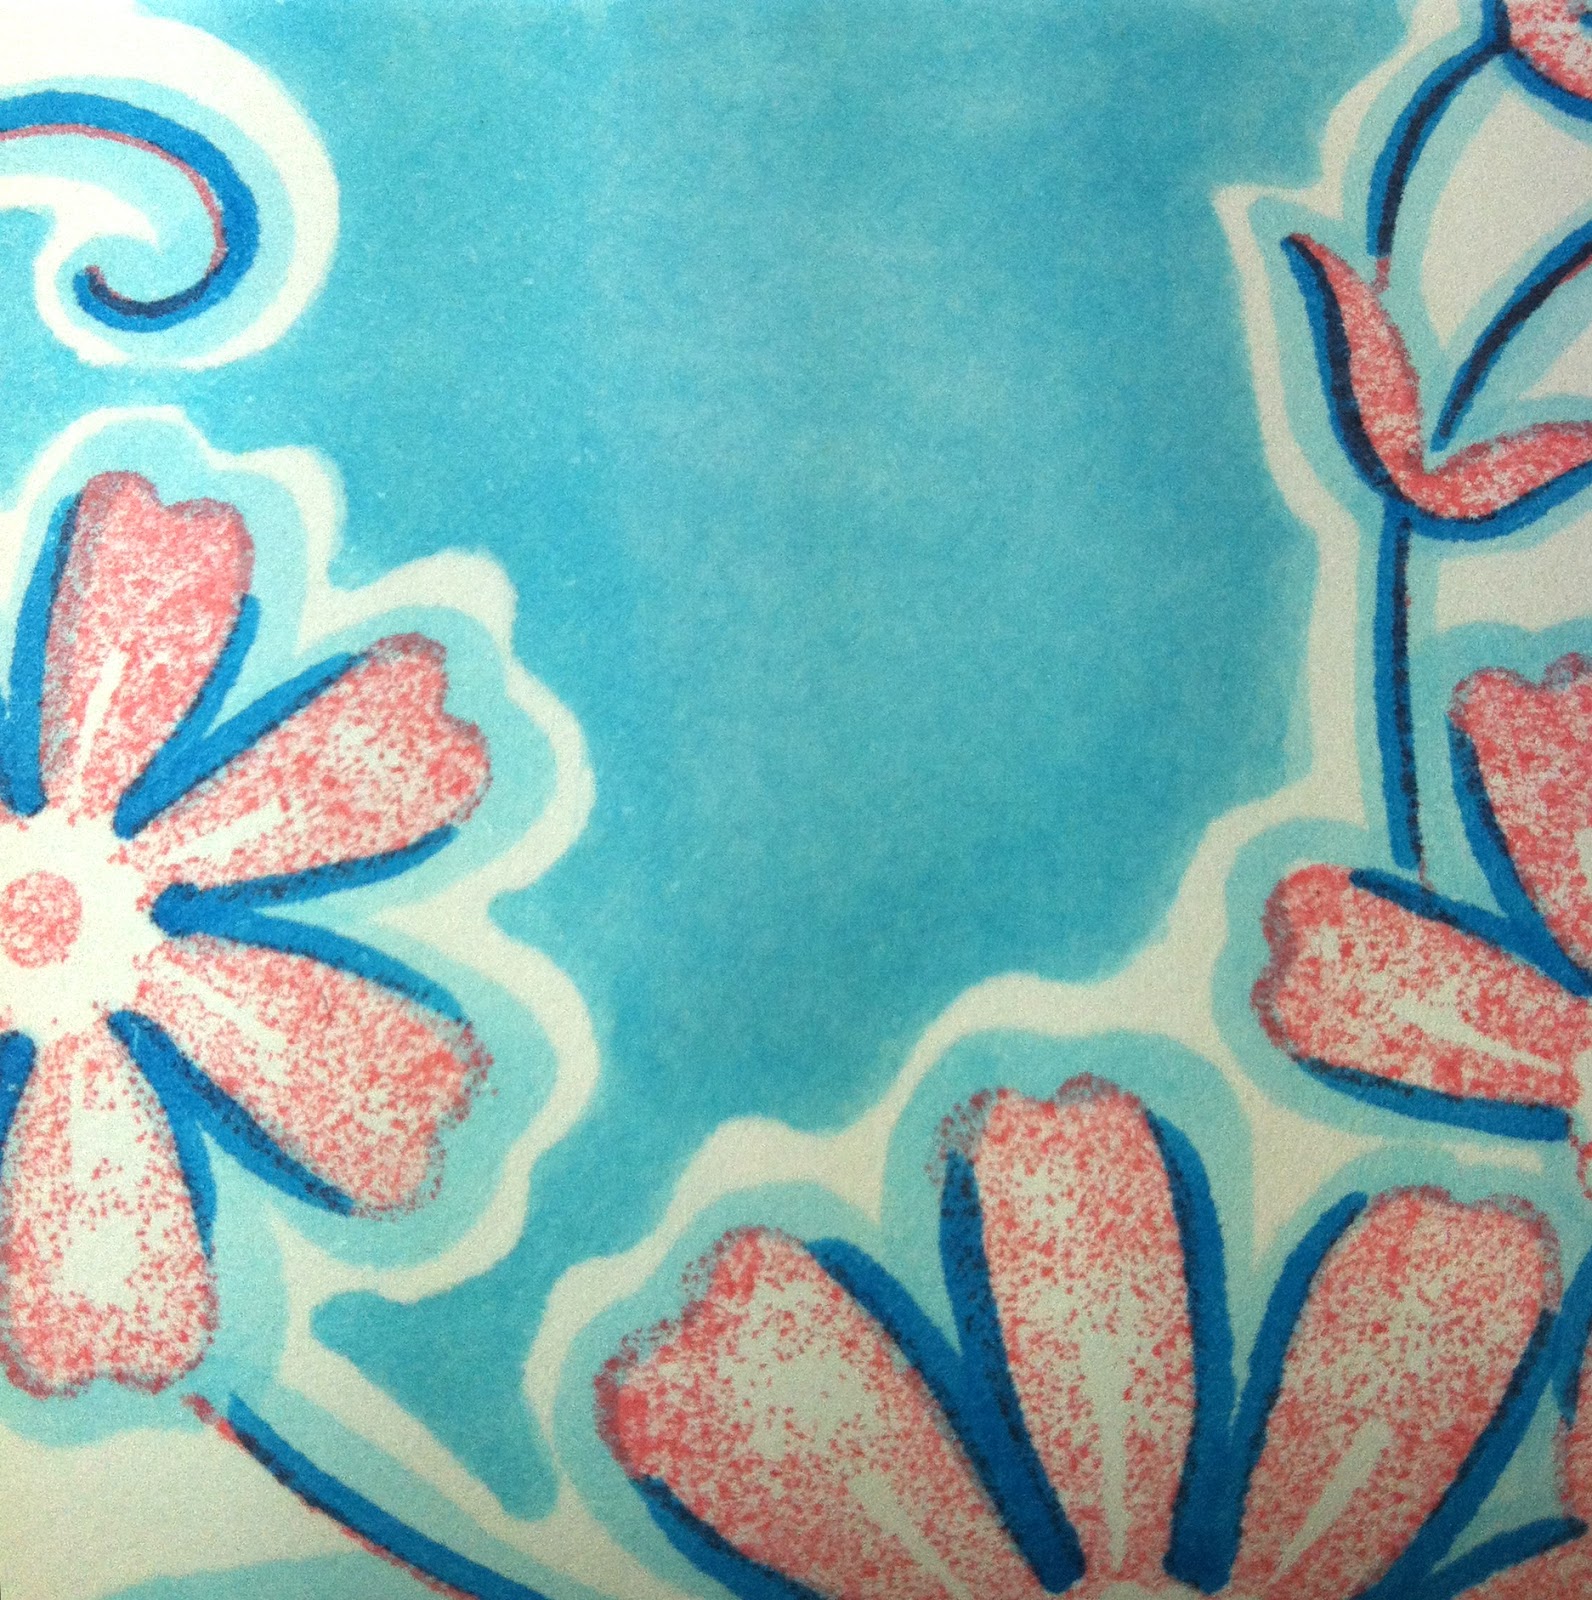
| Just had to zoom in…the white is much brighter but, had to tone it down so you could see the white dots. Have you been feeling dotty lately? |
 |
| Three nights before bed I would apply a big blob of Glossy Accents. Ready to get started? |
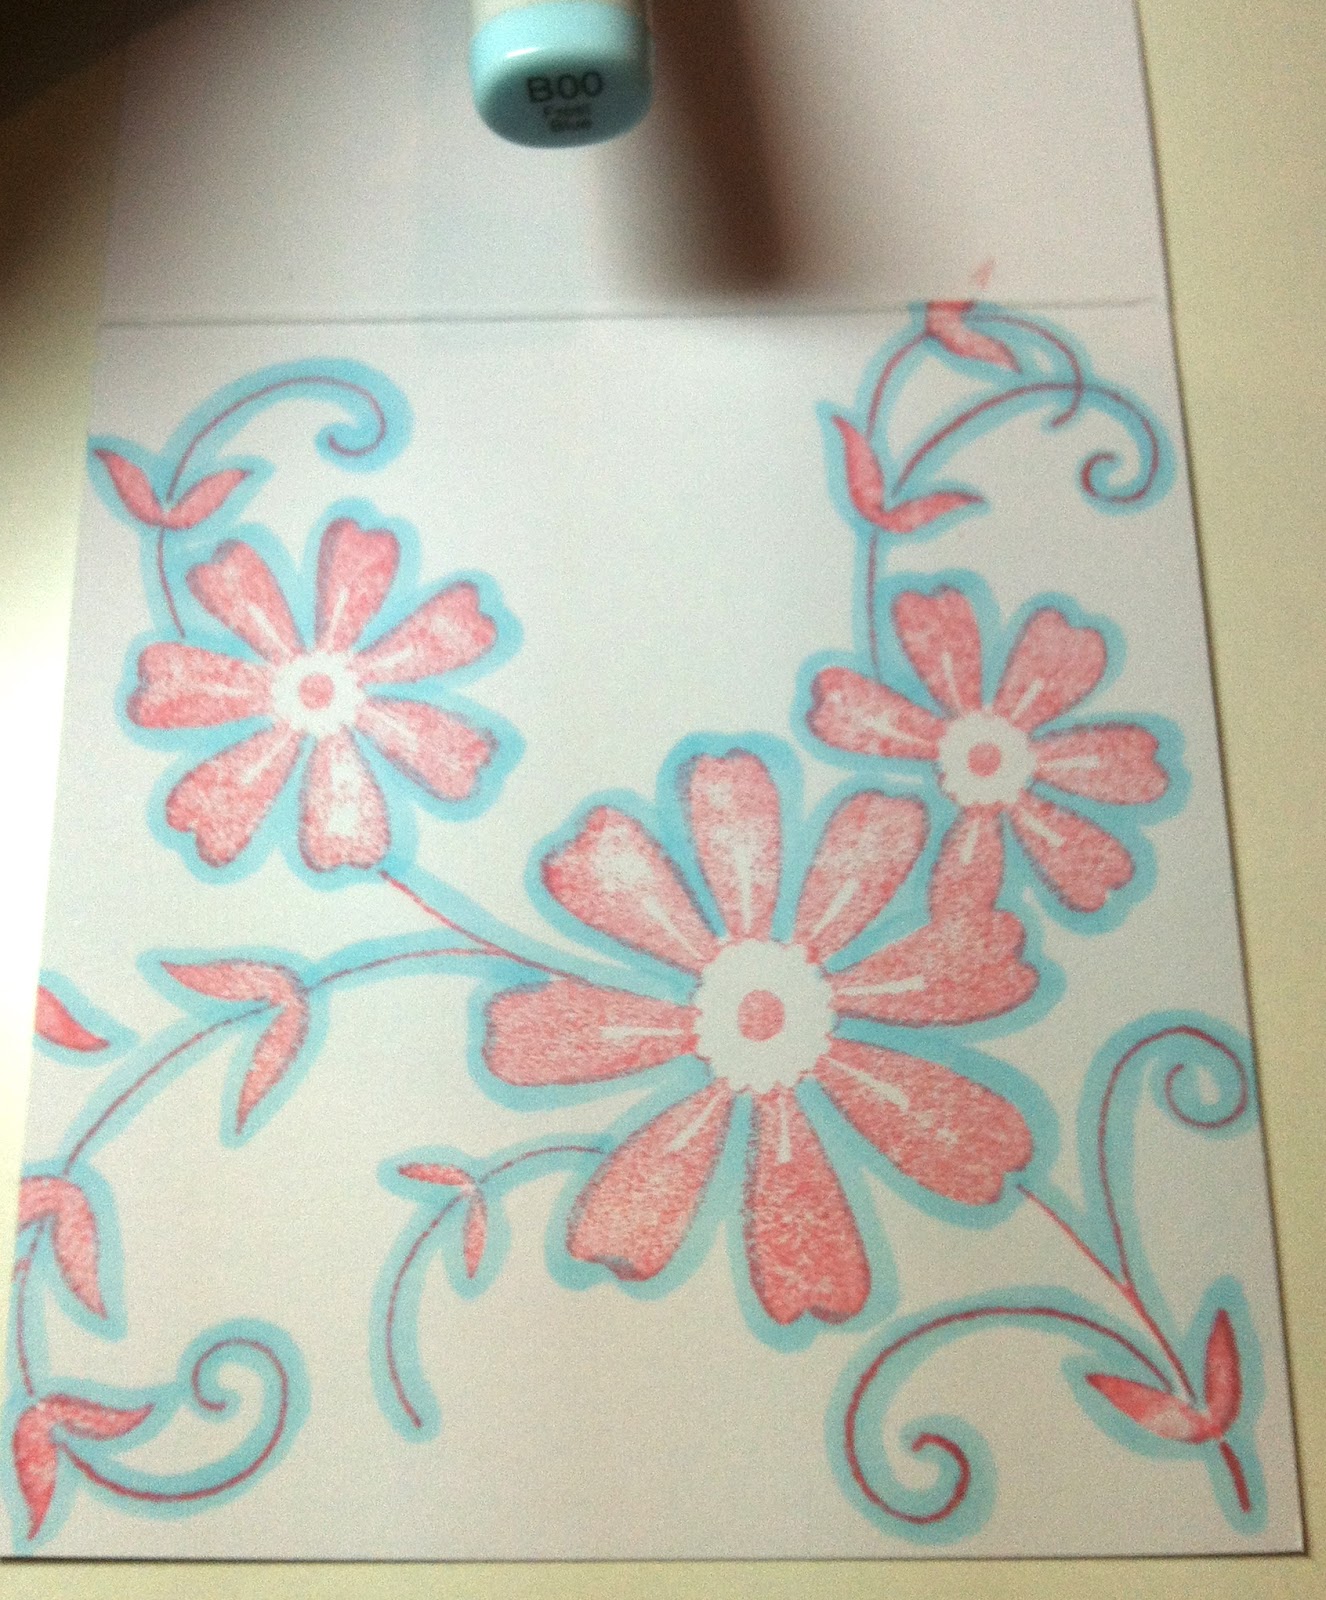 |
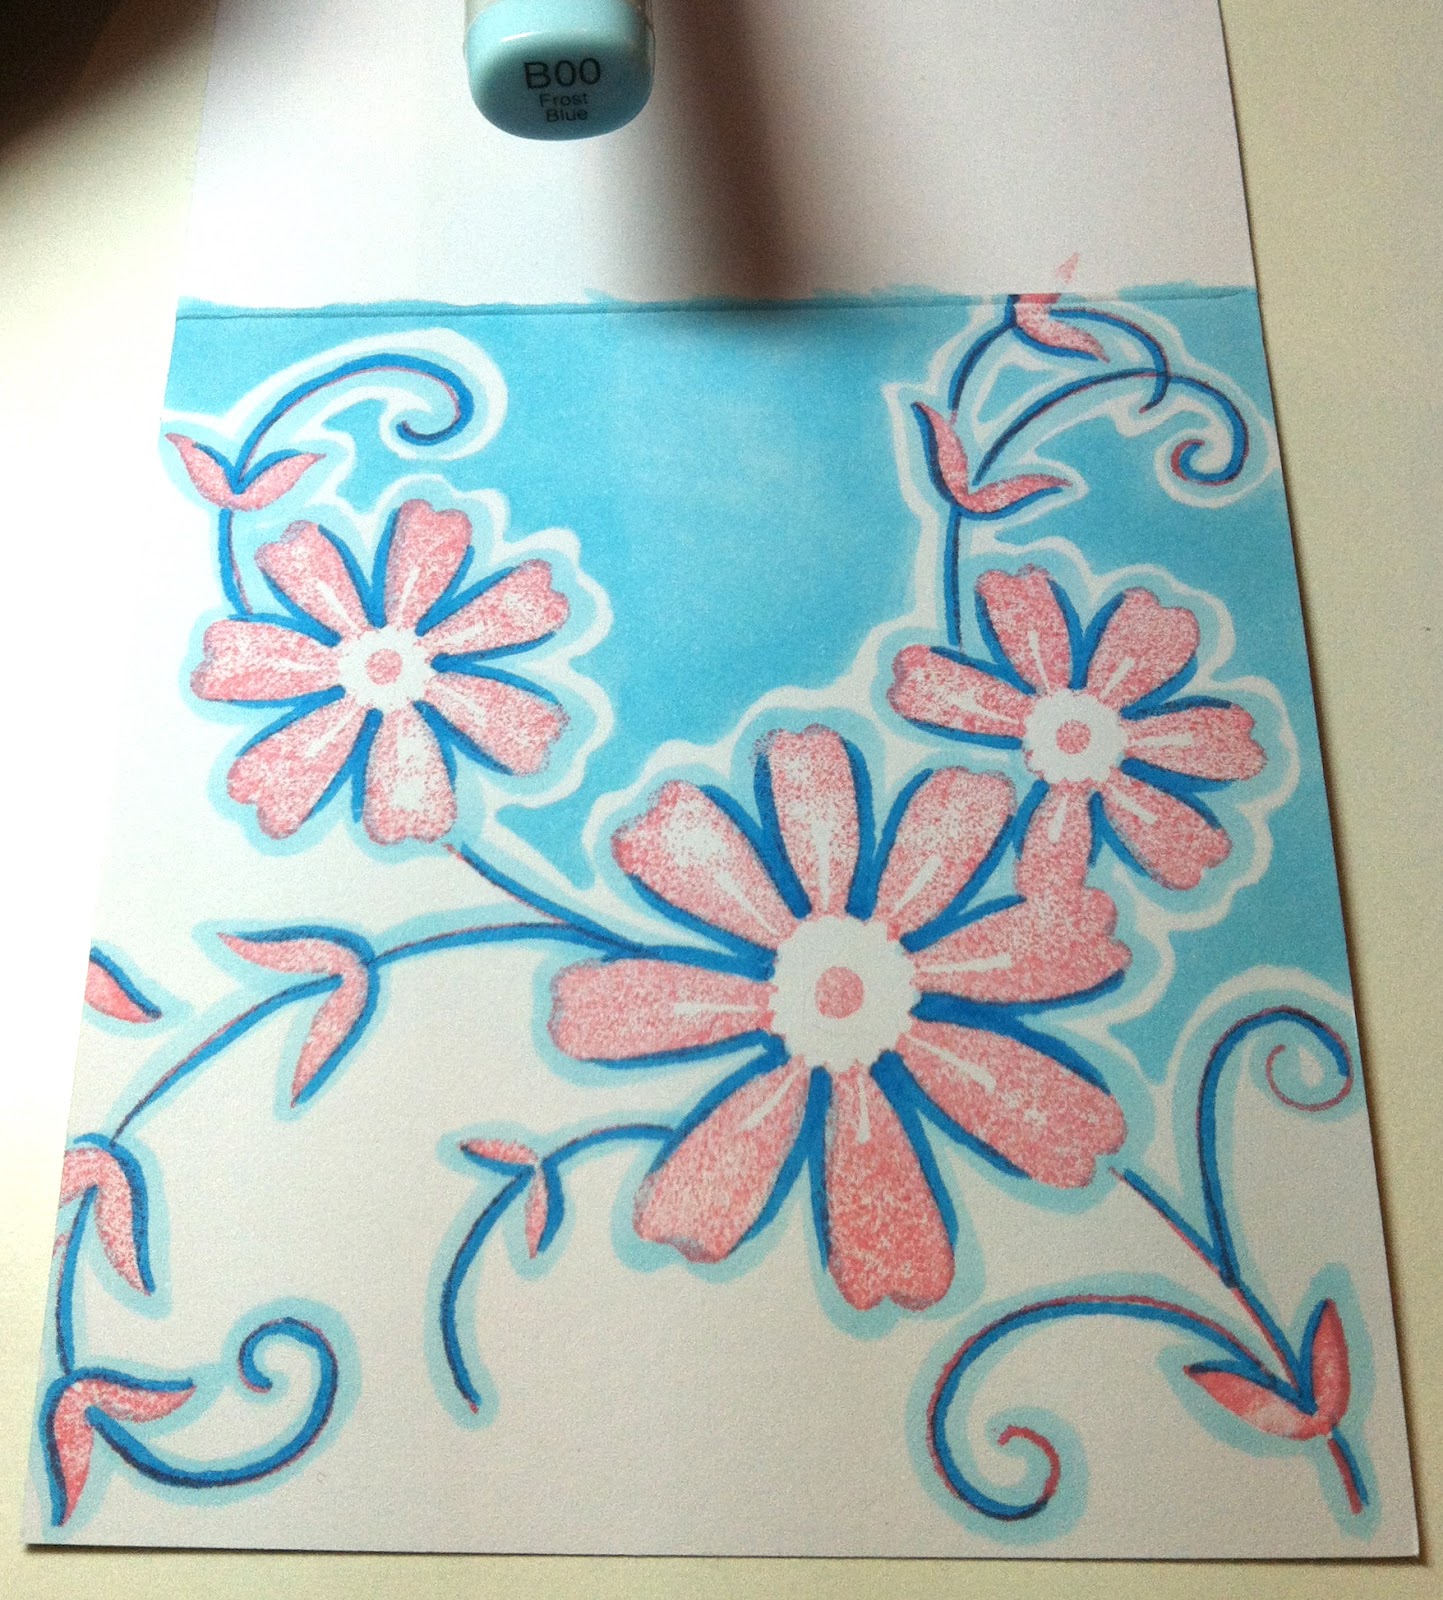
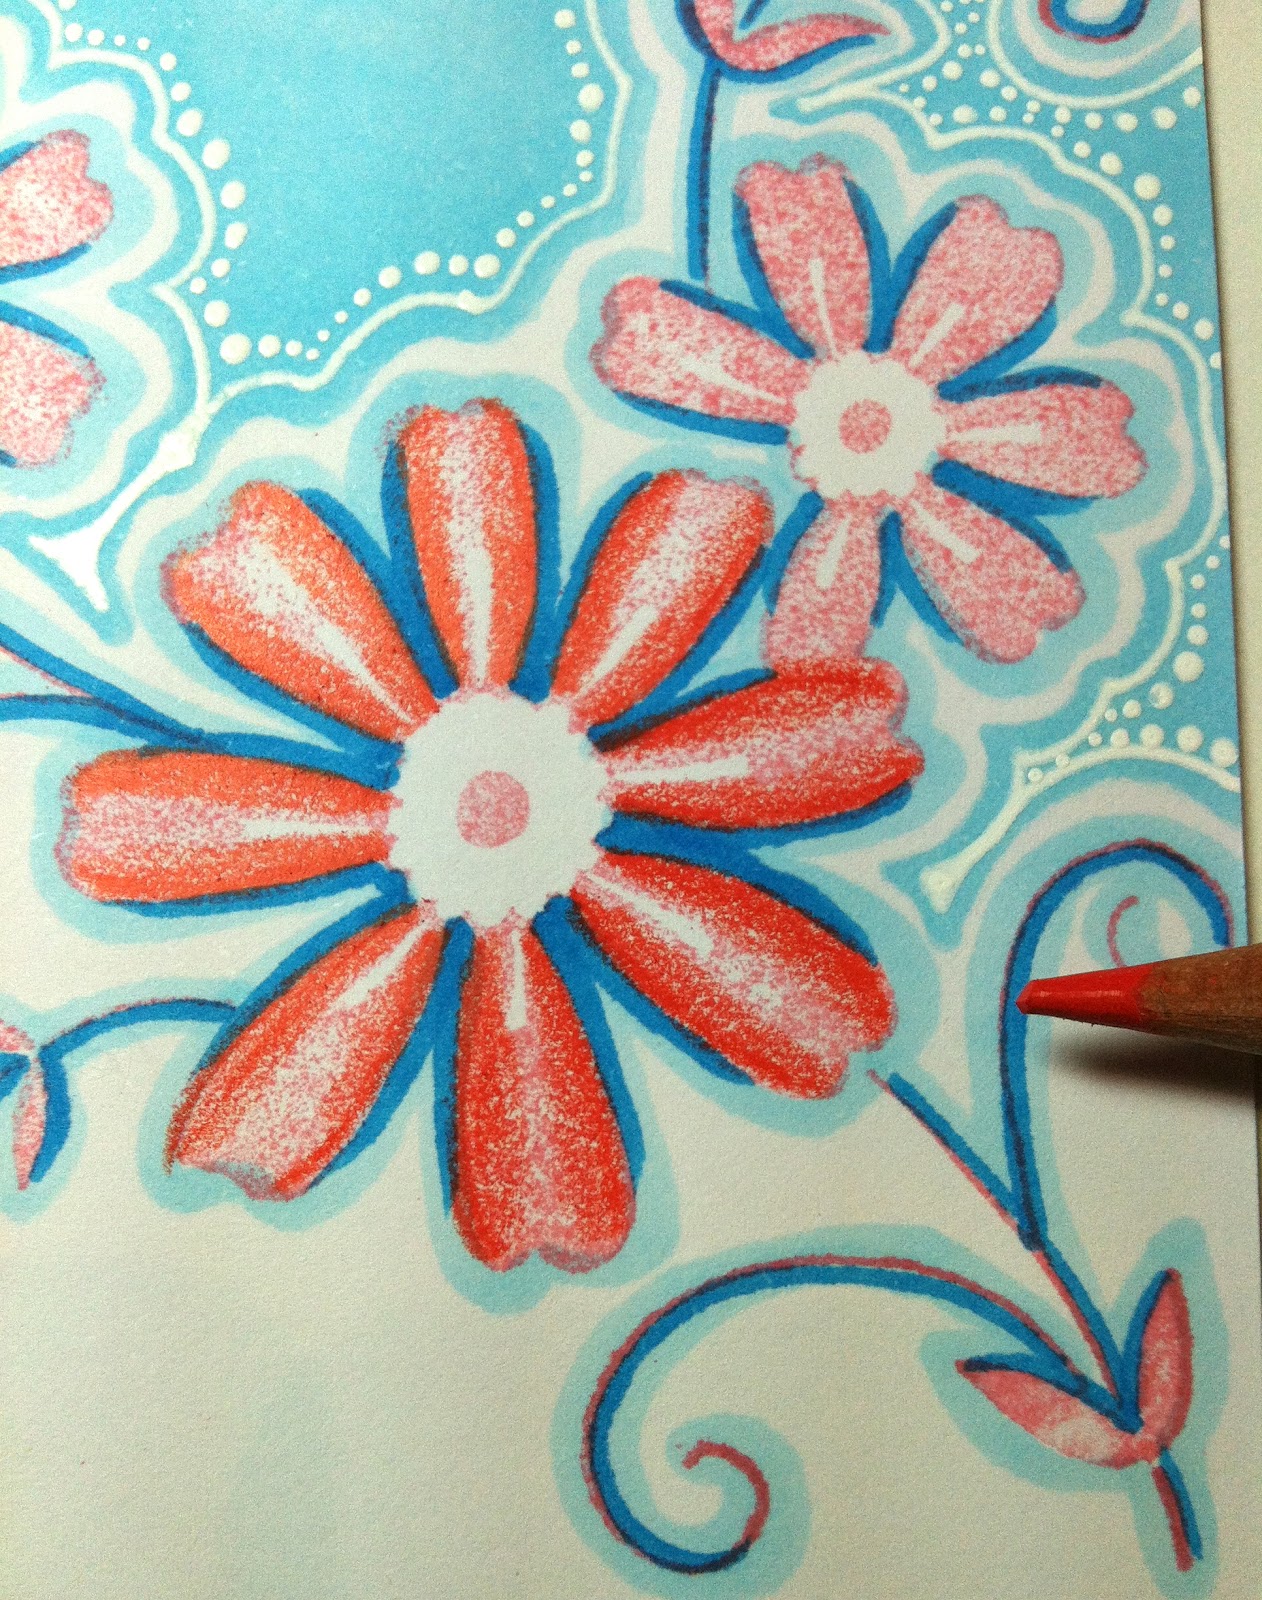
| Stamp your image with any light colored ink. Outline with a light blue Copic marker (Boo) and on both sides of the vines. |
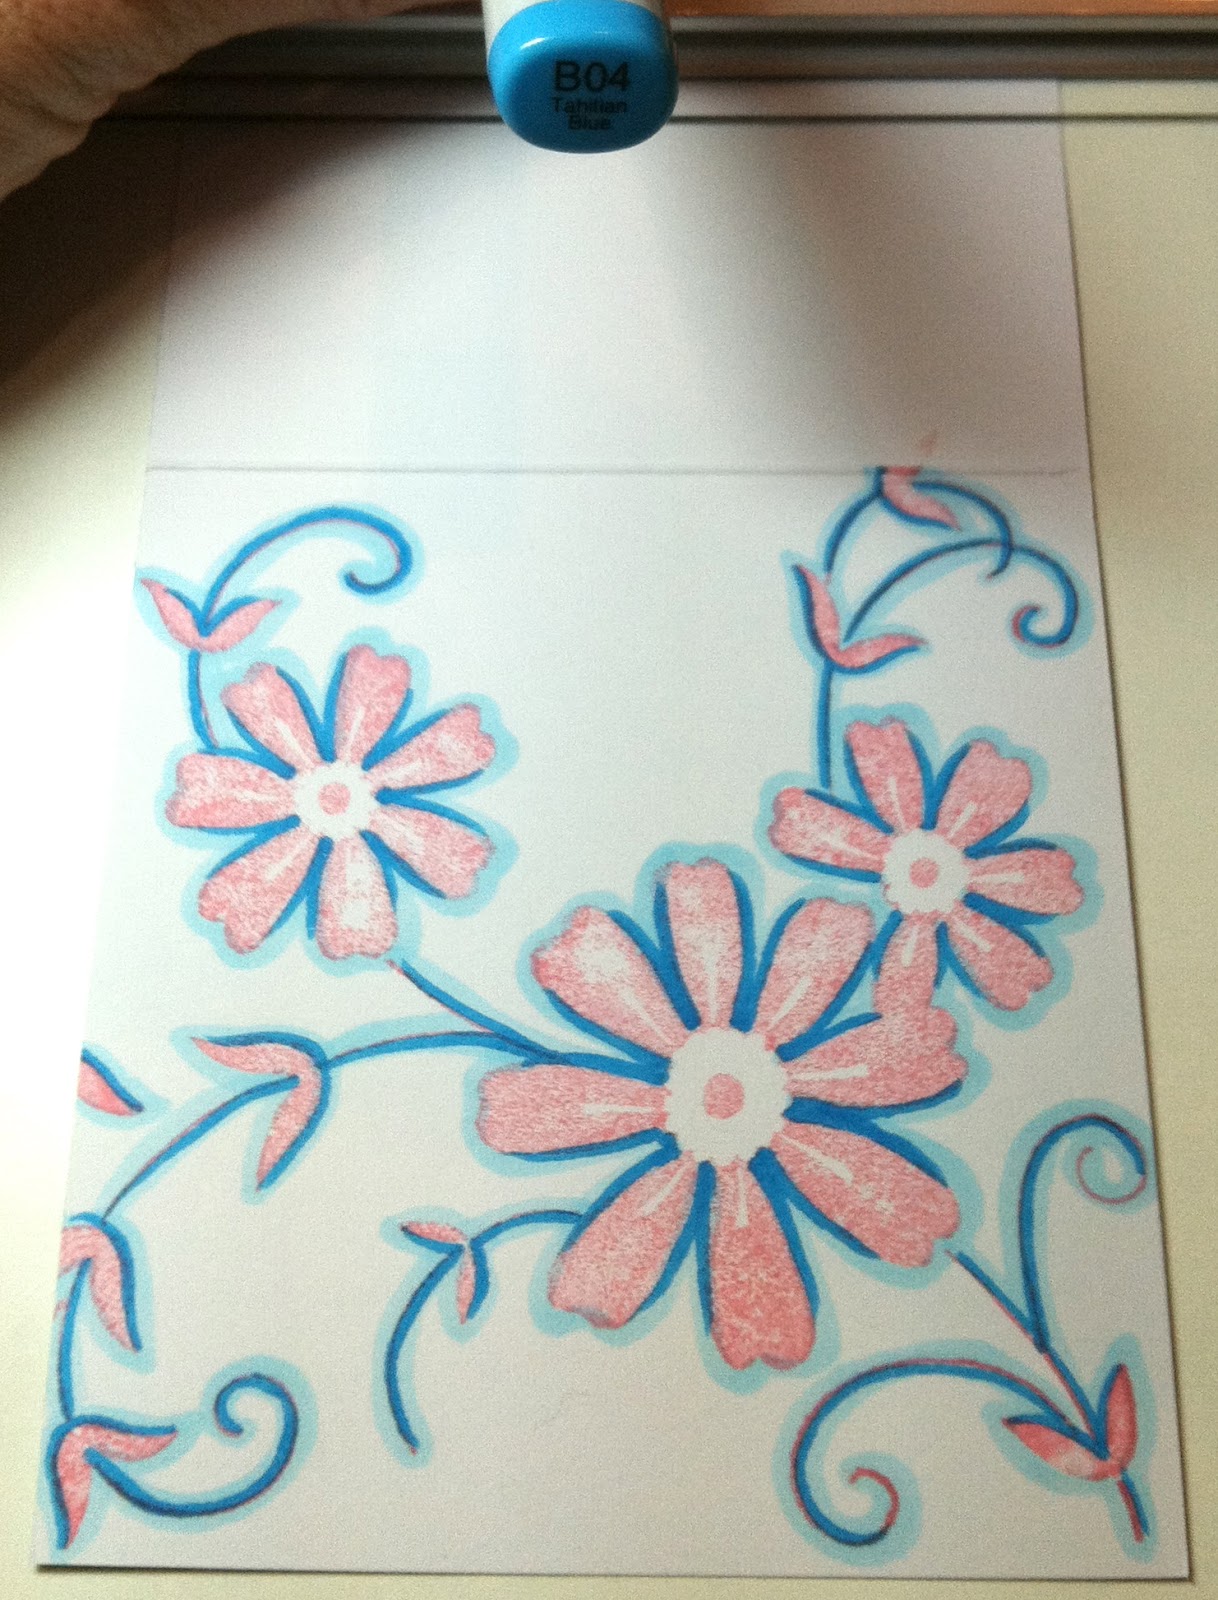 |
| Add some shading to the inside of the petals with a darker marker (B04) and on one side of the vines. |
 |
| Color the top part of the background LEAVING A white boarder with your light marker (B00). Don’t worry about good coverage because you will go over this area again to get saturation. |
 |
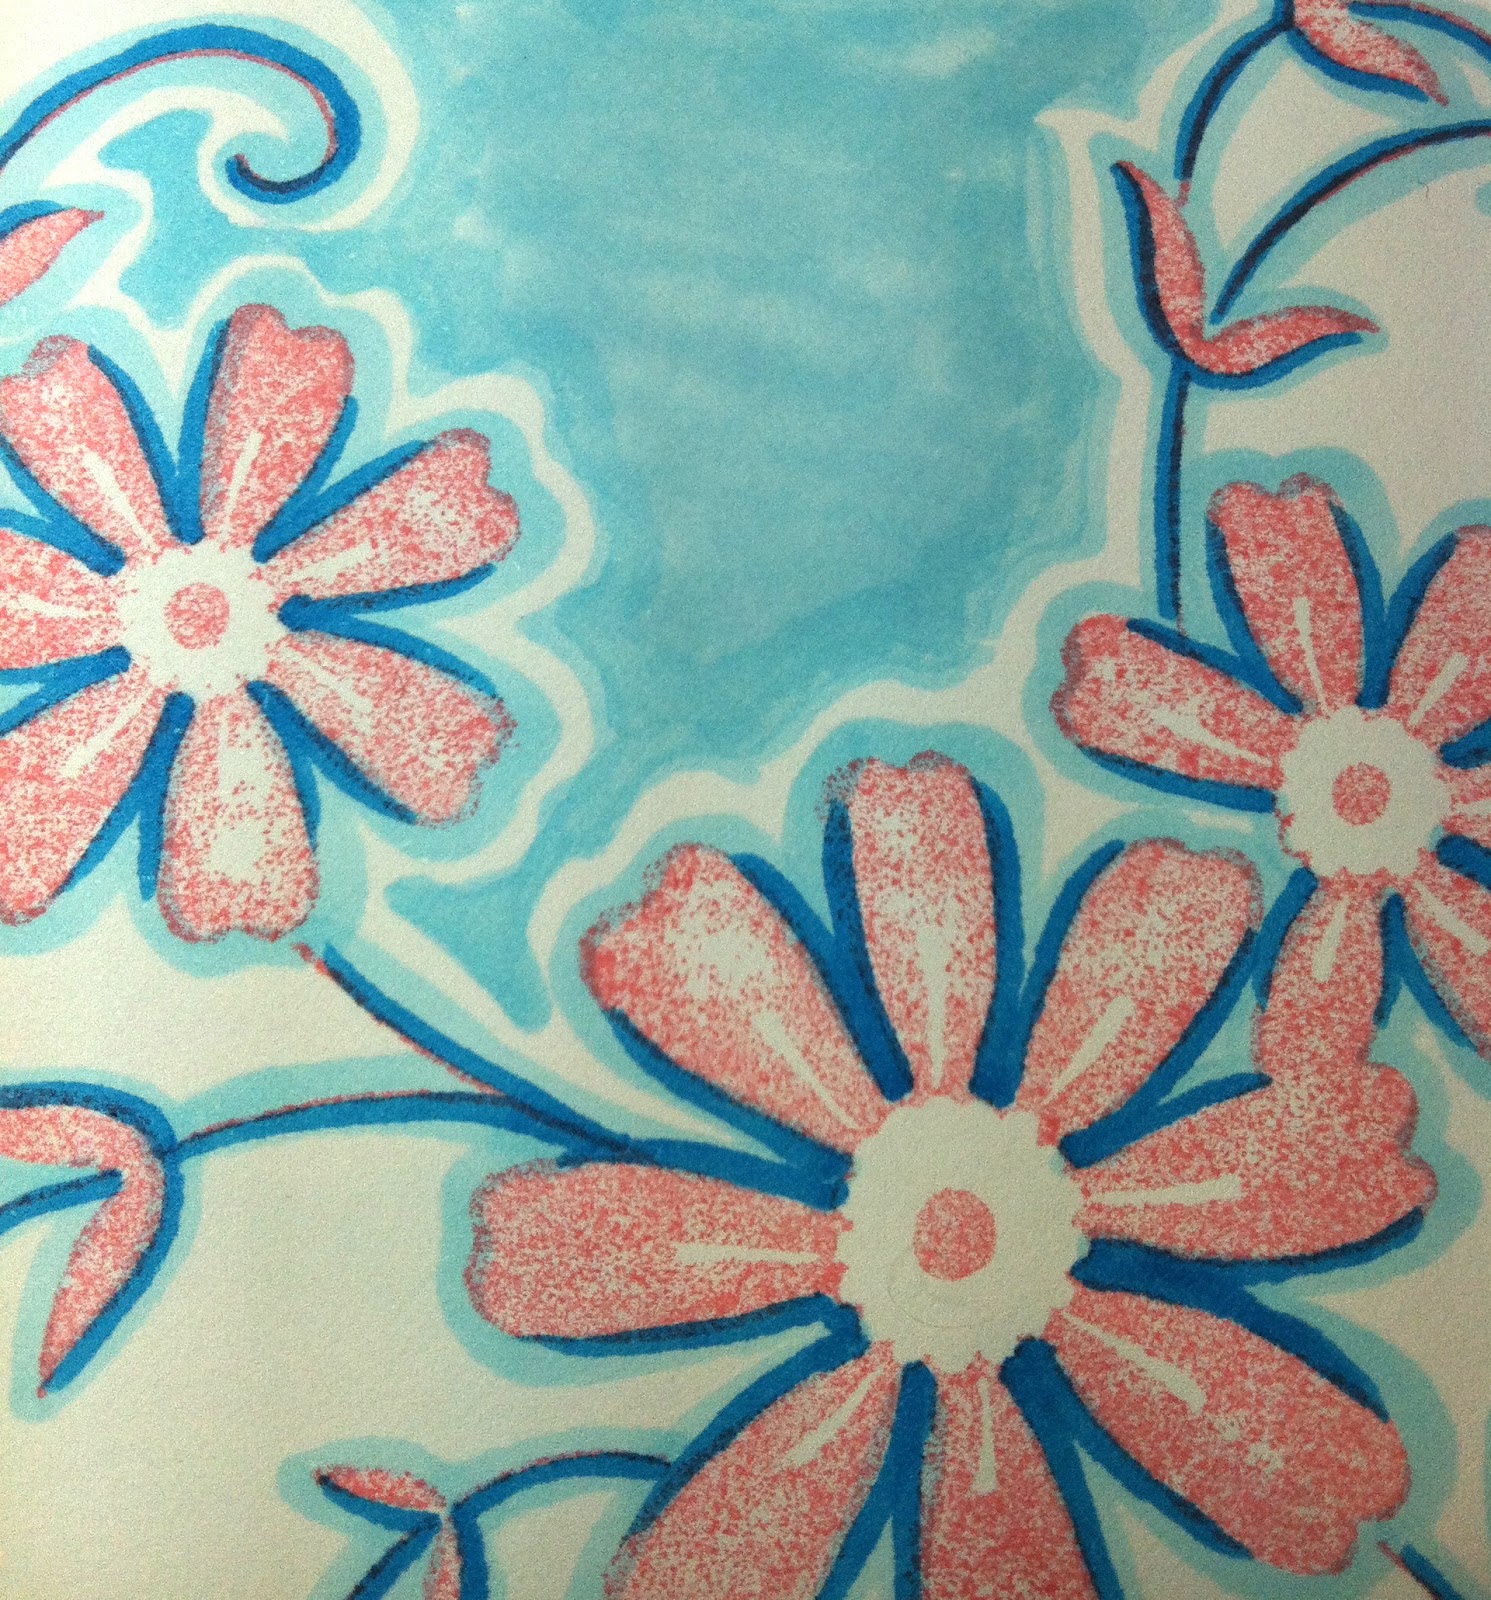
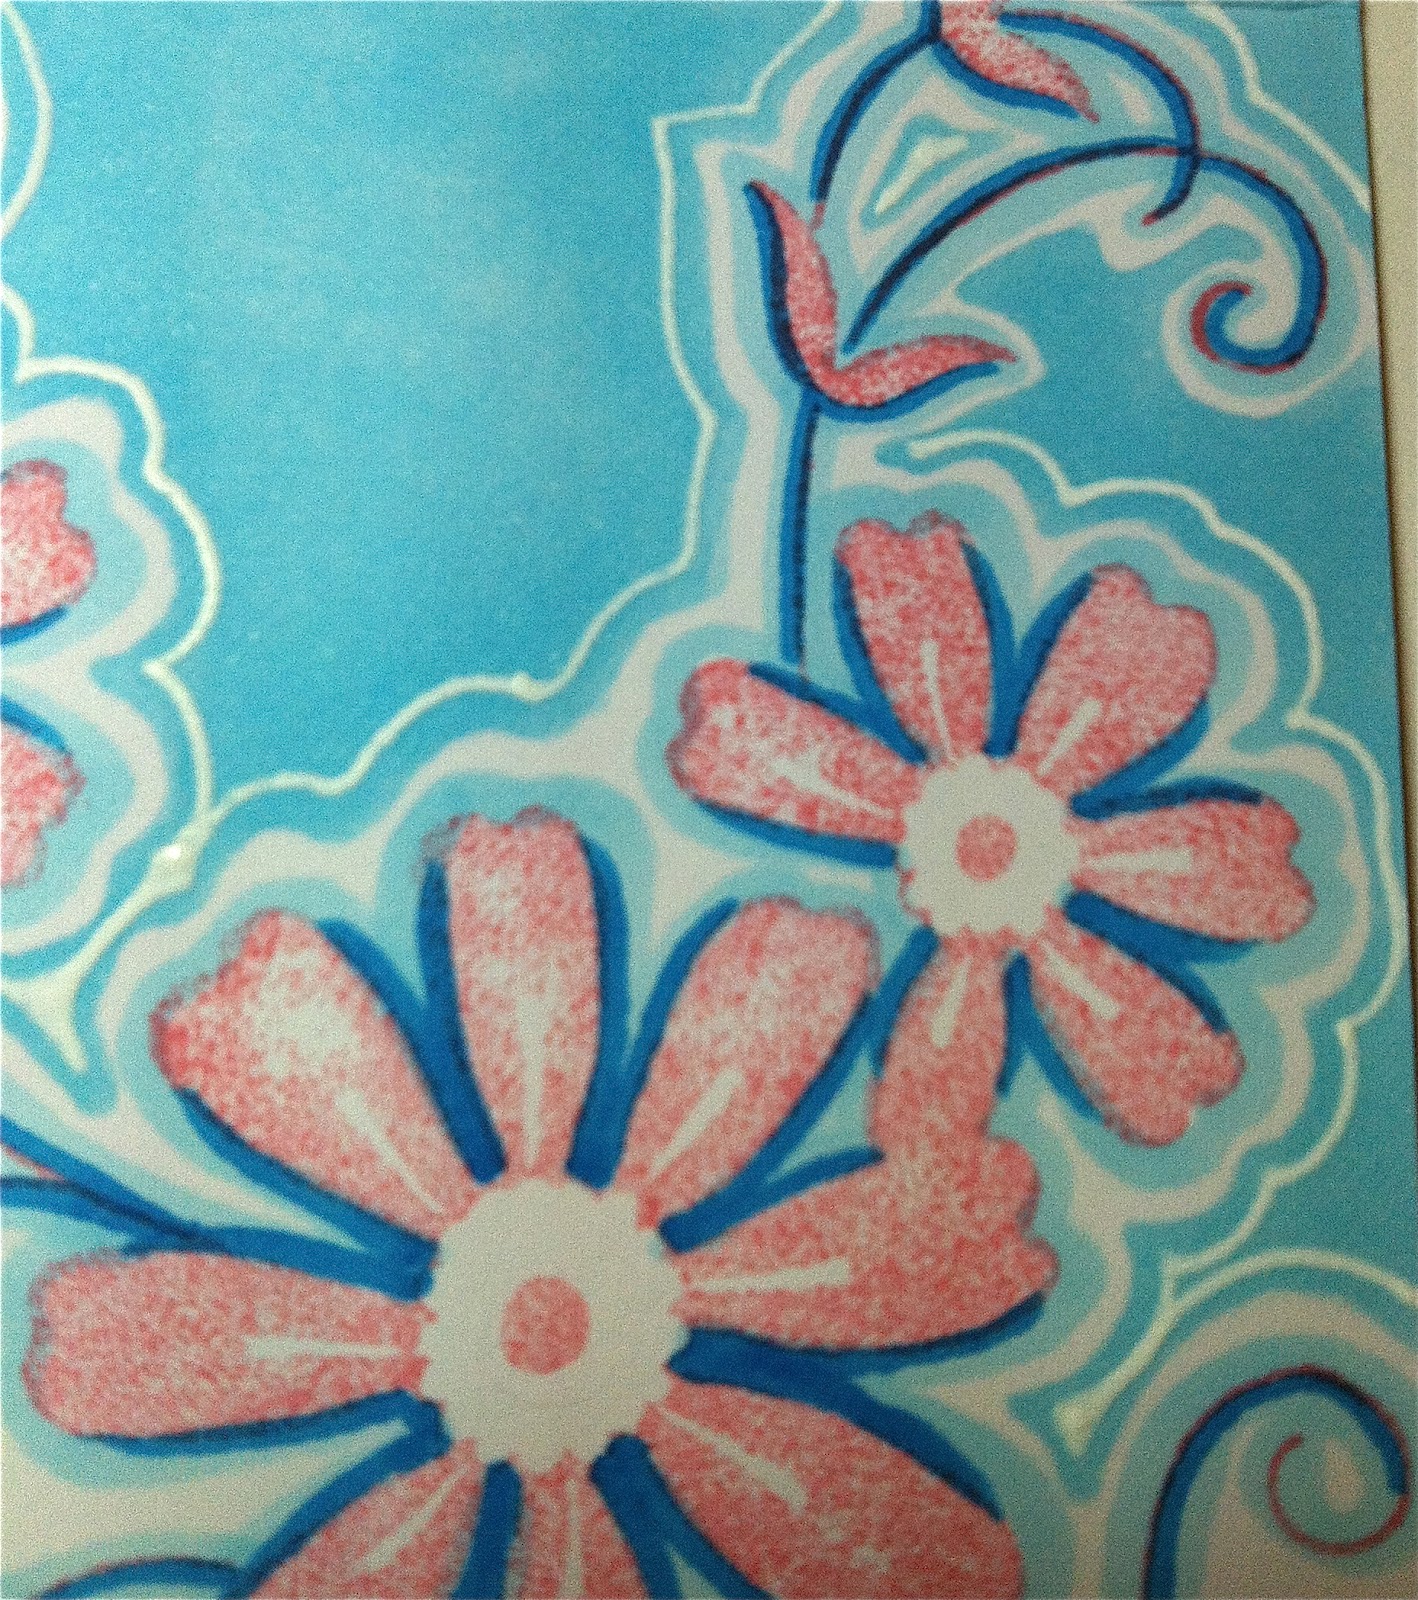
| This is what it looks like with complete coverage after going over the area one more time. |
 This photo shows you the area I colored on the background. I tend to stop in the design where there is an ending at the edge of the paper. Know what I mean? |
 |
| Now the fun begins. Take your white gel pen (see supply list) and follow the white boarder you just finished THIS TIME LEAVING a boarder of blue. When using a gel pen I always start it on my finger to get it flowing. Go slowly to control the flow when drawing your outline. |
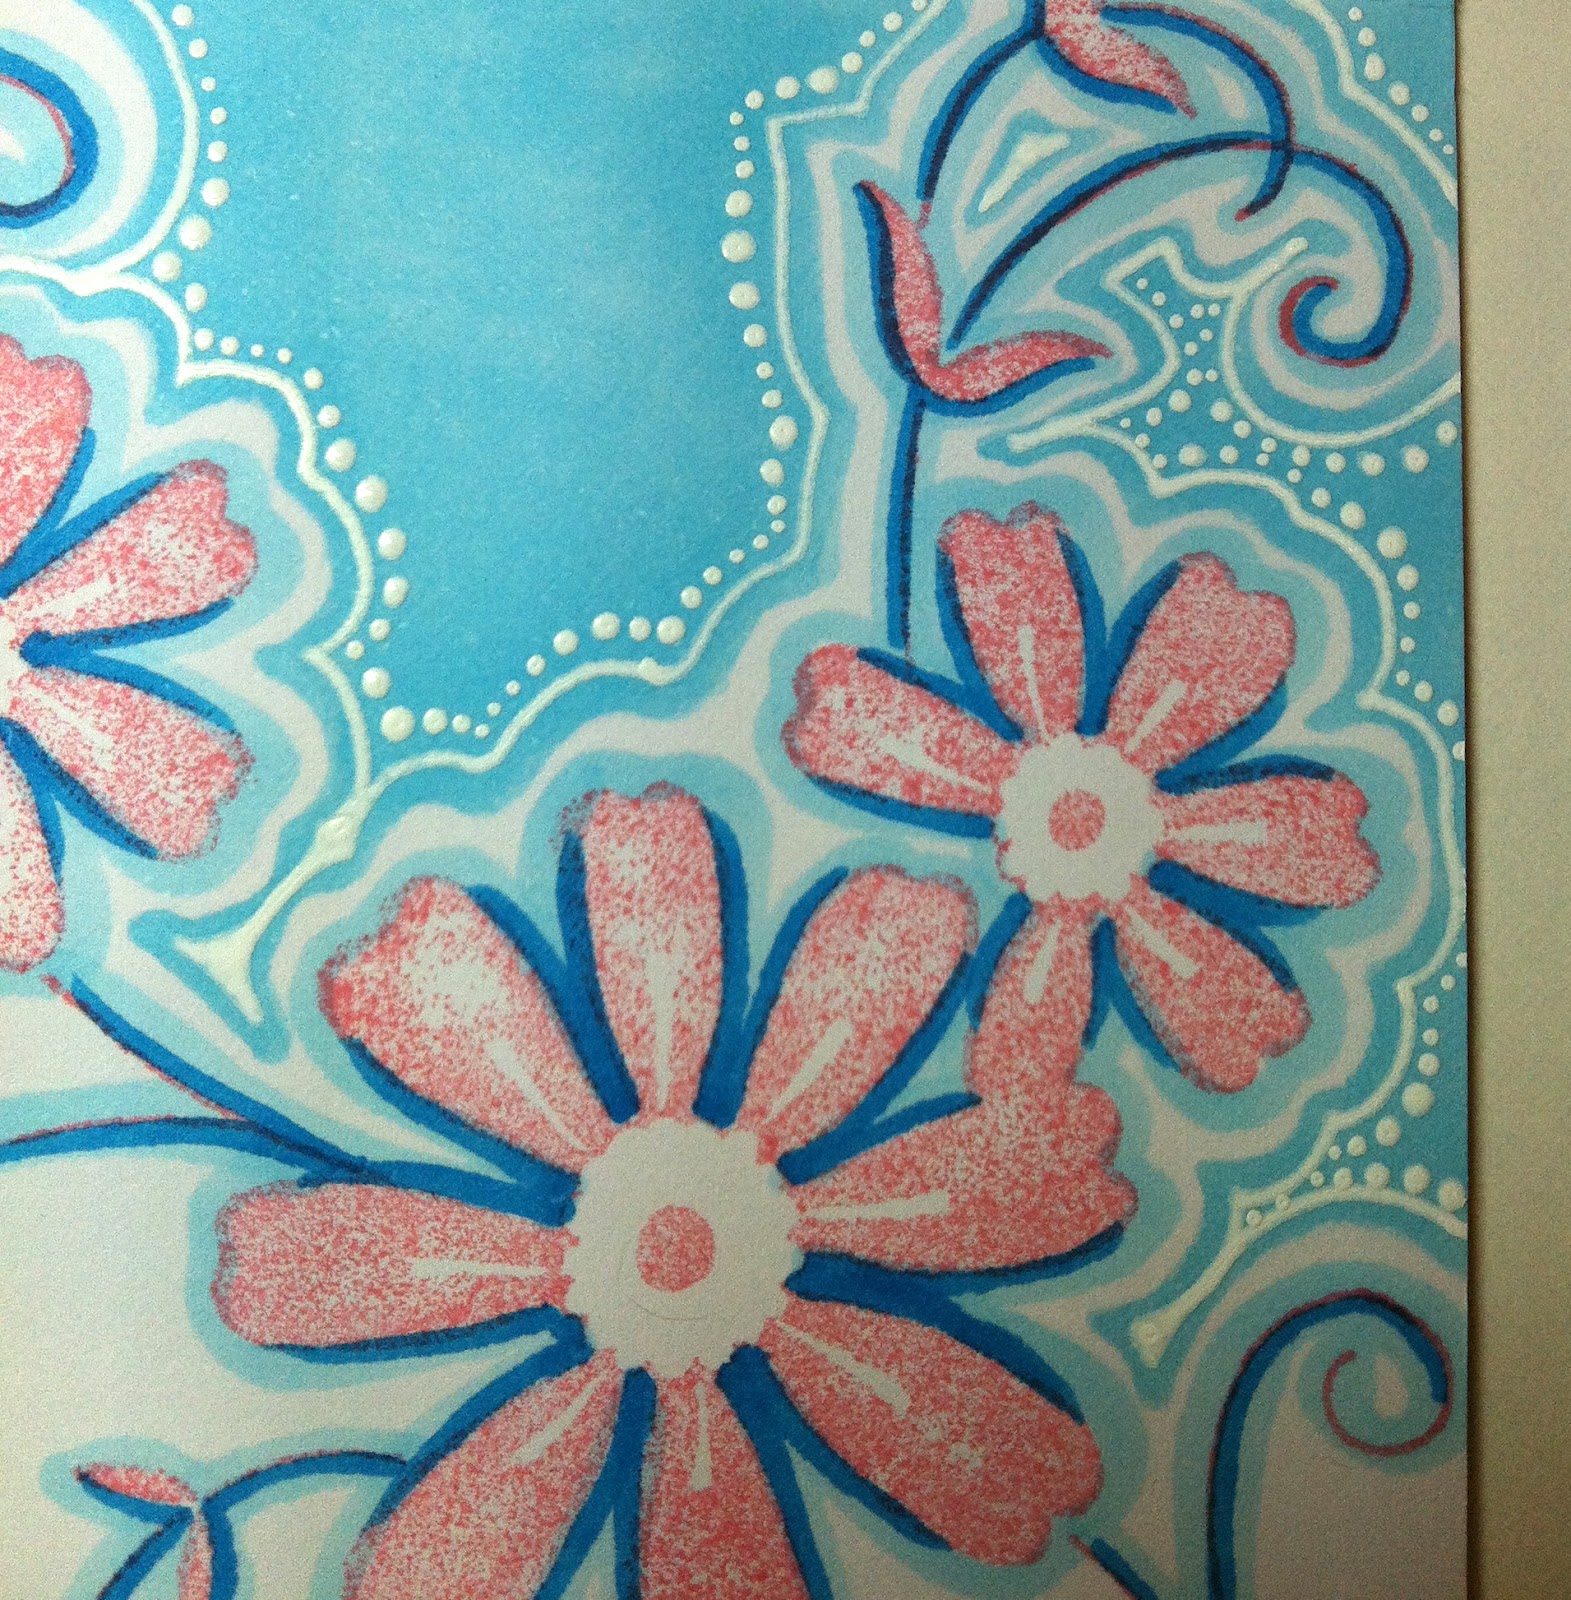 |
| Now you want to add dots creating another boarder leaving some space (between the white boarder). Give your pen time on the paper to pool the white ink before lifting it up. |
 |
| Add some color with colored pencils. First I outlined the inside of the petals with red. Then I colored the inside with purple. |
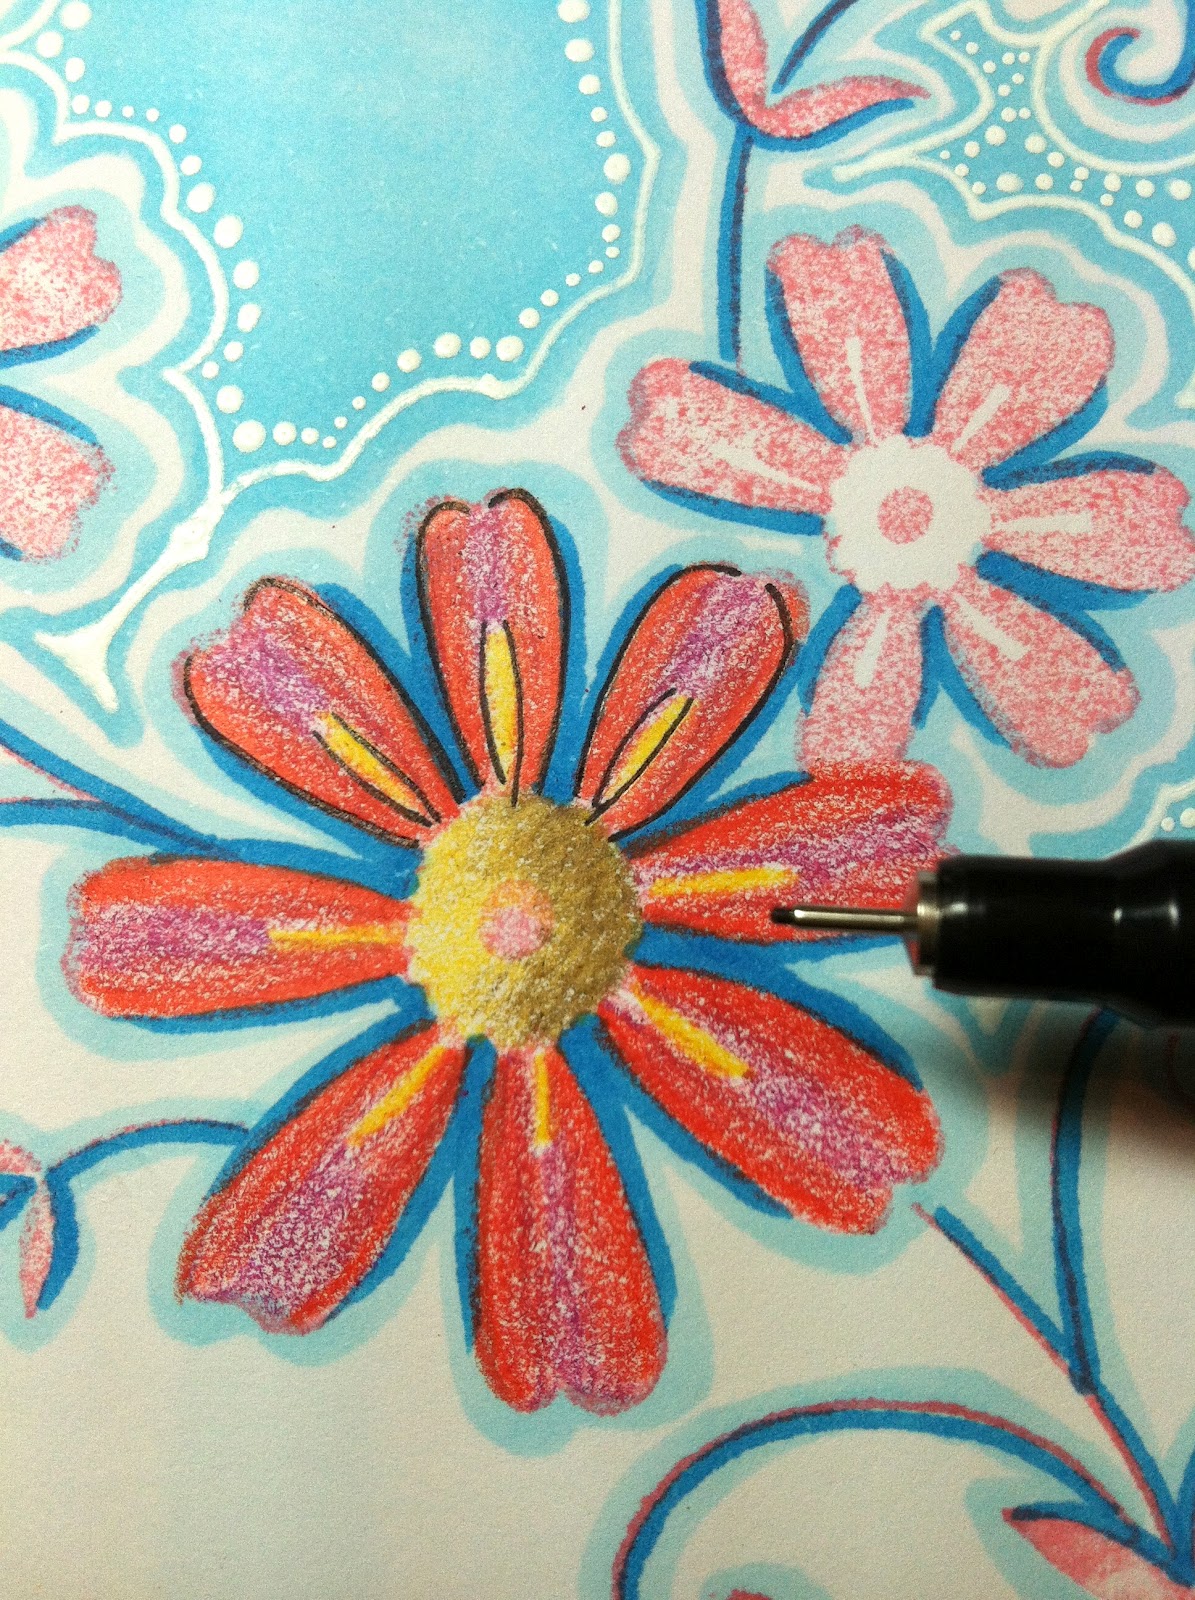 |
| After shading the center with yellow & brown trace over part of the petals with a fine tip marker. Don’t be shy about doing this…you can do it and it makes such a big difference. (Trace over all your flowers the same way and the leaves) |
 |
| Sharpen your brown pencil and trace over the stems and vines. Add green to the leaves. |
 |
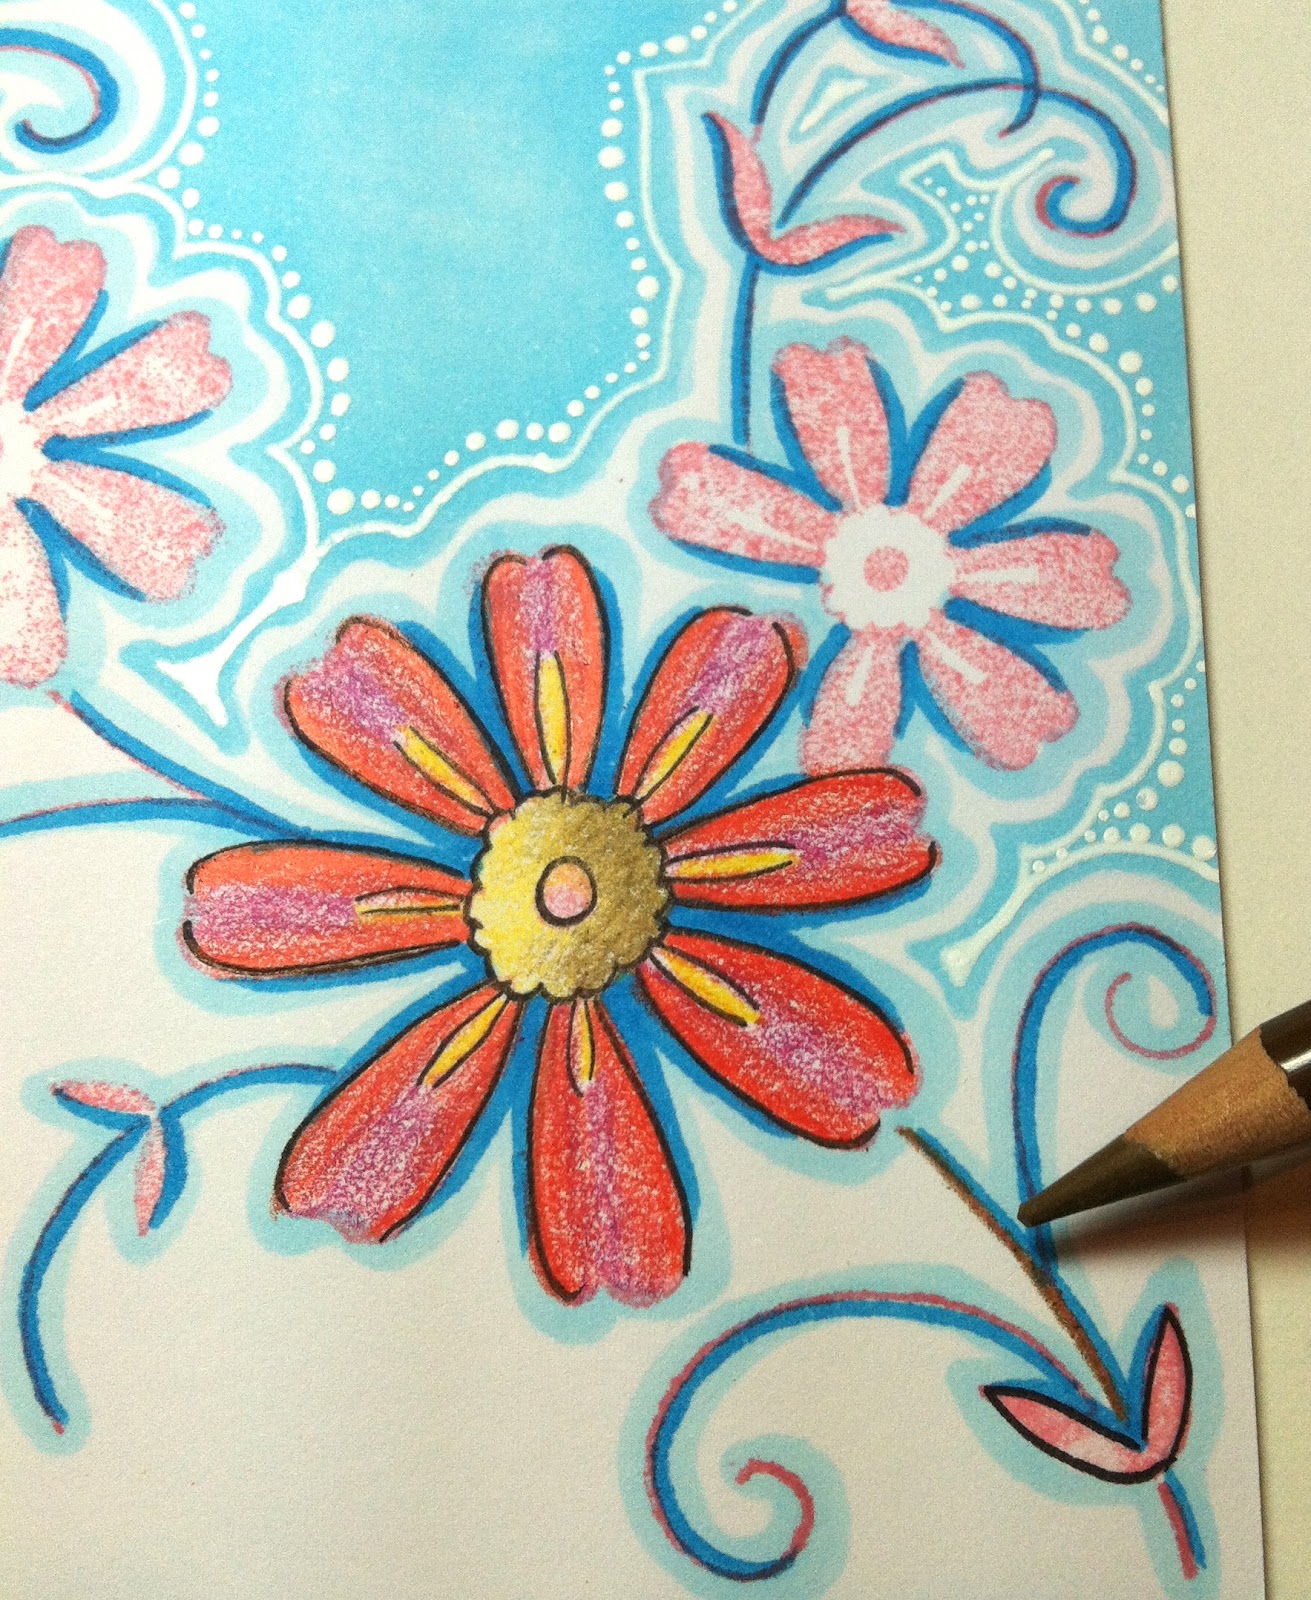
| I added dots to the vines, leaves and the center of the petals. I recommend adding three coats of Glossy Accents allowing dry time between each one. That’s it in a nut shell and I hope you found something useful. If you have an questions please send me an email. Enjoy your weekend and I am thankful for your visit. Hugs, Kathy CARD SUPPLIES: |
|
|
|
|
|
|
|
|
|
|
|
|
|
|
|
 giveaway… lots of inks and paper
 Day 28. Giveaway & Polka Dots
 Baby Girl Card


It looks amazing! Thanks for sharing this tutorial! 🙂
Incredible Kathy. You make the ordinary, exceptional!
SUPER this is so great ..never thought of doing this ..Thank you so much for this tutorial..will def try this!
Groetjes Holly
Gorgeous! Thank you Kathy for the tutorial and the close up photos of every step! You are such an amazing artist!
Incredible! I love the way you did this.
Love how that darker blue border really makes the flowers pop in the finished product!
Beautiful cards- thanks for the great how-to!
This is just terrific & thank you so much for giving a tutorial on it too. It’s so helpful with the tip about allowing the gel pen to pool a little. The colours of your flower really make this striking & I love your use of the dark blue to make the flowerheads really stand out.
Paula (PEP)
This is just terrific & thank you so much for giving a tutorial on it too. It’s so helpful with the tip about allowing the gel pen to pool a little. The colours of your flower really make this striking & I love your use of the dark blue to make the flowerheads really stand out.
Paula (PEP)
Thank you for the step by step explanation and pictures of each phase. Hard to believe the final product came from the initial stamped image! Amazing transformation!!
Once again, I am in awe! Amazing, Kathy – and oh, so beautiful! Happy weekend to you too! 🙂
The look is absolutley amazing, Kathy, but then your work always is! Thanks for a great tutorial!
This is a gorgeous card and so many ideas to try. I have a question about the glossy accents. You said to add 3 coats – where is that to go? over all of the card or what? Thanks.
AMAZING! Thanks for the step by step. Incredible to see the initial stamped image and what you ended up with… stunning.
I have a habit of buying those shadow stamps and never using them. Now I know what to do. Thanks for a great tutorial.
Utterly AMAZING!! Love love the details that went into this! You rock, sista!
Truly stunning and thank you:)x
Oh wow…that is such a fantastic tutorial. Love all the detail. Amazing the colours you added to the flowers…
WOW oh WOW Kathy!!! AMAZING colouring and detail….LOVE them both!!!
This is beautiful!!! I love it, and thank you for the tutorial! Amazing!
Lisa
I can’t wait to try this out! You are so helpful Kathy & this is just gorgeous!! Thank you 🙂
Does the extent of your talent ever end, darn girl you make me drool each time I visit..have a wonderful weekend..love and hugs!
Hello GORGEOUS! Your talent never ceases to amaze me Kathy 🙂 Your backgrounds are beautiful dear!
You are without a doubt the Queen of White Ink! And thank you for the excellent tutorial on how to do it … that took a lot of work to create and post! Without your white dots the card would be ordinary instead of extraordinary!!
This is absolutely fabulous! Thanks for the tutorial.
Amazing…your creativity never ceases to astound and delight! Such gorgeous artwork, Kathy!
I just love how you’ve created this image! BEAUTIFUL!
WOW this is a fantastic tutorial and the card is absolutely stunning!!! Thank you for sharing your creativity with us!!!
Hugs,
Jo
A fresh new idea for me. Love it.
Such a cool coloring idea, love it! Awesome idea and great cards, you should revisit this technique again in the 30 color challenge…I am sure a lot of people have these shadow stamps or shadow background stamps…Thanks for sharing.
Katie B.
Great information I as a beginner will know where to start now .
You make things fun. Thank you creative lady.
Lyn P.