
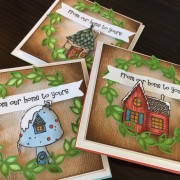
Hello Friends, How are you this Monday? I don’t think I will ever tire of flower stamps especially when I think spring is right around the corner or… at least I am hoping that spring is 🙂 This flower background stamp from Penny Black is so beautiful that I decided to cut it apart and make two cards from the one background flower stamp. FUN I promise!

Below I have a mini tutorial for you. I paired the beautiful stamps with these sentiment stamps from Simons Says Stamp. I LOVE the size of the sentiments and felt they would stand out nicely on my cards. Since my background is somewhat busy I used two layers of this heavy weight vellum. Here are two more cards I created with the sentiment set from Simon Says Stamp and here is one of my favorite cards with another altered background.

After coloring my background with some Copic markers I cut around the stamp and inside the stamp in a few spots. I proceeded to add some highlights with a white colored pencil. Can you believe that I actually put my gel pen down?? lol

Dimension and I go hand in hand so out with the Enamel Accents. Don’t worry if a few of the enamel accents run together…what flower is perfect right? Hold the bottle STRAIGHT upside down and work quickly so you don’t get a large blog of black dots on your flowers centers. I suggest that you practice on some scrap paper until you feel confident. 🙂

What do you think? Don’t these flowers looks beautiful cut apart … because the design is so good I believe. I added white Enamel Accents to the small flowers.


 |
 |
 |
|
 |
|
|
|
|
 |
 |
 |
 |
 |
 |
 |
 |
 |
 |
 |
 |
 |
 |
 |
 |
 |
 Wreath Cards
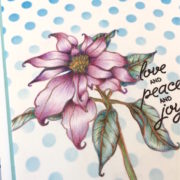 Backgrounds, BD Hop & Video
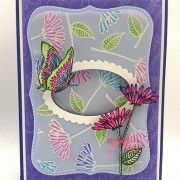 Watercoloring on Vellum with Tombow Markers


Wow, love how you did this! At first, i thought these were both two different stamps from a set. Will be looking at my background stamps differently now!
Really a great use of this background stamp – love the cutout areas between the flowers!
fabulous Kathy. Thanks for the mini tutorial
This looks awesome Kathy, really awesome work. Thanks soo much.
So beautiful! I love the florals and how you saw to cut the apart. That background stamps is so lovely the way you colored it. I have to dig out my enamel accents as I haven’t used them in a while and I am thinking the would look great also on dark red poppies! Thanks for the inspiration!
Clever idea. Beautiful work!
Awesome job Kathy! Love your coloring, especially the blue border!!
just amazing. the shading if so pretty. I just noticed the shadow around the whole cut out piece too. wow!
Geez I’m glad I follow you! Stamp, color and divide it up…clever. And oh so beautiful. Love those backgrounds too. I should learn how to use my copics, you’re so inspiring!
Laura
Sensational card. Enjoyed the tutorial.
I’ll be playing with the black enamel today.
Your card is really beautiful! Love that stamp. Thank you for the tutorial!
Pam
scrap-n-sewgranny.blogspot.com
These are gorgeous cards. The coloring, as always, is amazing.
Oh, Kathy, these are gorgeous! LOVE the colors you chose!
Oh wow!! These are so so gorgeous!!!
Lovely the enamel accents in the flower centres, such beautiful colouring Sista!
Stunning!!! Your art work is gorgeous! Love the coloring on the flowers and the background stamp. Love the idea of coloring in the background! Beautiful shading with the white pencil too!
WOW!Very pretty,Love your coloring…
The accents do add a lot. Nice
Wow…these are amazing! I don’t know that I have the patience for it–but you did an amazing job!!! 🙂
Brilliant idea & so effective with your colouring of the Indian Wheel background. The softness of the white pencil has really given dimension & I love your use of the enamel accents for the flower-centres.
Paula (PEP)
Absolutely brilliant! Thanks for the inspiration Kathy!
Lovely!
wow!
Fabulous – thanks for sharing this great technique
So very rich – what yummy colors! Thanks for the wonderful lesson. Glorious!
A Masterpiece! Wow!