Hello Friends, How are you? I really miss your daily visits and posting on a daily basis. With that said it’s nice to recharge too. We just got back from the Bahamas and it was nice to sit, read a book and really chill. I edited a video for today’s post but, didn’t realize I wouldn’t have wifi and was unable to do my voice over on vacation. Big boo on that.
![]()
Inspire Me Monday’s on the Power Poppy blog are always informative and inspiring. Today it’s an honor to be a guest on their blog for the Inspire Me Monday feature.
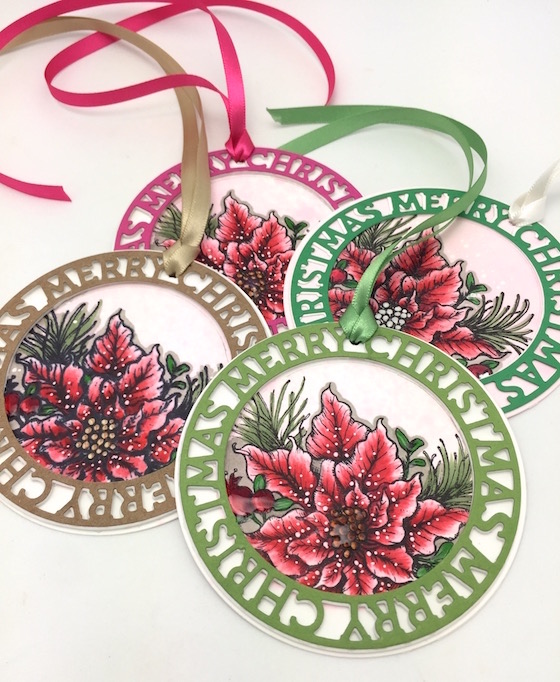
My tags today were inspired by Jennifer’s kindness campaign and I have more on that at the bottom of my post. For my gift tags I used Simon Says Stamp “Token Wafer Die” and cut off the beautiful snowflake. ( a great way to get more mileage out of your die cuts) I really wanted Power Poppy’s gorgeous poinsettia to take center stage on my tags and just wanted the sentiment to enhance the beautiful poinsettia.
In case you are wondering I am hooked on fun foam and used it to get lots of dimension on my tags.
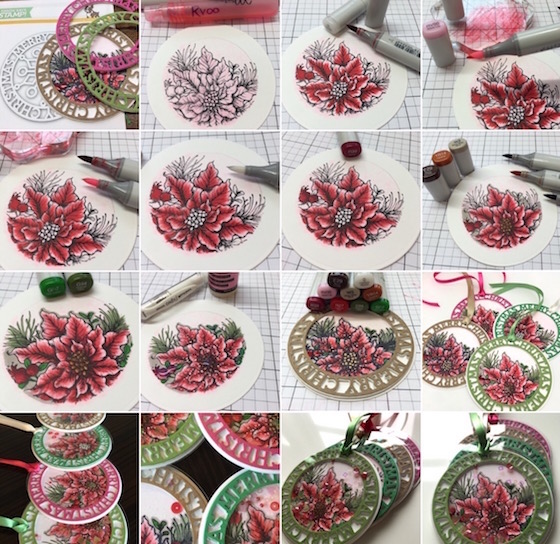
As you might imagine I have the full tutorial over on the Power Poppy blog. It takes me hours to do a post so I hope you will check it out. On their blog I share my big takeaway. (I shared my takeaway tip at the Mama Elephant BD party and Simon Says Stamp create event and it was so rewarding to see everyones mouth drop open BECAUSE IT’S SO EASY AND A NO BRAINER. ) It’s a great way to mass produce for the kindness campaign or for holiday cards or whatever floats your boat.
All you need is one of these in any color and a mini mister. Are you curious? Hope on over to the Power Poppy blog here.
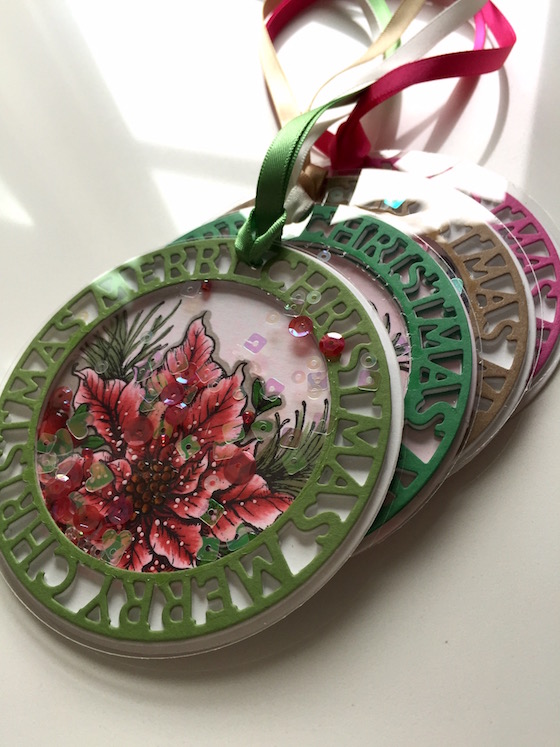
Once I finished everything I thought hey I could turn these into shaker tags. I used Lucy’s beautiful beautiful sequin mix.
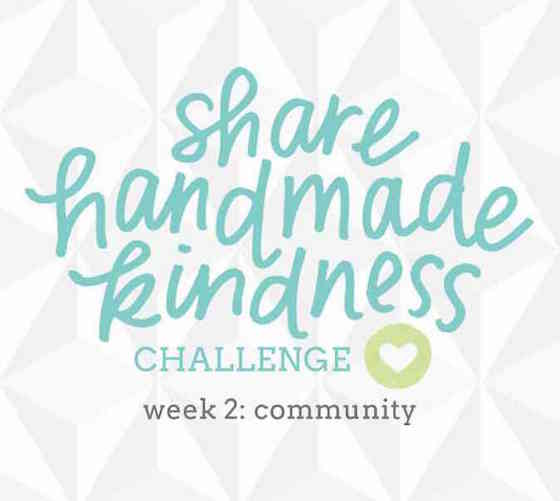
I just have to give a shout out to Jennifer McGuire and her kindness campaign. With everything going on in Paris I can’t think of a better way to refocus my mind. She is in Week 2 of the Share Handmade Kindness Challenge… focused on giving to those who serve or work in our community. There is still time to participate and she has so many giveaways it’s crazy!
MY GIVEWAY: I am giving away a Simon Says Stamp die cut plus a goodie bag. Just leave me a comment on my blog and tell me if you liked my takeaway idea on the Power Poppy Blog. I will announce a random winner next Monday.
I always say it and I always mean it… always so grateful for your visit. Have a good start to the week. Hugs, Kathy
Today’s Card Supplies & Links: Click on the thumbnail to go to a store. Affiliate linking might be used depending on the product.


 zentangle plus weekend flash sale
 Video-watercoloring w/distress ink
 Day 16. Five Giveaways!


First I want to say your tags are terrific! you take away idea is interesting but I don’t have any alcohol pens so wouldn’t work easy for me.
stamping sue
http://stampingsueinconnecticut.blogspot.com/
You can try other solutions in a mister and see what you create. Have fun experimenting. 🙂
These tags are beautiful!!! Love the idea of using the mini mister to add a base layer of color! Saves time and adds a beautiful light colored background!!
I love your tags! They would really add some gorgeous ornamentation to a gift. I think your idea on the Power Poppy blog is great. I plan to try it using my spritzer for alcohol markers rather than the liquid ink. Hopefully, using my spritzer will work just as well. Thanks for the idea!
Have fun experimenting! 🙂
These little tags/ornaments are fantastic! The coloring really makes this cool stamp pop! I definitely like it! Thanks for the giveaway! <3
They are exceptionally beautiful tags! I want both the die and e stamp set.
Sweet tags!! Beautiful and I love the shaker element!! Awesome tip- cant wait to try it!
These are gorgeous!!
The coloring on these is amazing, Kathy, and I I love that you made them into shakers, so so pretty!! Love the technique you shared on the Power Poppy blog 🙂
Oh wow, I love your takeaway idea—just beautiful!
Thanks for generosity!
Love your creative idea with these shaker tags, beautiful work as always!!!
OMG I think these tags are the most beautiful thing I have ever seen! I was fortunate enough to see you demonstrate in person at the Mama Elephant party, but will be sure to check out your technique again now.
Beautiful Tags Kathy! Love the idea that you gave on the Power Poppy Blog. I will have to give it a try!
Beautifully done! I haven’t done much with misting, but this sure seems like a great time-saver when making multiples, like at Christmas! Thanks for the fun idea!
Love your tags! They are beautiful! I have to try that idea. I have seen those mini misters at the store, and have almost bought them several times.
Also try filling a mini mister with just water and spritz onto distress inks. Cool result. Play with spritzing from different heights and also how many times you spritz. See what you like. 🙂
They are fabulous for small amounts of misting! I’ve used mine with watercolour paints and other things I just want a small amount of. Colours you might not want a full bottle of.
Very nice tags, beautiful colors, and thank you for shoowing us the technique!!
A new way to use those markers! Also fast for making many tags. Great idea.
LOVE your tags, and your great idea! Just out of curiosity, when you use the re-inker spray does it make your paper wet, or does the alcohol base keep the paper from warping? I don’t have any re-inkers, but am wondering what would happen if I tried spraying on a watercolor solution instead of brushing it on. Maybe the very light mist of color would give a different effect? Anyway, you always give me ideas and keep that mojo going! Thanks and Love You! 🙂
Play and experiment. You’re going for a mist of color so the paper shouldn’t get to wet. Also try spritzing different distances away from your paper. Alcoholsolutions dry quickly. 🙂
I went to Power Poppy, experienced breath-taken-away awe at your tags, delighted in your misting/colouring techniques, and have returned to say: Stunning tags that are gifts in and of themselves! You’ve highlighted the beauty of the poinsettias wonderfully with your outstanding colouring. Truly and absolutely beautiful
~c
Beautiful tags. Great take away tip. I have to try my misters. TFS Big hugs, Kristina
These tags look great. I also had a look at the Power poppy blog and checked out your tutorial. Thank you very much for posting it. It’s very clear and easy to follow. Love the idea how you used that colour from the copic refil. 🙂 xx
Beautiful tags and beautiful flowers
I love your idea. You always have a great blog to check out. Thanks for a chance to win too. Jennifer has really started something I think!!
I love these tags! Great ideas too. Thanks for sharing your step by step tutorial. Will have to bring out y sprays and experiment with them.
Beautiful tags Kathy! Love the idea of putting alcohol based inks in the mister. I’ll need to give this a try!
WOW KATHY!!! I LOOOOVE that die!!!! More to add to my Christmas list! 😉 Your coloring just makes those flowers POP off the page! GORGEOUS WORK!!!!
Glad you had some time to rest & relax! 😉 Take care!
Tags are awesome! Love the entire poinsettia stampset from Power Poppy and the Merry Christmas circle is really fun, too. Gotta think about the misting of the first color layer, I don’t mind coloring all of my layers.
I NEVER would have thought of pouring my Copic refill into a mini-mister to use as a spray. Does the alcohol interact with the plastic if you leave it in there for a long time? Do you pout the refill back into the container when you’re finished (or is that even possible)? Thanks for the cute tag idea and the giveaway!
I haven’t had any issues leaving the copic refill ink in my mister. Just remember to label it with your color for the next time. Putting it back into the refill could be quite the challenge. Start with a small amount in your mister. You don’t need much. 🙂
Just love your tags but when they are made into shakers you really hit it out of the field! What a lovely idea for any time of the year but great for ornaments/tags/cards! Thanks for sharing!
what a beautiful project! Your tip is a good one, except I don’t have any Copics! I love the looks you can achieve, but I am too rookie and still collecting what I consider to be more basic tools (dies, stamps, ink pads.!) I just started this addiction this time last year, so I have a lot of skills still to develop and toys to buy. You make it look so easy, and I love how you share what you know. All that and a chance to win something!!! WOW, you’re amazing!
I love techniques and this is a dandy one. I can hardly wait to try it. The tag is faboo and since I love making gift tags, I’m going to be having a go at this one. Thanks for the inspiration, Kathy!
I love your shaker ornaments. Yes I DID like your Take Away tip. Using the mister like that was a great idea.
These shaker tags are magnificent!! I love poinsettias and shake cards so combining the two is awesome!!!!
Great takeaway!!! You are GENIUS!!!! TFS!
Love this card ! Great takeaway idea! Wonderful directions and inspiration!
These are so beautiful. I love them. I hope you don’t mind but I HAVE to CASE these. Such an inspiration. Thank you so much for sharing.
I loved your takeaway idea! Your tags are absolutely gorgeous and after reading how you did it, I feel like I can make one. Love the foam on the back. Great idea for an ornament to enjoy for years. The flower stamp from Power of Poppy is so gorgeous.
You know what, you’re brilliant. What a fantastic idea. It looks so good on these gorgeous tags, I’m getting my mini-mister and ink refill out and trying it right now.
Kathy,
As always, your coloring is beautiful! The tags are so creative and your Copic spray idea so ingenious! Thank you for sharing your time and talent. It is much appreciated.
Beautiful little tags you’ve made with this altered SSS die! I love them! You’ve encouraged me to give my foam and adhesive a go soon, I’ve never made a shaker card what am I waiting for? Christmas? Have a wonderful Thanksgiving Kathy!
Loved both the spray tip and the blending technique!
Great idea and tutorial, Kathy. Any way to get quick color down is a great technique! The tags are fantastic, too. Thanks for the giveaway and inspiration.
Your takeaway idea is fabulous and so are your tags. They are beautiful!
Kathy, I love your ideas for these tags. First of all, they are truly unique and the combination of the two really stretches each. Secondly, they are so cute!
Love this tags and how you created them.
the take away idea is great especially if you know what you are doing and you use it like a champ. your tag is beautiful as always and you inspire me to continue learning
Gorgeous tags Kathy, I’m so glad that you had a wonderful trip. I’m headed over to the Power Poppy blog to see your tip and video.
these are beautiful
ADORE these tags, been salivating over them since I saw them on Instagram – that’s okay, my screen wipes off. HA HA!
Thanks for the in-depth blog post at Power Poppy; your work is endlessly amazing and breathtaking. Thank you for sharing your talents with us!!
Your shaker tags are awesome! Beautiful spray tip and fab look!
Awesome tip. I would never have thought to spritz with alcohol reinker. Thanks for the great tip!!!
Love your tags and when you turned them into shakers….WOW! Great job TFS
I love these! Just when I thought I had enough pointsettia stamps, I feel I need another!
My Dad grew pointsettias every year, we owned a nursery and florist. They hold a special place in my heart. Thanks so much for sharing.
Unbelievably cool tags! You did a great job coloring those magnificent flowers! Thanks for sharing your kindness with us!
Oh great idea making a mister with the refill ink! I bet you could make matching paper for your Copics if you couldn’t find one. Or even tint an envelope perhaps. Love the soft background and all over colouring start it gave your tags! Super smart!
Great ideas. Try it and have fun seeing what happens. 🙂
Your takeaway idea is wonderful! Just wished you had wifi so I can watch it in action. Thanks for sharing!
Gorgeous tags and I love
your tip about putting the
ink in a misty bottle!
Carla from Utah
LOVE your gorgeous tags, and your quick tip takeaway is brilliant! Anything to make mass producing quicker is awesome and I love the soft look of the spray of reinker. Thanks for an awesome tutorial.
Love the idea of craft table at Thanksgiving to get whole family involved!
The mister idea is neat too!
These are so pretty! I have a couple of questions; do the sequins stick to the glossy accents, and, is the fun foam a particular brand from Michaels? Some of the foam I’ve tried gets “mishapen” or”squished out” when I die cut it, but not always. ( I don’t know what brands I was using. They were just what I had in my stash.) Thanks!
I use glossy accents for everything. It is my go to adhesive. I just got the Michaels brand of foam. SSS also sells foam. The foam is great for easy dimension. 🙂
Gorgeous tags and Brilliant idea! Love the idea of using the mister and the copic refills ♥
Beautiful coloring! Love the skip-a-step tip, will come in handy when mass producing cards. TFS!
I left some love for you over on the Power Poppy post~ I really meant it when I said “FANTASTIC”! Yes, all in caps. You are so talented and so sweet.
All my Mini Misters are filled with Distress refill, water and sometimes a ‘lil scoop of Perfect Pearl bling. I’m going to use your technique when I water color, since I don’t have Copics or other alcohol markers.
Have a great day~ hugs!
Hey Kathy, thanks for the post and for the take away. I’ve avoided getting into Copics like the plague because I already own so much paper crafting stuff! Seems like a good idea though.
Warning copics are very addicting. It is an investment but you can always refill them. Copics are definately a favorite of mine. 🙂
Stunning tags and a brilliant idea to make the spray
Totally awesome! Jo x
Brilliant idea! That first “splash” of color really starts the ball rolling, doesn’t it!
They are so gorgeous!!! Yes I love your idea on the takeaway!!
Such a cool trick 🙂 I don’t have any Copics or refills, but I have to keep this in mind for when I do 🙂
The tags turned out awesome and I love the poinsettia stamp so much.
Why do all of these other people get here sooner than I do. Always at the tail end. lol On my way to Power poppy right now. Love the tags but miss the snowflakes.
These poinsettia tags are awesome; can see ways to do this for other holidays/occasions. Poinsettia is one of my favorite holiday stamp images. Thanks for the chance to win your prize. I, also, commend Jennifer for her “Share the Kindness” campaign.
I {heart} tags and yours are GORGEOUS! Loving that beautiful poinsettia! Welcome back to the real world…..sigh…..
I love how you used that die cut to house your stamp.
I love the poinsettias. The colors are so rich and the white dots are a perfect touch.
Fabulous takeaway idea on the Power Poppy Blog! Your tags are gorgeous!!!
What a WONDERFUL idea!! Perfect for mass production and you lit my head for some other products as well!! Thanks Kathy, these are the MOST BEAUTIFUL tags I’ve seen so far!!!
I LOVE this take-away. I think I will try it with a Ranger alcohol ink to see if I can get a similar result. Also, I’d love to see a video of this technique to be sure I understood all the steps. Thanks!!
You should have success and just a water spritz over a layer of distress ink will work too. You can always dab extra off with a rag. Experiment and have fun. 🙂
That is such a fantastic tip!! And what a time saver! I’m thinking you could also make sprays for doing watercolor projects too – I definitely need to try this! Thank you for sharing!
It’s a great takeaway idea! Anything that skips a step/saves time and still looks great is good with me!
I really like your tags. I love poinsettias so much and these are beautiful. I like your take away. I am going to have to bring out my mini mister.
Kathy — These tags are STUNNING! Love them and think they are amazing..but then again, nothing you ever create is another but superb! Hugs
This is gorgeous, Kathy!! I have left you a comment on Power Poppy blog too. I love your idea and would love too see it in action. Thanks for the giveaway also.
Brilliant tags Kathy, off to check out your post over at Power Poppy. Hope you had a great holiday.
I loved your idea at Mama Elephant and still do! Such an easy and quick way to get a fabulous base coat down. Gorgeous shaker tags!
Your tags are just stunning!! A piece of art. I enjoyed seeing your takeaway tip in person at Simon Says Create and glad to see it again. Thanks!
These tags are super pretty!! The colouring is without a doubt superb!! I adore how you stretch the die, thanks for sharing Kathy!
Terrific post on Power Poppy. I’m sure the takeaway idea is a big help to the “Copic girls” but not for me. I guess you could adapt the idea to other mediums like water color though. Great tags, Kathy.
You certainly can. Have fun experimenting. 🙂
I do like the foam under my stamp items. As always, your tags are so wonderful. I really want to say when one mentions kindness and blogs, your name is fist on my mind. Thanks
Thak you for your kind words. Hugs 🙂
Love your beautiful tags. The takeaway idea about spraying is awesome. I can’t wait to try it myself!
I do like your takeaway idea although I don’t have any Copic refills. I do have Copics although rarely use them but I am fascinated at how you color with them! Maybe time to take them out again!!! Thanks for all you share – love watching you bring things to life!!
Take those copics out! Copics should never get dusty. LOL 🙂
Oh, wow! I loved your take away over on the Power Poppy blog! I absolutly have to give this a try….
Oh, Kathy, you are so amazing, and I totally love this tag and how you’ve used the mister with the blender solution and a reinker. It’s brilliant, and I love the idea. And using this beautiful poinsettia set from Power Poppy in this beautiful die is gorgeous. And I would love to see a video of this. Hugs!
Your Takeaway is genius! It eliminates that first step of just saturating the paper with Copic!
Beautiful tags! Your takeaway idea sure would save much time–will certainly give it a try. Thanks!
Your tags are beautiful, and yes, I would like to see a video. I liked your takeaway tip. I am going to give it a try. TFS
Very pretty tags and love the tip about the copic ink and mister. Thanks for sharing.
Yes on a video, you have so much to teach us and I myself have so much to learn. Love these tags and would like to see how that copy paper part works I don’t quite understand. Thanks again and you need to get a very very large suitcase and stuff me in it when you go on these awesome vacations.
Cute tags! And yes, I like your idea of spraying your backgrounds. Neat idea. Thanks for the chance to win. 🙂
I love that idea of spraying the base. How brilliant! Anything I can learn using Copics is wonderful. Your tags are gorgeou!
your tags are gorgeous! I confess i don’t use my copics enough to have any refills but using mists as a base color in general is a great tip!
Gorgeous tags! I love the tip for using the refill ink and mini mister for a base coat. Great idea, especially if you want to make a bunch of a design.
I love your tip. Sometimes I use airbrushing that way but I hadn’t thought to try spritzing!
Beautiful tags! Thank you for the chance to win.
Of course I liked your take away idea – I like ALL your ideas! lol And I always love your posts (sorry they take so long!) & appreciate them very much. These tags/ornaments are adorable – love the poinsettia (we always have a red, a pink & a white at Christmas).
I will definitely have to try that misting technique! I need a quick idea for mass production. 😀 Thanks for a chance to win, too.
These tags look beautiful! I love the die you used to create these tags. Of course, your coloring job is perfecto. Your takeaway idea of adding color with a spray is fabulous. I can see how it would save a lot of time and still have the results come out so great. This is a great technique and I see myself using this quite often. Thank you for the inspiration…and thank you for the chance at winning this giveaway. I really want that die after seeing your tags.
Oh are these tags beautiful! I love how you cut out the inside die design to turn these into frames for your gorgeous poinsettias! These would look so beautiful hanging on a small tree wouldn’t they?!
Great Tutorial over on the Power Poppy blog!
Neat Takeaway idea to get an even base coat, Thanks!
and I will have to try to fun foam!
Hi Kathy! I love everything you do!
I love your tags. I am just learning how to use Copics and your tutorial is very helpful! I haven’t seen your takeaway idea before so that was very interesting. Thanks so much.
Great takeaway idea…and these tags are gorgeous!!!!
This is just simply a stunning project! I also did not know I could die cut with fun foam and am off to see if I can find out more about how to do this!
Foam is a great layer for all over dimension for words and a your card base. Do give a try. 🙂
Love your tags. They are so cute.
Thanks for sharing the tip about the mister spray…great idea!
Those tags are amazing. I don’t have many alcohol ink re inkers, but I have tried doing this with other re inkers. It is a quick way to color things.
Gorgeous tags and great takeaway idea. I have markers but no refills.
Try a spritz of water over a layer of distress inks if you have them. Experiment with what you have that is spritzable. 🙂
Love the tags could you use any reinkers or do they have to be alcohol since I don’t have any alcohol ones.
Try a spritz of water over a layer of distress inks if you have them. Experiment with what you have that is spritzable. It doesn’t have to be a alcohol base.
They look like they took hours and hours to make, yet they didn’t! I love this idea. Thank you so much!
What great tags. I love this idea. Thanks for sharing
Yes. I really liked your tip, but I would also like to see how you did it! Thanks! 🙂
What beautiful tags! Like the shaker version as well. Great idea on the background mist. However, since I don’t have any alcohol markers it won’t work for me. I’ve used dye ink re-inkers to make mists though.
That works too.Try a spritz of water over a layer of distress inks if you have them. Experiment with what you have that is spritzable. It doesn’t have to be a alcohol base.
Beautiful tags. Love how you made them, and thank you for taking the time for writing out a tutorial. I especially love the shaker. ♥
DELIGHTFUL tags Kathy!!!
LOVE your circle sentiments and GORGEOUS poinsettias – your colouring skills ALWAYS AMAZE me!!!
THANK YOU for sharing your CREATIVE INSPIRATION and TOP TIPS!!!
YES, I think your takeaways are FABULOUS – I have TWO COOL new things to try, the foam one I can use straight away as I have dies & foam, the colouring one is for another day, when I get some alcohol markers, hoping Santa puts me on his nice list 🙂
PS – I LOVE poinsettias and have so many PRECIOUS memories of my Grandma, Mother and Mother-In-Law associated with them … it’s time for me to get some to more!!!
You are always so nice so Santa should get you what you want! 🙂
THANK YOU Kathy – that is extra special coming from YOU!!!
Update on the poinsettias (the real ones) – we’re going to get some this weekend and I can’t wait 🙂
I do love the mini mister idea. I really love your tags. So beautiful and colorful. They would make perfect shakers…great idea. Thanks so much for your great ideas and perfect coloring.
I love that you did the Power Poppy blog. I get their e-mail’s all the time and I saw your name and I said “Don’t I know her”? I went onto the site and it was you! Surprise, surprise! Your tags are amazing! I love them! You always do such nice work. I’ll have to check out the site again. Wow, you guys all seem to get around! LOL
Love your idea – I am not a great colorer and your idea of using the mister to add the base color is spectacular !! Beautiful tags and yes, fun foam is very useful !
I forgot to say that I love your idea of spraying with alcohol inks to give it that base color!
Lovely tags.
You ROCK.
So many wonderful ideas! my head is buzzing with cutting sentiments with fun foam, skipping a step with copic refill in mini mister, adding gray around petals and crannies to add dimension. ….. thank you, thank you, thank you!!!
Ohh these are absolutely fabulous! Loved your idea for adding colour using the mini mister … but I don’t have any marker refills 🙁
Try a spritz of water over a layer of distress inks if you have them. Experiment with what you have that is spritzable. It doesn’t have to be a alcohol base.
ALL I CAN SAY IS WOW KATHY! THE TAGS ARE BEAUTIFUL! LOVED YOUR TIPS ON THE POWER POPPY BLOG!
I just love the tags. I love making tags, and I have the poinsettia stamp,, which I also love. So it’s a love fest! Thanks for the inspiration.
So pretty are your tags x
These tags are fantastic Kathy and your take away is a great idea. I never thought of spraying with Copic refills. Love it!
Oh, Kathy… these are so pretty. Love the coloring. The shading is beautiful. Love the technique with the mister. What adhesive do you use with the fun foam? I’ve used it couple of times, but I had a hard time gluing the foam to the cardstock…
A heavy duty double sided tape works well. Check out SSS. They have rolls in different widths.
That is a great idea. I don’t use copics, but I am sure you could do the same thing with water based coloring, but there would be extra time for drying.
The idea is a mist/very light spritz so your paper shouldn’t get that wet. You can always use your heat gun to speed things up. 🙂
I love your takeaway idea. I also love your videos. I personally believe the unedited versions come out the best. Wishing you a fun relaxing time on your vacation.
I think that’s a great idea! I already have a mini mister filled with blending solution for Copic techniques… which is a tip I picked up from Cindy Lawrence, my Copic instructor (& Power Poppy Designer). 🙂
Your tags are beautiful…I shall have to try your awesome tip…Thanks so much…!!
These are absolutely gorgeous Kathy! And yes, that is a great no-brainer that never occurred to me- thanks for the idea.
Absolutely gorgeous! I love shakers! Heading over to check out your tut!
Those tags are so beautiful Kathy, so great that you could hang them on a Xmas tree! And spraying with Copic refill solution?? Thats such a cool idea and certainly would cut down on the colouring time. I bet the Bahama’s were so beautiful and hope you got the rest you deserved!!
Fabulous tags. Yes do love the idea.
These tags are so pretty, Kathy. Love your takeaway idea, but of course it will only work if you have any refills, which I don’t.
Marianne x
Try a spritz of water over a layer of distress inks if you have them. Experiment with what you have that is spritzable. It doesn’t have to be a alcohol base.
How have I lived without all of your clever ideas! Love your tutorial and being a subscriber to your blog! I get the news right away! Thank you for the chance to win and for the heads up about the idea!
I loved your takeaway…you are a wealth of information. I left you more comments on the other site, but GREAT JOB!!!!
P.S. I do love using the fun foam for adding dimension. Have you ever used a product called Stick It for adhereing your die cuts together or onto your card or both? It’s wonderful, especially for die cuts that are intricate and you can use it on the back of the cardstock die cut to adhere it to your fun foam and/or on the back of your fun foam if you use the foam that isn’t adhesive backed. Not as messy as glue and it’s repositionable. But, you probably already know this…LOL There’s a You Tube video on it.
Thanks. I have used it but using foam is a new thing for me and I’m having fun with it. Thanks for sharing. 🙂
Not only like it, but LOVE IT! Your idea is brilliant! These tags are gorgeou, Kathy! Thank you for sharing the steps! Always admire your coloring technique 🙂
I love these tags and would love a video on these I am a visual person
That is an interesting idea. I tried a mister before, but I think because it was not intended for craft, it misted a bit too much water. I will have to try again, with a proper mister sometime!
I love all of your ideas! Your tags are fantastic! Thank you for the wonderful giveaway.
Erin
ErinLoves2Run at gmail dot com
I saw these Tags on Power Poppy! They are gorgeous, Kathy! Do you mean, the make and takes for your Thanksgiving? I think it’s a very fun idea. I don’t think there would be time at my house. LOL
SQUEAL!! I LOVE LOVE LOVE this Tip and I CAN’T WAIT to TRY!!?? I LOVE that you shared too!! =) THANKS and have a FABULOUS WEEK!! =)
I have never made a shaker tag so this sounds great and I could use them at Christmas. Wonderful job. Thanks for sharing.
Your tags are so beautiful. The stamp .set is lovely, too. I like your idea, I don’t have Copics, but will remember the tip. Thanks very much for a chance to win. Michelle t
Try a spritz of water over a layer of distress inks if you have them. Experiment with what you have that is spritzable. It doesn’t have to be a alcohol base.
LOVE your gorgeous tags! I’m going to give that technique a try.
I just love these gorgeous tags and have to try them. they are such a great gift idea. The take away tip Awesome !! what a great way to cut down on the coloring steps
_ Love it
These tags are the bomb! I think they’d look great on a tree, too. Great job!
Wow you colored that pointsettia so beautifully love the mister idea and those tags marvelously beautiful. 🙂 glad you had a relaxing vacation
I really like these. Very nice color combos.
Love your tags & your coloring tips: skip a step when coloring by adding color with a spray
I love these tags and the techniques, which I can use for everything! Thanks!
Kathy, I like your take away idea and would love to see a video using it. Thank you for the beautiful creations and new ideas.
Like the idea of using the inks in a mister. I have the Craftwell system but haven’t used it. Using the mister would be so much easier and faster.
The poinsettias are beautiful.
thanks
Wow, Kathy, the beauty of this blows my mind!! I also loved the spraying, but I don’t own any reinkers yet. Maybe someday. 🙂
Try a spritz of water over a layer of distress inks if you have them. Experiment with what you have that is spritzable. It doesn’t have to be a alcohol base.
Thanks for answering to my comment and the additional tip! Have a great weekend!
I love your idea… if you left the snowflake, you could spritz different colors of blue at different levels to get a neat speckled pattern.
Amazing as always 😀
AWESOME! Love these tags. Such great ideas!
I don’t have reinkers for my SN markers but that’s a fun tip!
Love these tags, what a great die! Your tip is wonderful! Can’t wait to try it out!
Your tags are wonderful. Thanks for sharing them and the fun technique.
Crafty hugs,
Dawn
DesignsbyDragonfly.blogspot
Very neat takeaway idea…will have to try with another medium since I don’t have the same products. Beautiful tags…just got hooked on craft foam too! Happy Thanksgiving!
Love your take away idea and your tags are stunning. Thanks for sharing.