
Hey! Where has this month gone? I feel like I need an extension and I am not quite ready for the 30 days to end! Eek! I still have to finish up that video and I want to make another one. Today we are talking backgrounds! One of my favorite things to do is stamp a background.
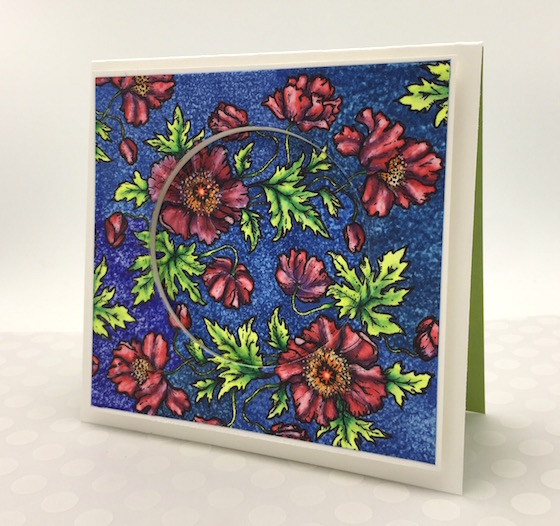
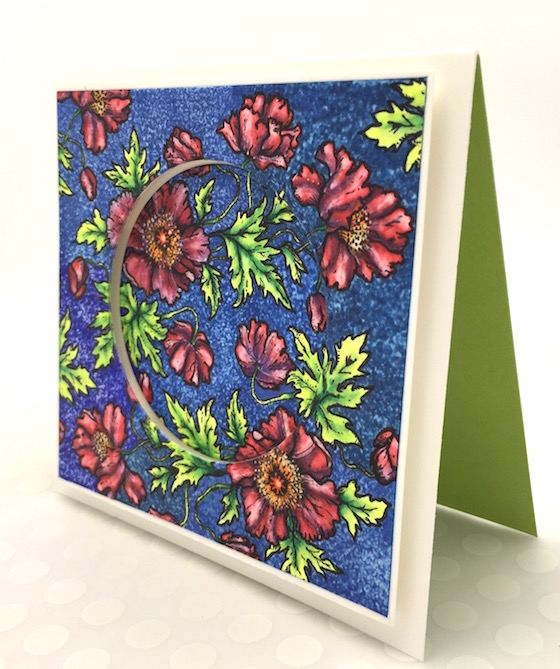
I feel like I have made several cards with circles during the challenge but, they add a lot to a card and it’s quick and easy. When I said that the stitched circles would come in handy I wasn’t kidding. 🙂 After coloring the background I die cut a circle and added foam tape to the back of the negative..or is it the positive part?
This stamp is from the same stamp set as yesterday from Power Poppy. If you missed it click here and you will find a giveaway too.
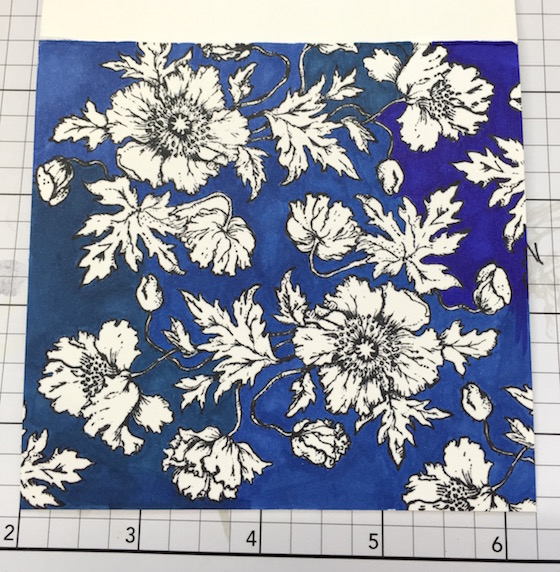
After creating a background with the stamps I colored it with four different random blues.
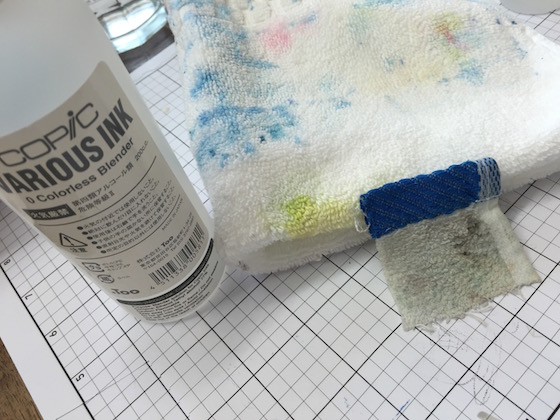
I have a dirty looking rag that I have used for years … it’s with the blue edge. You can use a towel or a rag with some pile in it. The more pile or nib to your rag the more texture you will get from it. Try some denim and other textures to see what works best for you.
Add some various ink colorless blending solution BUT don’t saturate it just nice and damp. (Put the lid back on the solution right away.) If you don’t want a large bottle and just want to try this you could start with the refill for the markers (it’s smaller)
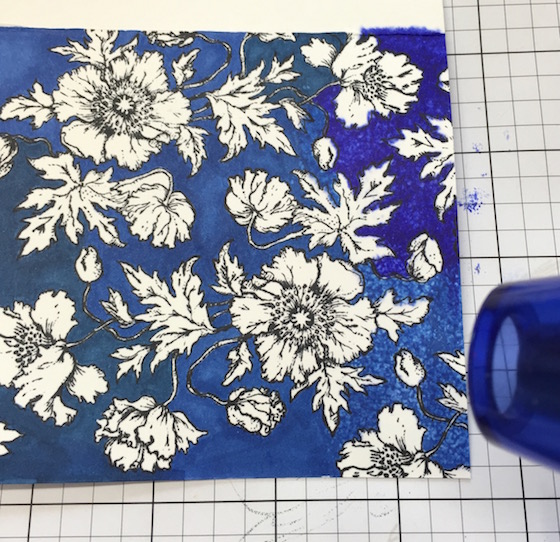
Dab the rag directly on to your project. I think my rag was to wet when I did the top right corner so the color spread out. You want to work in sections and after dabbing each section use a heat gun to dry the section. Then move onto the next section.
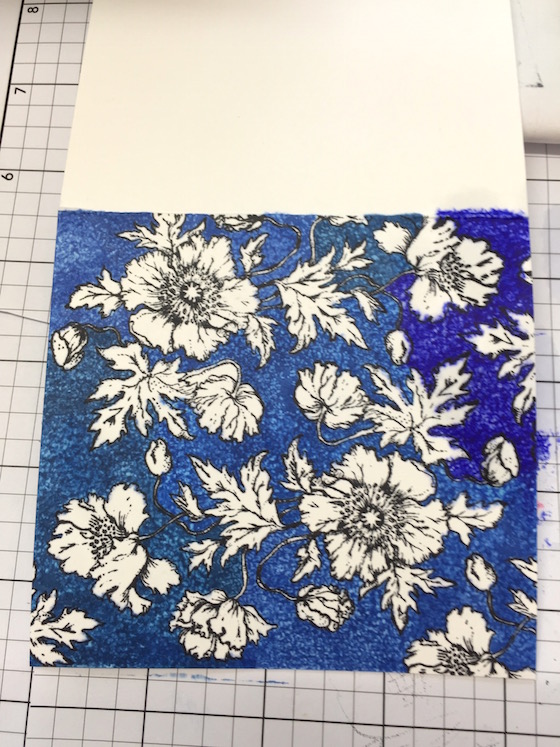
This is how it looks when it’s finished. The top right corner is a little to blue but, I proceeded anyway. In the final card it’s not that noticeable. Whew!
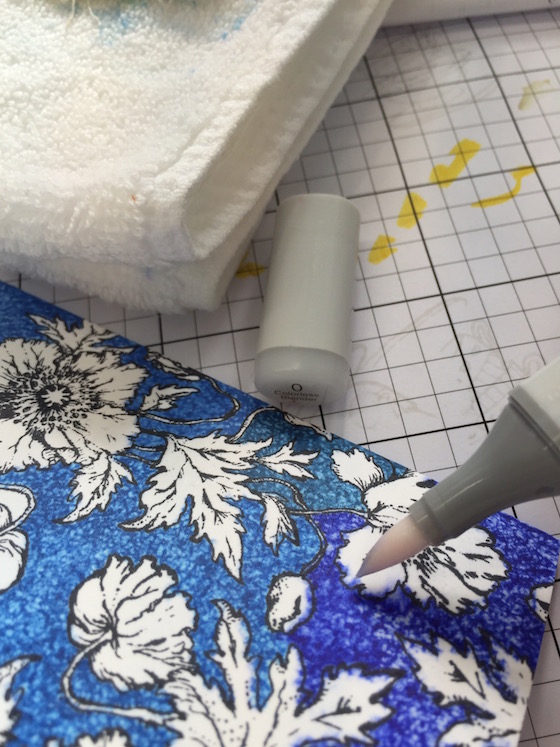
When you are finished you can use your “0” marker (it’s the same fluid) to push the color out of the areas that you want to color.
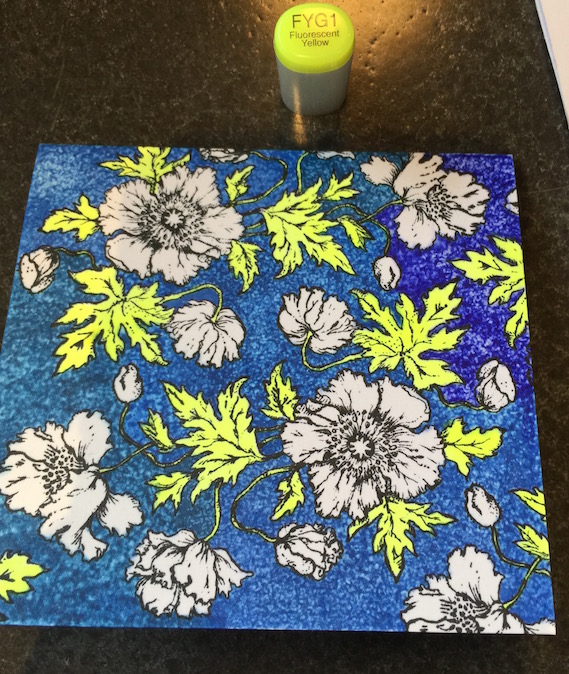
This FYG1 is a new favorite copic color.
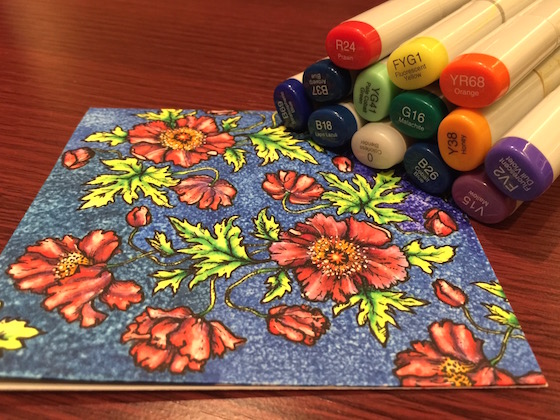
Here are all of the colors for you. I ended up spending way to much time messing with the flowers. Just coloring the poppy’s with a solid red probably would have looked great.
Then it’s just a matter of finishing off your card. Sorry for the inconsistencies of the photos I was moving all over today from porch, kitchen, family room and finally craft room. Yes way to much time coloring on this lol.
Off to bed to get some brain power so that I can end the challenge with something good for your guys on day 30. See you tomorrow. Hugs, Kathy
 Day 9. When You Mess Up Keep On Going
 Day 12. Dark Background
 Mama Elephant Stampede #celebrating6years


Kathy, what can we say mmmm. Perfect absolutely awesome. Glad you spent all that time adding colours to the poppies because this is going to be the most wonderful card that you will send someone. Love the new fluro (it keep replacing fluro with floor) green, and your background blue is so clever. I will have to try this. I am posting a day early on my 30 day challenge as I have to head back to mum and dad and don’t want to miss the end tomorrow. Its been sensational Kathy.
So artistic and beautiful. 😀 Thank you for sharing with us. 😀
The blue background is gorgeous, thanks for shRing
That’s an amazing set of stamps. What a ton of work you put into this. I think I would have died when it started to bleed onto the flowers while texturing the background but you take it in stride! No wonder you get such amazing results. Another fabulous one!
That blue background surely packs a punch, Kathy, and I love how it makes the light green of the leaves pop.
Marianne x
Beautiful flowers…love how you created the texture on the blue background.
Gorgeous Kathy!! TFS
Ahhh, this is SO PRETTY, Kathy!!
So beautiful!
I think it was worth all the time you spent coloring it because it’s stunning.
What a pretty background!
Such a cool technique! I love the textured look! Amazing
It is a beautiful card. Can you explain how you dabbed all the blue area with cloth, without getting any on the intricate flowers and stems???
Also I am confused about your saying you use colorless blending solution on the rag. Would that be after dabbing ink all over? Thank you!
Annie, I used the colorless blending solution which is the same solution in your 0 copic marker.After my background is colored (in this image it was the blues) I put just enough blending solution on my rag to make it damp not really wet. At this point I start dabbing the rag on the background ad there sometimes I need to fold the rag to get into small ares. You can aslo mask your image if you’re afraid you’ll get the solution on your image. I hope this helps. 🙂
Ok, thank you! I hadn’t understood that you colored the blue in with MARKERS and not your rag! Really pretty!
Kathy, BEAUTIFUL.. Love it. This time has flown by even faster than the first 30 days !!! I haven’t even posted any of my project’s yet. I colored every day but 1, but I don’t work like a lot of your ladies do. It is such great therapy for me. Happy coloring everyone.
What an AWESOME card Kathy! Did you use alcohol inks for the background? Or can you? I don’t have copics, been working with my distress and tombow markers, it’s been a challenge! LOL!
These colors just pop, and it is gorgeous. Your artistry is amazing! This technique is amazing, not sure I understand exactly how it was done. 🙂
Hi Kathy!
End with something good??!! ALL of your challenges are GREAT!! Wow what a beautiful card for day 29! The blue and green together are just stunning! Love those stitched circle dies, too.
Absolutely stunning card, Kathy, and what a gorgeous background for these beautiful poppies!! I love it! And thanks for your wonderful technique “class” today!! You rock!! Hugs!
Thankyou for another poppy card and tutorial am poppying along!
I just love the blue background and all the different ideas that you give us. And all the different cards made with the same stamp set….. Thanks so much.
There is no way this card was a waste of time. Wow. Tiz beautiful.
I really hate for this 30 days to end. It has been so wonderful to open my e-mail to a new and beautiful inspiration each day. Thankyou!
Lovely–I have a little piece of old wash cloth I use for texturing copics too–so fun! I need to find it, it’s been lost for awhile, under the pile that is supposed to be my desk! Sent you an IG message about the hair gel cards.
OMG Kathy, the background on this card is simply gorgeous!!!
I really like what you did. Like you, I have one of those rags too. It used to be an old towel that my mom cut up and I use to clean off all of my stamps. We have a bunch so I just borrowed one! I like how you did that with the towel but does it have to be a towel? I get why you used the towel but when I do something like you did, I need something smaller so I don’t color into all the areas I shouldn’t. I guess a Q-tip is out of the question. I don’t have any colorless blending solution but if I want to try this, I guess I have to get some.
I love all the colors and your technique with the towel. Something new for me to try! Thanks for showing me! I make and sell greeting cards. Do you know how much you could get for that card? Big bucks! LOL
Gail you could try some alchohol but not with a copic marker. I makeup QTip that is pointed will work, a tiny glue tipped applicator can work,any fabric with a nap, a piece of old jeans etc. Let imagination go. Hand sanitizer can work too. Do some practicing on scrap paper before you do a finished image.Hope this helps. 🙂
i so hate to just repeat myself and everyone else…but if I must…. AWESOME, BEAUTIFUL, GORGEOUS , ETC… WHAT WE ALWAYS SAY ABOUT YOUR WORK… This has been a fun challenge , even if I did fall behind…
Oh, no! Not solid red. I love the way you colored the poppies. Perfect.
This is absolutely magnificent! I am in total love with it! Really need to get these stamps! Stunning does not even begin to cover my thoughts on this card! LOVELOVELOVE it!
I really love that texture look with the various .These colors are soo popping for poppies,hehe.GREAT LOOK..IM SO GLAD IT DIDNT MESSAGE UP KATHY.
Nice card. I really like that bright blue background. Thanks for sharing.
Love this card and technique! Sorry this is all coming to an end!
Another lovely poppy card. Thanks so much for encouraging me to try Copics.
The effect is beautiful. I don’t know how you can top what you gave already done but I can’t wait to see . I am not ready for the series to end either. I have enjoyed it emmensly and learned much. Thank you Kathy. Xo
OH MY GOSH!!! that background and the poppy’s too were both spectacular. i’m going to get a piece of an old washcloth today. I keep forgetting who uses that and then I cant remember what they use it for. lol I do remember that I love it and want to try it. today is the day. i’m cutting the rag. my new craft furniture is coming tomorrow so I might not use it for a few days. i’m so excited. you are so sweet to take so much time to show us fabulous ideas. hugs, treen
Oh my, that is lovely. May I say gorgeous. Yes gorgeous. Hugz
Beautiful. I love how you make the back ground with the cloth. Is it terry cloth? It makes such a neat back ground. Love your coloring. The colors you chose are perfect. TFS
Love the poppies color today. Awesome art. Thanks
I wish I could see this one in person. It looks really cool.
GORGEOUS!!!
LOVE how you created the background, LOVE your colouring and LOVE how you popped the negative – such a COOL effect!!!
That’s a lot of ink, woman! You have such dedication to perfection, and I love it.
Thanks for this inspirational month of June. Your challenge pushed me to carve
out a bit of time each day to do art. Thanks for that.
Keep doing it Maureen!! Coloring is good for the soul and we all need to find time for ourselves. Thank you for your kind words. 🙂
Just have to say how I’ve thoroughly enjoyed seeing your wonderful creations each day. I’ve not been able to post any creations this time, but I have been colouring away in the background. Maybe next time, I’ll share what I do??? Thanks so much for the inspiration and encouragement to “have a go”. 🙂
Super idea and great technique! You’re a genius when it comes to coloring! 🙂
Hi Kathy! It’s Beautiful! Really reminds me of ceramics and the way the glazes motle (is that a word ?) in the kiln. I will definately try this.
I was going to try this background technique with watercolors and I forgot about it. My bad! Tomorrow is the day it’s going to happen. I’m so glad you posted this one. First it’s gorgeous and second it reminded me to try this with my watercolors. Thanks!
I finally had a bit of time to catch up with your 30 day challenge. Clean up from tornado is now awaiting the contractor’s to fix everything.
Hi Kathy, I like the way that has turned out, and those flowers really pop on that blue,
it must have taken quite some time, but the effect is lovely, also the card made from it, Cheers Anna.
Another beauty that blue really make the poppies stand out. I am now hooked on Poppy Power or power poppy could spends lots there so many pretties. Thank you Kathy this has been just as much fun as the first one:)
Roxy, Thanks so much for your kind words. Power Poppy is certainly a unique stamp company.I love them Many images to buy. Check out their Digis. 🙂
so pretty!
Stunning!
Absolutely gorgeous and stunning. I’m saying that without an exclamation point because I’m awed inwardly. Know what I mean? I wish I could sit down and do the same. I have to see if I have all the colors you used here. Again, beautiful.
Your background is beautiful. Thanks for sharing.
Crafty hugs,
Dawn
DesignsByDragonfly.blogspot
Beautiful! Love the blue background.
Hi, I love the rich colors you use. Thanks for the step by step images that show how you accomplished such a lovely image!
Laura