Hello Friends, Anything new happening in your neck of the world?? How was your weekend?
 |
| I have a quick share today with my final DAY FIVE of my vellum feature. If you are wondering what I am talking about you can catch up on DAY ONE here, Day Two, Day Three & Day Four. |
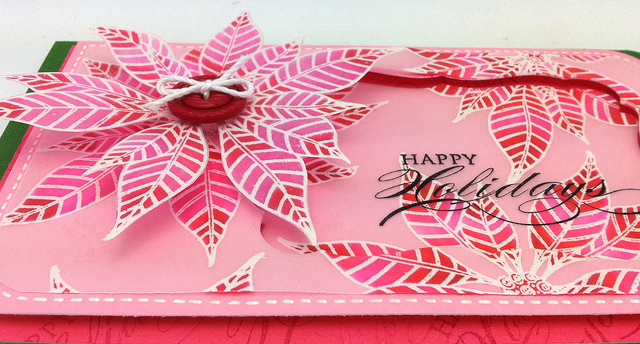 |
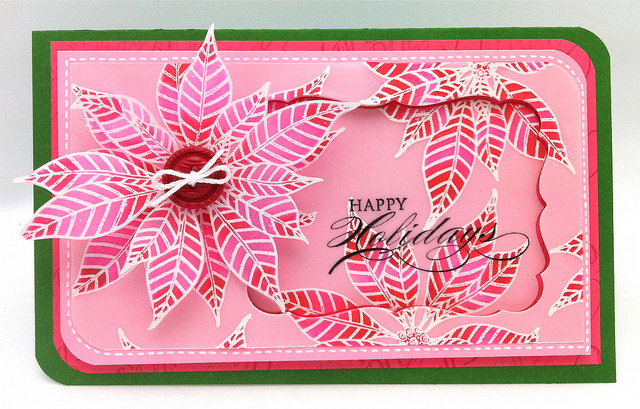
| Before I emboss on vellum I like to use this to reduce static and get a more crisp image. Stamp your flower in a random pattern on the vellum with Versa Mark ink. If you are stamping in a well lit area you will be able to see where you are stamping since Versa Mark is clear. Use a fine white embossing powder like Zing(OPAQUE White Embossing Powder) to emboss your images. (When embossing on the vellum move your heat tool more than normal around the area so the paper doesn’t burn. )Stamp an extra flower on vellum. A painter’s palette is a nice way to apply your water color markers. I scribble the color on the palette and pick the color up with a Dove Blender to apply the color on the back of the embossing. The dove blender becomes the paint brush. Continue to reload the color and apply to your image. The effect looks like stained glass to me. Here is a card I designed with more of this technique and more color. Let me know if you have any questions. Enjoy your day! Hugs, Kathy P.S. I will be announcing the winners soon for my blog candy and the vellum flowers. |
|
|
|
|
|
|
|
|
|
|
|
|
|
|
|
|
|
|
|
|
|
|
|
|
|
|
|
|
|
 DAY 5. Power Poppy- video-giveaway
 Kathy’s Lily Pad Palette Color Challenge
 Watercoloring with pencils & video


beautiful card…lovely colors
Tina
Kathy, you made an amazing job! I do love it! Miria x
What a beautiful eye catching card. I definitely will be trying this technique xoxo
Absolutely stunning Kathy
Anne x
Gorgeous Kathy…. I’m trying to get a hold of the magazine with your techniques in it… it is so slow getting here to NZ… hopefully next month… Your vellum projects are lovely.
I so love the colours you have used….such a wonderful card.
Love this card, it’s beautiful!
Ohw, it’s gorgeous!
Marie-Anne
This is so pretty! Ger x
GORGEOUS!!! I LOVE all the things you do with the PB Poinsettia’s!! This one n Pink is YUMMY…..xoxoxo!
Beautiful, Kathy! I’m always drawn to the pink poinsettias; the red ones just never appealed to me…….
wow, this is beautiful! I have to try this!
Truly stunning!
Oh, my goodness, Kathy, this is absolutely stunning! Wow, wow, wow! I love not only the coloring on the vellum, but the fun design with the die cut portion! Beautifully done! 🙂
I would never have guessed that was vellum! I love the shading and gradients on the flowers and never knew you could use watercolor on vellum. I learn something new so often on your blog.
This looks like magic – I mean “how is it done?”=)
Wow! Gorgeous!!
Kathy, it‘s a great work! The flowers are simply amazing!
Wow just so beautiful:) Sandra H
I LOVE the colours ♥
Beautiful effects;)
Have a fine new week;)
Hugs Line
WOWZER! That’s jaw-dropping gorgeous!
Cool lookin’ card! Love the dimension! 🙂
Beautiful card, I love the red and pink together.
Just like peppermint candy, love these colors, could just eat it! What a beauty, Kathy!
Stunning card. You always amaze me.
lovely card…i totally love the colors you have used so pretty!!
Wow this is stunning Kathy! Love the bright pink. This is amazing!
I thought my eyes was tricking me lol, had to look closely because it looked like one layer, then multi layers, LOVE this card, and that technique. I went to see your other card, the butterfly really does look like stained glass. I have got to try your technique.
Absolutely gorgeous, Kathy! Never knew we could water color on the vellum – You are a GENIOUS!
Christmas full of pink 😛
Must say that I never seen befor such christmas card 😀
Completely creative and unique…LOVE THIS!!! So gonna case this 😉 If you don’t mind. LOL
Hugs and thank you for the inspiration.
Lisa xx
What a great card! Love those colors
Svetlana xx
Stunning card. Love the colors.
Absolutely stunning card! Lovely colours!
Great center to your poinsetta, and I love the little window you created for your sentiment!
This is gorgeous!!!!!!!!!! so pretty! Have a GREAT day!
I cannot believe how gorgeous this card is, my mouth is on the ground…glad you had a wonderful time away…hugs
Stunning. The colours are amazing!!!
Love love LOVE this card!! The flowers are so gorgeous!!
Really beautiful! I love this, the great color you got on the vellum, the pink, the cut-out with the sentiment in it. Fabulous! Thanks for sharing.
Katie B.
This is stunning Kathy. I love the effect of water-colouring on vellum – the card with the butterfly is amazing too. Thank you for the inspiration, this is something I will definitely try.
Clare x
I love the way you have vared the traditional red & green by using pink & th way you have given the whole card dimension with your layering/window aperture. the white cotton really accentuates the white embossing beautifully too & is so bright against the red button.
Paula (PEP)