Hello Friends, I’m going to jump right in today ok? Did you happen to notice the awesome creations on the Penny Black blog this week. Today you will see this project on the blog *wink* (in case you want to comment there) EVEN if you don’t celebrate or like Halloween these stamps can be use for other things. Like these cupcakes that you will find on the PB blog by the creative Cathy A.
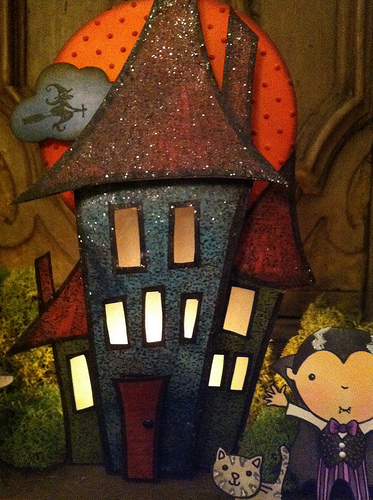
Can you see how the windows are lit up?? There is a tea light behind the house that I enlarged from one of my favorite stamps because it’s so versatile.

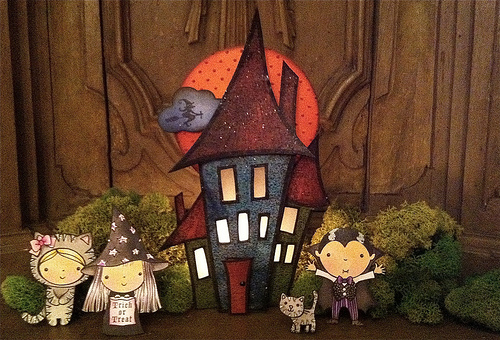
Here it is with the lights on. You might ask what the green stuff is…moss.
I used lots of distress ink and Rock Candy all over. Love what Rock Candy does to things.
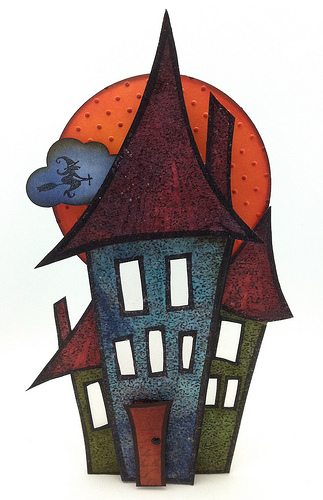
Sorry for all of the photos but, it’s hard to photograph really. Below is the house without the candle light. I started out creating a “congrats on your new home” card for my mom and this is what it ended up to be. When we were little my mom always told us that she was a witch…a good one and had a laugh to prove it…lol
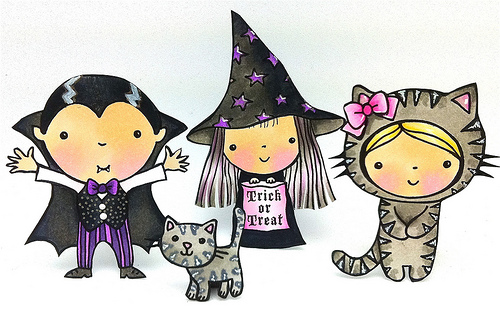
I had to photograph these little goblins in the day light..lol I colored them with Copics. I had fun coloring the “witch” hair and added purple streaks.

I stamped onto some copy paper then scanned the image. In this photo I printed it in a few different sizes until I was happy. The original is at the bottom.


This is a regular sheet of copy paper so it’s a nice size. Outline
your image with a black marker. (for this I used a regular Sharpie
marker)

Cut the image into pieces. I ended up cutting off the roof on each one too.
Trace the houses onto some thick cardboard or grunge board. I always save any cardboard that comes with any packaging as I am sure you do too. After tracing cut out the windows with a blade or small scissors.

If it’s easier glue your house down FIRST then cut it out. I was lazy and used my test sheet on regular copy paper. At first I was thinking I would trace on cards stock and color the house but, decided that I like the texture on the image.

Please note that on the side of the houses I cut beyond my tracing (created tabs) so that I have something to attach to the center house.

To get lost of dimension and easily I pulled out my favorite Scrap Dots. After adding my blops of scrap dots I placed the roof on top and set aside to work on the other two houses and my Halloween images.
I’m going to link the color of distress inks in the supply photos at the bottom of my post. Any colors will look great with rock candy on top. The texture on the house was in the copy of the stamp that I scanned.
I created an easel to prop everything up on the back like you do for your cards. Vellum is behind the windows and gives them a nice soft glow. I think that explains everything.
Also I thought I would mention I have been tweeting more so if you want to hear a little bit more about me just thought I would let you know. Have a happy day and thanks so much for stopping. Hugs,Kathy
SUPPLIES: The new stamps will NOT be available until August. I will keep you posted.
|
|
|
|
|
|
|
|
|
|
|
|
|
|
|
|
|
|
|
|
|
|
|
|
|
|
|
 ATC and bronze ink
 Giveaway-Simon Says Stamp’s Card Kit
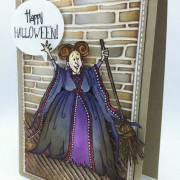 altering your stamped images


Oh my word – this is amazing. The images are so cute – thanks for sharing your idea. Excellent. Jeanette
OOOOOOH how wonderful is this!!!!!!
We don’t do a lot of Halloween in Holland but this is soooo cute, thanks for sharing/showing!!
Gr. Irene
This is soooo incredible!!!! Beyond Amazing Kathy….love it so much :):)
absolutely spooktacular creation kathy…hugs kath xxx
Fantastic project, such a great use of a stamp.
** Kate **
Fantastic Kathy. You never cease to amaze with you work….
This is fabulous! I can’t wait for the stamp to be available. Love it!
oh wow Kathy this is an amazing project! gorgeous creation. Joey x
Your creative wonders never cease Kathy. This is AMAZING!
What a clever lady you are. Always thinking out of the box. Great work.
Amazing work, Kathy! The halloween images are so adorable. Thanks for sharing how you made it.
First of all, Happy Birthday to you, sweet Kathy! Have a fun-filled day! This project is absolutely incredible! I don’t think there is anything you can’t do! Just love it! Amazing work! Hugs to you! 🙂
Fantastic!
AMAZING! Totally love this!
You’re Awesome Kathy Rac…..LOVE LOVE this Fabulous Design and I see some more MiMi’s I need…..xoxoxo!
I love, love, and more love this creation. This is just wonderful, beautiful colors. Thanks for showing.
That is so adorable! I don’t have anyone to decorate for at Halloween, but love the holiday myself! That is one night that I am sad that my kids are grown and moved away!
Amazing project Kathy!
Just fabulous Kathy, this project is so creative, just love it to bits! Blushing too that you mentioned my cup cakes, thanks Sista!
Oh WOW!!!! This is totally fabulous (found your blog from someone’s tweet of this post)
AWESOME creation Kathy !! I love how you scanned in and blew up the image- I might have to give that whirl someday. I LOVE Halloween and this is do perfect and totally COOL 🙂
How amazing!!!! So much talent:) Thanks for sharing all the photos too.
Enjoyed our chat the other night. Let me know if you need anything else. Always enjoy helping a friend.
Sandi
Very cool. It has always been unclear to me if copying stamped images like this would be a violation of a companies polices or not. So I have never tried it.
Kathy, oh my word… this is fantastic! Cutest Halloween decor, ever!
Really? I mean really? A masterpiece
oh my… Kathy, you already finished a FUN decoration for halloween this year! LOL! 😉 this is so cute, more than scary, and I luv it!! Luv Rock Candy too 🙂
what a wonderful project!
WOW!! Amazing project!
Blessings Bernie
WOW! This is so amazing Kathy!! Such a great idea and so fun! I LOVE it!
Phenomenal – I love the inventiveness of your projects & really appreciate the amount of effort you make in showing how to do things. Love the purple effects on the characters & your detail on his waistcoat. I can see the little cat being used for a number of projects too.
Paula (PEP)
Phenomenal indeed! What a scene!
Okay, now that I have straighten my shirt, wiped the drool from mouth, all after picking myself off the floor I want to say that this is “FRIGHTFULLY AMAZING!!” Thanks for all the information with pics. Your the tops!
Love how it started out as a new home card! LOL! Love what you created.
Love this project! How creative and inspiring!
Wow oh WOW Kathy – this project is clever and amazing! I just shake my head and think how wonderfully your mind works! 🙂 SIMPLY FABULOUSNESS.
What an amazing scene Kathy — I just love it. I giggled to read that it started out as a card to your mom!
Thanks for this awesome tutorial! I don’t know why I never thought of stamping and scanning some of my favorite images to enlarge them… what a marvelous idea!
Anniebee