

One day I received an email from ProMarkers by Letraset. They wanted to know if I was willing to test their markers and see if I like working with them. You can imagine that I didn’t have to think twice about that and couldn’t wait for them to show up at my door. Once they did this is how decided to display my pretty rainbow of happiness.

Welcome to “Kathy’s Color Throw Down” today at the Lily Pad blog. I hope you have been keeping up with all of their fun posts. Yesterday they showed you how to rescue an ugly spice rack into a snazzy shelf for your craft room wall. Were you able to pick out my baby photo in this post here?? I would love to hear what your guess is.

Take a closer look at the white areas on some of the petals. Can you see the ultra fine flower soft?
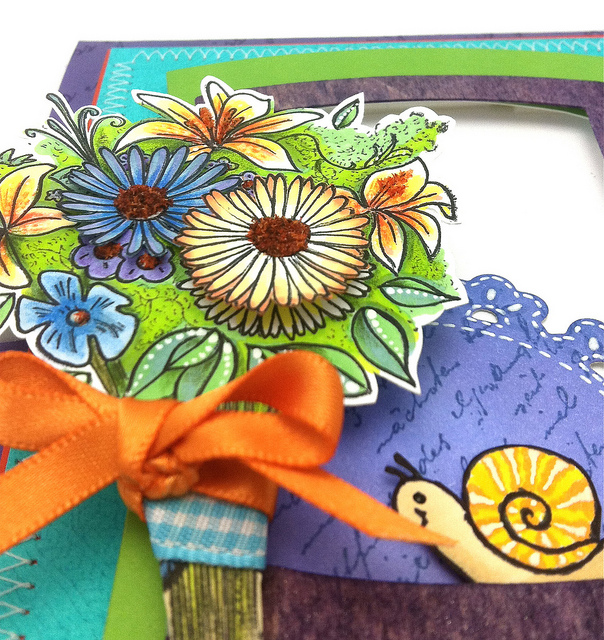
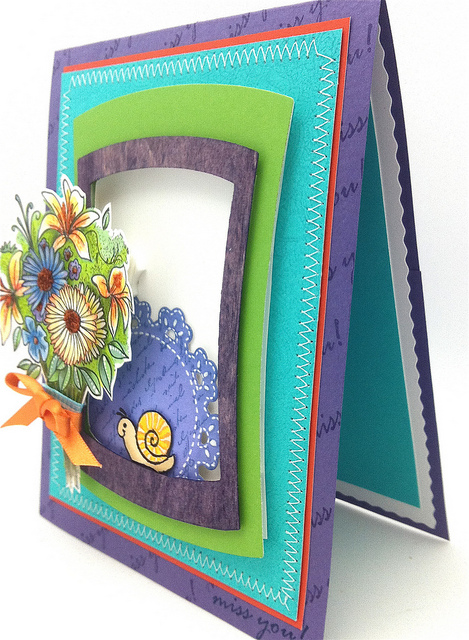
The center purple frame was cut from some wood paper and stained with distress ink then I spritzed it with some pearl spray.
HERE SOME TIPS FOR ADDING COLOR:
DON’T BE AFRAID TO ADD AN UNLIKELY COLOR: I added the blue markers to the green leaves and some BLUE to the green background. They blended so nicely with the markers leaving no “lines”
LEAVE SOME WHITE SPACES IN YOUR COLORING for accents as you can see on some of the petals in the flowers.
DON’T BE AFRAID TO ADD HIGHLIGHTS WITH A DIFFERENT MEDIUM for example, colored pencils to add some more highlights if you need a different color that you don’t have.
The only negative I found is that the numbers are soo small on these markers. I easily solved this problem by writing the number larger on each marker for reference & fast blending.

Stamp your image on white paper with Memento tuxedo black ink.

Fill in entire background with a light green marker.

Use a darker green marker to shade in some areas.

Find an acrylic block or a smooth surface to add an even darker shade of green. Sometimes I’ll use some plastic packaging or a plastic lid. (sorry for all the different colors on my block.)

Use your smooth surface to scribble on some darker color. Take the lighter color marker to pick up the darker color (from your block) with the lighter color. You are using the bullet tip as a “paint brush”
Once the darker color is the the tip of the nib on the lighter color marker… Lay the color down on your image to highlight more areas in your background.

Now it’s time to take a look at your image and ask yourself if you are satisfied or if with your shading or would you like to continue to add more layers of color. On this particular image I decided to add some blue to the green leaves & in a few spots in the background.
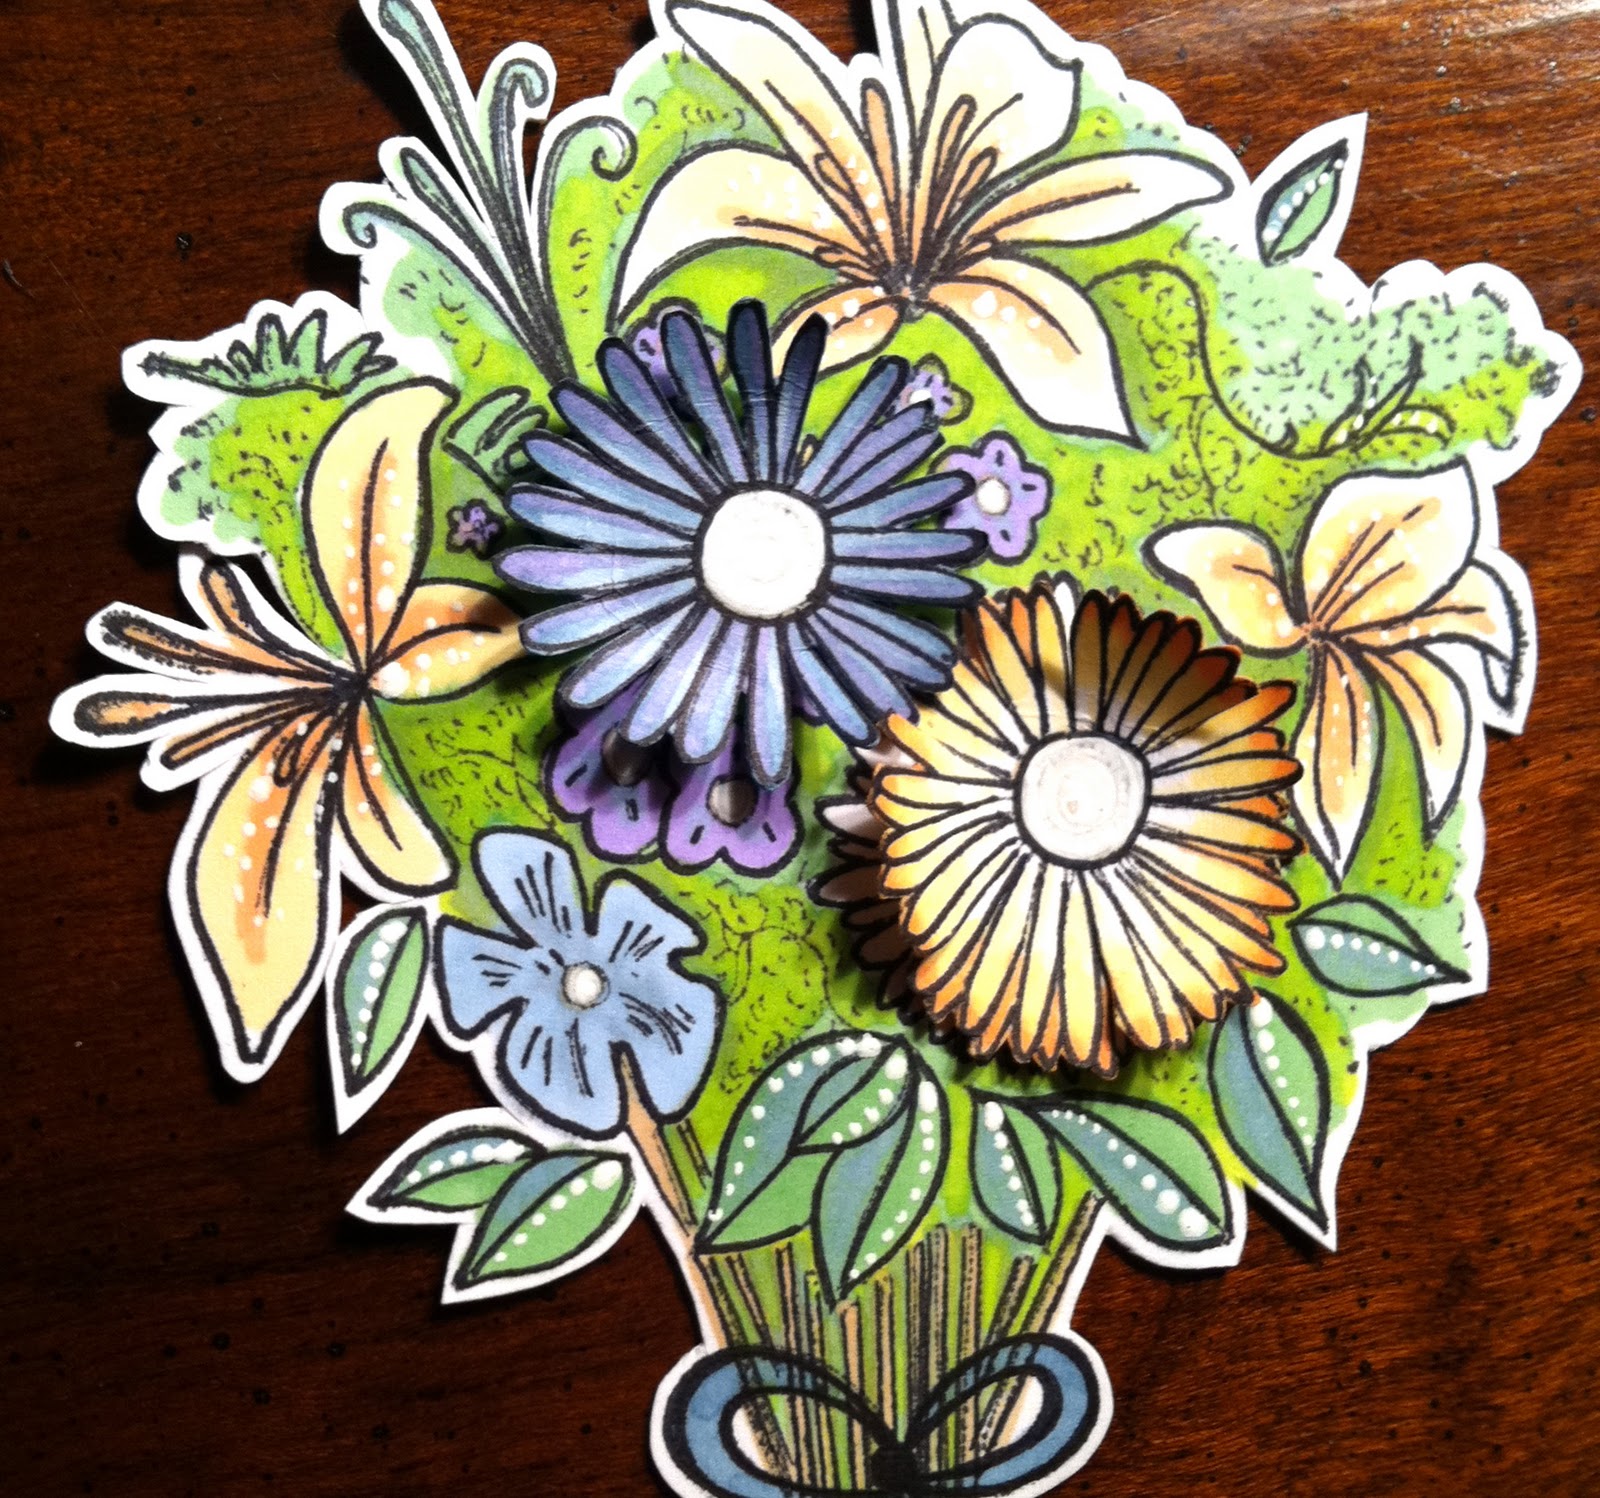
Once I am satisfied with my coloring I always outline all of my images with a fine tip black marker. I find the outlining really makes any image pop.I encourage you to give it a try and you will see what I am talking about.
I decided to stamp another one of the center flowers. I cut out two of them & trimmed one flower with less petals for a different look.
On the photograph of my card you will notice that I ended up adding ultra fine flower soft to the center of the flowers. I like to add some glossy accents to the image then sprinkle with a mix of orange & brown flower soft. I also added some of the mix to the stamens of the flowers. I hope you found some of these tips useful and please email me if you run into any snags or have any questions. I hope you will have some fun with any of these colors in the challenge and will link your cards up to the Lily Pad blog. There still is time to enter the challenge at the Penny Black blog here. Angela is creating some real magic with her ATC’s. I hope you might have time to stop by Angela’s blog because she is a true artist and you will be inspired!
I am grateful that you have visited me today. Have a happy weekend. Hugs, Kathy
|
|
|
|
|
|
|
|
|
|
|
|
|
|
|
|
|
|
|
|
 Two Catalog Cards with Penny Black’s Fashion Girls
 Day 21.
 Giveaway… and a water color background


I love promarkers too Kathy,thats some selection you have though lol. Loved the tutoroial that card is just so gorgeous. I am always afraid of the white space:( but am trying to overcome that lol. Must go and check out that challenge.
soooo soo beautiful! i love everything in this card! i am so interseted in the new challenge! 😀 thanks for ur tutorial!
beautiful card and great info on the Letrasets!
Wonderful tutorial and gorgeous card! Love the litle snail!
Kathy this is one stunning card, thanks for the tutorial. Joey x
Great tutorial and beautiful card, Kathy! Thanks for sharing.
Kathy your talent & creativity is amazing – beautiful!!!
STUNNING card. Love all that layering and color!
wow what a great card!
i never worked with promarkers, but it looks great to me!
Gorgeous card Kathy, and thanks for sharing all your colouring know-how! I often use coloured pencils with my Promarkers and love the way they look. That is such a great colour combo, hope I can get some crafting time in this weekend, Jo x
Love it Kathy! Everything you do is beautiful 🙂
Thank you so much for the great tutorial !
Beautiful inspiration for our challenge this week, sista! Loved the tutorial, too! Must check out these markers!
AMAZING!!! These colors are so bright and beautiful, Kathy! And thank you for always taking the time to give us some coloring tips! Love this gorgeous card!!
Wowwww, so colorful! Awesome tutorial and tips, too!
wow, thanks Kathy – that was interesting – beautiful job!
Sandra ltb
What a beauty – such a lovely array of color and dimension! Thank you for the tutorial – knowledge and practice make all the difference!
A crafty friend of mine got the complete ProMarkers set and LOVES them. Nice to see them in action!
Great…something else I’m gonna have to add to my list of stamping addictions! 😀 YEAH!! Your card rocked and the tutorial was amazing. Thank you!!
hiya sweetie
i’ve some promarkers to, and loving them
i only have 10 of them, but you have to start sometime, right
manly i have copic sketch
i just love your coloring and your card is lovely
have a great weekend sweetie
hugs angelique
What a lovely card.
Marie-Anne
Wow!!! – So cute, fun and cheery. Makes me smile.
Thanks for sharing the details of how that lovely card was created. The step by step instructions are really helpful. By the way, I think the first photo of the little girl who is one of ten children might be you.
Love the use of the Flower Soft & the dimensional aspeccts of this. Your tips are brilliantly helpful – hadn’t thought about using an acrylic block with tip to tip blending. I have to agree with you that Copics & ProMarkers are different – I find their colour intensity differs too; the ProMarkers give more subtle colouration whereas the Copics are more vivid – I cannot choose either but have a selection of both.
Shall try to enter the Lily Pad – it all looks very exciting what I see & I’ve finally worked out how to add it to my Reader as opposed to RSS!!
Have a lovely weekend.
Paula (PEP)
I can see why they sent them to you to test out!!! Stunning work!
Kathy, luv how you colored the bouquet! Very pretty! 🙂
I love the promarkers. I only have a few but have more on the way.
Liz
Fabulous card Kathy, your colouring guidelnes are brilliant, I like the idea of a fine tip, sometimes a copic brush tip is just too big, Might have to save up and invest in some of these as well!
Kathy your “tute” was very enlightening. Great skill. I’m trying to do the baby picture match up at Lily Pad’s. I think you are baby J. Did I get it right?
Loved your tips. THANK YOU SO MUCH>
Your coloring made a beautiful bouquet.
Really beautiful transformation of colors on your flower bouquet, thanks for sharing and what a wonderful set of markers to work with!
hi Kathy, i have used promarkers for a while. I find it difficult to get into the small areas – perhaps it is because of the cardstock I am using which makes the colour bleed. I am going to try some of this new Neenah cardstock which has been recommended. Thank you for another inspiring card and some techniques. I never used an acrylic block with my promarkers. But seems like a great idea. Will give it a go. x
Lucky you! This card is beautiful and the colors so vibrant.
Great tutorial! LOVE your card- I so admire your style and talents!