Hello Friends, How are you all? I love Wednesdays cause it’s the middle of the week and it’s a new Simon Says Stamp Challenge. Just click on the photo below and it will take you right to the Simon Says Stamp store..or click here for the challenge blog.
Each week there is a fifty dollar voucher for a lucky random winner…love that too 🙂
The challenge this week is called “Coffee and Cream” how perfect is this for all of you coffee drinkers? I hope my card makes you think of some yummy espresso with some cream on top?
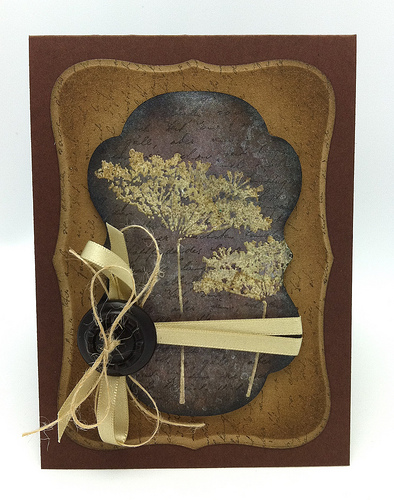
I had so much fun inking this Queen’s Anne lace stamp. The Perfect Pearls Mist is what really made my card to come to life. If you want some details read on. First cut your Labels 8 on kraft paper and Labels 14 on white card stock. Distress the Label 8 with Walnut distress ink. (If you use the ink blending tool you will really get a professional appearance on your label.) After distressing label 8 stamp the letter background stamp on it with some Walnut distress ink. Set aside.
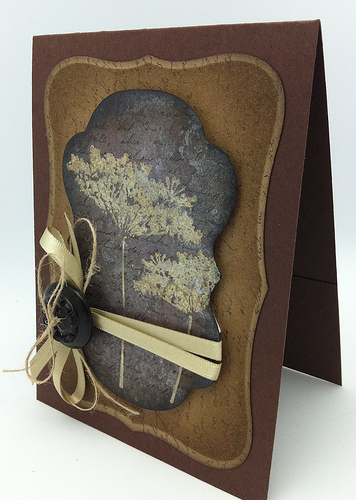
Move onto Label 14. Ink up your flower stamp with embossing ink then add some distress ink on top of the embossing ink. I used two colors- Brushed Corduroy and Antique Linen. Once your stamp is layered with the embossing ink and two distress inks stamp onto the Label 14 and use your clear embossing powder and heat set it. Once cool distress the background on the die with Walnut first and add Black Soot on the edges. Use your letter background again and ink it up with Black Soot and stamp it onto the label 14. The real magic happens when you spritz the image and label with the Perfect Pearls.
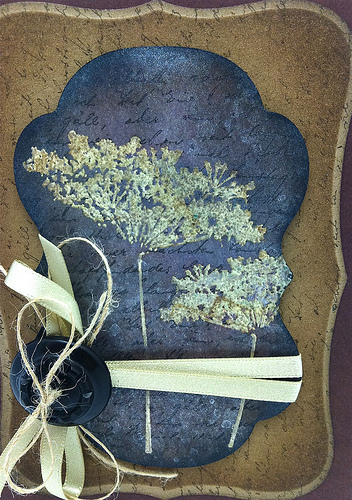
Keep in mind the right tools really make your life easier. I hope you have a craft mat and the distressing tool. Until I had that tool… my distressing was awful!Assemble you card and wrap some twine through a vintage button. Let me know if you have any questions. Scroll down to see the stamps I am giving away this week and thanks so much for your visit today. Hugs, Kathy
|
|
|
|
|
|
|
|
|
|
|
|
|
|
|
|
|
|
|
|
|
|
 Happy Haunting
 It’s Simon Says Stamp Diecember & Giveaway
 Day 7. Happy B.D. Lawn Fawn


it is a beautiful card you’ve created, i love it!
Gorgeous!! So rich, warm, and elegant!
So beautiful and elegant, love it!!!
Your Queen’s Anne Lace creation is lovely – the blue background is so charming!
Marie Moore
now i also want those labels… wow… a really stunning card… the Queen Anne lace stamp is just too die for!! definitely on my wish list
hguz
shamela
Great card! Love the color you’ve used.
Marie-Anne
Fantastic card Kathy 🙂 I loved reading the details of how you made this ,, brilliant !! I love the shimmer, beautiful colours ,:-)
going to make a cappucino now ,,,, 🙂
luv
Lols x x x
Gorgeous card Kathy, that combination works so beautifully together.
Pinky
Gorgeous card Kathy, beautiful layout and colours.
Great project. Thanks for sharing.
Love the idea of adding distress inks to the stamp, over the embossing ink! Wonderful effect! Such a pretty card, Kathy! Thank you for always taking the time to share your instructions. . .I really appreciate that! Hugs! 🙂
What a gorgeous card! I really love the flowers. Stunning!
*smiles*
debbi
BEAUTIFUL!!! I’m now running to my craft room to try layering embossing ink and distress ink… genius! Thanks for much for sharing this – again, beautiful!
Stunning Kathy, will definately try this technique, so beautiful.
Wow another stunning creation, Kathy! This is so rich and elegant!
Absolutely gorgeous! I got to step 6 and felt overwhelmed! You put so very much love and work into your cards, and it shows!
Just gorgeous! I can’t wait to get that queen anne’s lace stamp – it shipped from simon says stamp today!
this is gorgeous, kathy! so much work in it, too! It’s nice that i can see your creation now there too, cuz i often play at SS 🙂
Jaw dropping GORGEOUS sista!!!!!!!! LOVE those colours….so wish it wasn’t 5:30pm…I’m craving coffee now!!!!!
It is so important with the correct tools – thanks for stressing that. I love the way you’ve layered the inking & stamping & used Black Soot too – I’d never have dared mix it with the browns but it’s so different. Goodness you’ve given me some ideas. Thanks.
Paula (PEP)
PS- the two different shapes of labels are very striking together too.
brilliant – love this look
Fab work, Kathy!! It really takes me back to nature 🙂 I love the layering and the big button is beautiful!!
*mwah*
Steph
Simon Says Stamp
That is one classy card, my friend! Those dark neutral colors are just so serene and elegant…love this card!
blessings~
Your card is so beautiful Kathy!! I love rich warm colours and i love this card! 🙂
Gorgeous card Kathy.
luv
debby
I love the embossed look and the vintage feel, so gorgeous as ever!!
This really amazing! though I don’t know if I would have instinctively known it was yours–I can usually tell right away! I just love it!!!!
Very elegant and beautiful. Great techniques.
This is a classic beauty. I am blown away!
Wow, Kathy, your card is amazing!! I love all of those wonderful techniques you used. You definitely rocked the challenge. Have a great day.
xoxo, Christine