Hello friends, I am so excited to share my RANGER COLOR CHART with you today that I created for the Penny Black Blog. Jenyfur asked us to create “anything but, a card” so this is what I came up with. 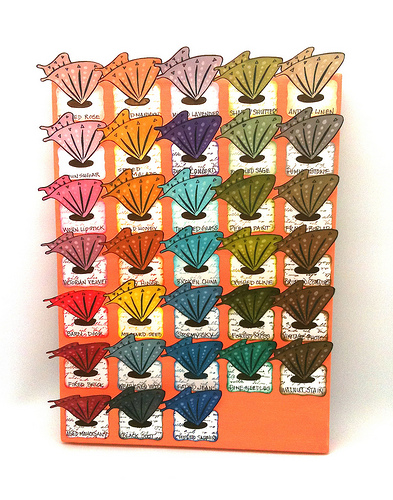
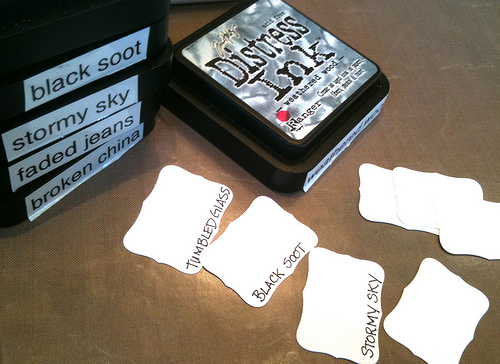
If you scroll down you will see a photo of all my inks, daubers and my OLD color charts. What I love about this new color chart is:
1. I can see how the colors look distressed (on the small labels)
2. I can see how the colors look inked (I used a text stamp on the label)
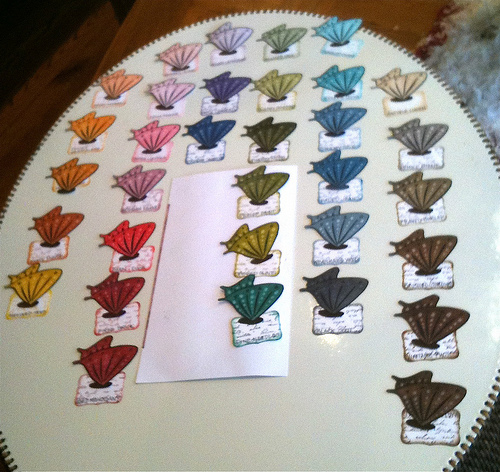
3. I can see how the colors look fully colored (the butterfly wings)

I also added white dots (with a gel pen) before I used the distress ink so they take on the color of the inks.
If you click here you can download a PDF file to print labels for your inks.
This canvas measures 9×12 inches.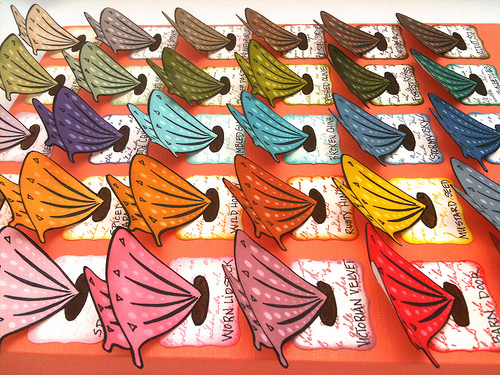
These butterflies were the perfect image to get the job done and I love how it looks on my wall.
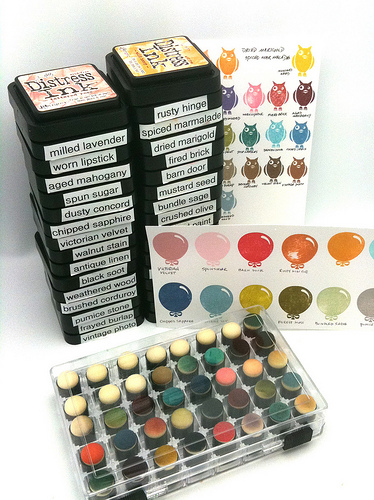
Using daubers for small areas makes your life soooo much easier. If you make it to the end of this post you will notice I organized my daubers too. The dauber organizer I purchased from my favorite store Angela’s Happy Stamper !
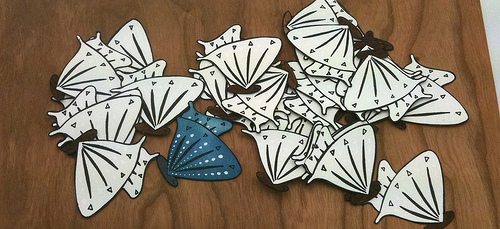
This is how I started with lots of butterflies. They traveled all the way to Aruba with us for some family time. If you break down a large project into smaller ones it’s easy to get the task completed and to enjoy the process. (There are 33 distressed butterflies)
I used a small “Labels 8” to show the text stamping and the distressing on the edges. I did ONE color grouping at a time. Start by writing the ink colors first, then start stamping and distressing. I suggest you begin with the lighter colors first and don’t forget to clean your craft mat after each color so you don’t have any mixing of colors.
As I finished each grouping I displayed them on the bottom of a tray or a cookie sheet so I could plan how I wanted them to layout on my canvas. (As I complete each color I lined up my daubers by color.)
My wall is blue so I decided to use a beautiful orange for the background. Claudine Hellmuth’s studio paint is like butter and comes in gorgeous colors. The best part is the paint covers so well I only needed one coat of paint.
To glue your labels and butterflies glossy accents is a must. 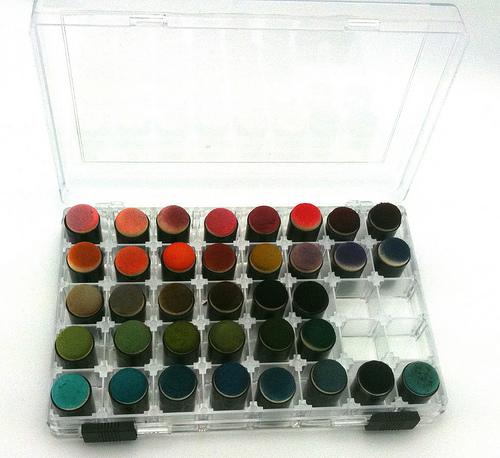
Please email me if you have any questions. As always thank you so much for popping by! Hugs, Kathy
Supplies:just click on the links to see them larger
|
|
|
|
|
|
|
|
|
|
|
|
|
|
 Lila Grace welcome :)
 Starbucks Gift Card Holder & a photo
 A Touch Of Whimsy


Awesome idea Kathy. I have a stamped flower of each distress colour on a sheet, not nearly as pretty as this!!!!
I’ve never thought of making a colour chart for all my distress inks! All this while I just guessed how it would look like on paper, stamped or inked, LOL.
I think I’m gonna start making these tonight! Thank you so much for the inspiration, Kathy!
What a beautiful job ! it doesn’t look like it’s real ! so perfect ! great !
have a nice day,
greetings, martina
x
This is an awesome idea!! 🙂 i do love it…
hugs
yenni
You ROCK Kathy :D!!!! I’ve just tried some of your techniques in the last few days – now I want to do a colour chart too! xoxoxoxo
Hi Kathy!
This looks just wonderful!!! I can imagine it will be like art on the wall, which is even practical as well!! Love it!! Just bought my first daubers, because I always saw them with you and I hated those inky spunges on the ranger tool… but now I have daubers without a cap (they don’t sell them with cap in the Netherland) so it’s still inky!…. But now I see this box with you! That’s perfect!!! Can you tell me where to buy? would love one like that! And you’ve made such an amazing color chart, just perfect!!! Love how you think of things like this!!!
Hugs, Wendy
Oh my gosh!! Totally awesome Kathy….what a great practical project…love it.
Functional and beautiful, brilliant idea.
** Kate **
I love it..I just use their chart and a flower…yours is so much prettier.
Wow! What a pretty project! I am sure it will look gorgeous on your wall and in the same time help you out when selecting the ink you want. I also like the daubers, and the neat case! Thanks for the tips and ideas.
What great ideas you have! Will be trying to keep my colors in better order now! Thank you!
Kathy, you are the queen of colors and coloring and organization of the colors!!! this is so wonderful!
Totally amazing, Kathy! Love this fabulous, creative color chart! 🙂
I truly love this project.
pretty and also very functional. will try it for sure
Thank you for sharing not just your great talent but also your tips
This really is so great…thanks for sharing!
Wow, this is just simply amazing….
Love your ink chart and thanks for all the suggestions!
Wowzers Kathy! Love how you did your colour coding!
How inspiring is this! I love this idea, and now must find some of those daubers. Well done, sista!
What a great idea, and so good looking! I knew that I was lurking in the right blogs! 🙂
Thanks for sharing this fabulous idea!
Donna
So Calif
P.S. I really love your cards. If I ever venture into the copic world, I know where to come! You’re amazing!
What a perfect organizational process for your colors! Lovely chart Kathy!
Oh my – this is SO fabulous, Kathy! You’ve taken something that could be so mundane and made it functional AND elevated it to art!
This is stunning Kathy, what a great idea, when I have more time i would love to create something like this.
Sallyx
What an awesome color chart! I will have to put that on my to-do list. I also like your little case for your sponge daubers. Do you know of a mail-order place that sells them?
I love Angela’s Happy Stamper and your idea too! TFS
Okay wow this is a true labor of love! Wow wow wow wow! :>
This is THE coolest idea….I totally need to make something like this!
This is an amazing project! How beautiful and how useful, too! Love the way your brain works!! Hugs.
Oh kathy!! This is too cool!! What a fantastic idea!! Love the little cubbys for your daubers!! Gotta have one!! Super creative idea you’ve made come to life!! Thanks so much!
Hope the New Year has been good for you!
Hi Kathy – WOW, I am so inspired after seeing this project and visiting your blog! I found your blog from Vicky at Clips-N-Cuts 🙂
I am definitely a follower now – your ideas are awesome and your projects so inspiring! Thanks so much! Take care, Renee
Kathy not only is this a great reference tool, it is so colorful and a work of art!! Great tips and organizational ideas.
Wow..this is AMAZING project, Kathy!
Superb Tips!
exactly what a pp said – this doesn’t even look real!
so cool!
This is amazing very creative and a stunning piece of art too.
Ali x
This is so cool, Kath! Genius! And it’s a work of art as well. Thank you for sharing your creativity with us!
Your project is amazing. What a good idea to make such a chart !
Thank you for sharing ! Hugs
When I first looked at the chart, it looked like tissues coming out of individual tissue boxes, maybe because I have a cold, that’s all i see, lol. I love those individual butterflies and the way you colored each one. Such a cool idea.
Karen E.
This is stunning!!!! Wow! such an innnovative idea. I am truly inspired. Are dabbers better than the cut and dry foam?
This is very nice, I love it! I also need that dabber case:) Looks like I will be making a stop at Angela’s today.
What a fantastic idea, Kathy!! Love, love this!
Hugs
Wow! My Distressed Rangers ink pad colour chart is so BORING compared to yours!! I ended up just stamping a triangle and writing the name of the colour underneath it. Like I said, BORING!!
It has helped me figure out which color to use though. I have it on my bulletin board so I can view it anytime.
Wow this is awesome!! And I think I need to order one of those dauber organizers. IMMEDIATELY! 🙂
This is the cutest thing ever! Wow! Just amazing & so fun!
Question, I’m newish to distress inking (I barely have using my blending tool down, but I’m getting pretty good) and have about 15 ink pads. These applicators look really cool! Can I use the same as a blending tool, but for smaller surfaces? Is that what they’re for? Thanks so much for sharing this! It rocks!!
new to all this and picking up some great ideas here in englandand this is just so pretty x 🙂
Nicke
What an original idea! I do not haveany distress ink,perhaps in the future than I will make one like this
Thanks for sharing.
I just love this sampler!!! So cute, I ordered the things to make one too! I have no idea where to find the little dauber organizer box though living in Canada. Any suggestions? Thanks so much for sharing your creativity!!
HI from Phila, PA..Wendy from the Netherlands helped me understand something I have wondered about…the value of the Daubers!!! But to use in place of the one you change the sponges…how wonderful!!! And they can already match your pad color so you dont have to have to sort thru the usual daubers to find the one you used before!!!!!
I {heart} this idea! First I love butterflies, two – what a wonderful and beautiful way to be practical and artful and this same time! I just may have to do something like this too – I love displaying color, and I love all my distress inks!! There are a few I still don’t have but it is only a couple of the colors. TFS!!and the inspiration! You’re awesome!
Thank goodness for Pinterest! I just found this awesome post!Excellent idea! Thank you!